A-Z Guide to Retaining Wall Installation
Master retaining wall installation with our A-Z guide. Prevent erosion, create space, and enhance your home.

Why Retaining Wall Installation Transforms Your Central Florida Property
Retaining wall installation is the process of building a structural barrier to hold back soil, prevent erosion, and create level, usable outdoor spaces on sloped properties. For Central Florida homeowners, these walls serve both functional and aesthetic purposes--managing rainwater runoff, creating terraced garden beds, and adding dimension to your landscape. While DIY installation is feasible for walls under 3-4 feet using interlocking concrete blocks, taller structures require professional engineering and proper drainage systems to ensure long-term stability.
Quick Overview: What You Need to Know
- Purpose: Prevent soil erosion, level sloped yards, create garden terraces, and improve curb appeal
- Best Materials for DIY: Interlocking concrete blocks with built-in drainage features
- Critical Components: Level base, proper drainage pipe, compacted gravel backfill, staggered block pattern
- Height Limits: DIY projects typically max out at 3-4 feet; taller walls need permits and engineering review
- Timeline: A simple 20-foot wall can take 2-3 weekends for careful installation
- Key Success Factor: Water management--drainage failure is the #1 cause of retaining wall problems
According to landscape industry data, retaining walls can deliver a 105% return on investment through increased home value, and 75% of homeowners report greater enjoyment of their outdoor spaces after adding these structures. The difference between a wall that lasts decades and one that fails within years comes down to three fundamentals: a properly prepared base, effective drainage behind the wall, and correct compaction of backfill materials.
Whether you're tackling a small garden bed project or planning a major slope change, understanding the complete installation process helps you make informed decisions about your property. For comprehensive guidance on all outdoor hardscaping projects, visit our paver installation services page, or if you're ready to discuss your specific retaining wall needs, contact our St. Cloud team for a consultation.
Planning Your Retaining Wall Project
Before we even think about digging, a successful retaining wall project begins with careful planning. This involves understanding why you need a wall, what materials will best suit your needs, and what essential checks are required before breaking ground.
Why Build a Retaining Wall?
Retaining walls are far more than just decorative additions to your landscape; they are hardworking structures that offer a multitude of functional and aesthetic benefits, especially in the unique terrain of Central Florida.
Their primary function is to hold back soil, preventing it from eroding down a slope. This is particularly crucial in our region, where heavy rains can quickly wash away valuable topsoil. By preventing soil erosion, retaining walls protect your landscape, preserve plant life, and maintain the integrity of your property. You can learn more about how these walls combat erosion on our Preventing Soil Erosion with Retaining Walls page.
Beyond erosion control, retaining walls are masters of changing sloped or uneven yards into beautiful, usable spaces. Imagine turning a challenging hillside into a series of charming terraced gardens, perfect for cultivating flowers, herbs, or even a vegetable patch. They can also level off sloped areas to create flat, functional spaces for patios, play areas, or outdoor living rooms--essential for maximizing your enjoyment of your Central Florida home.
From an aesthetic perspective, these walls add dimension, structure, and visual interest to any outdoor space. They can define garden beds, create raised planters, or serve as neat borders. A well-designed and installed retaining wall significantly contributes to your home's curb appeal and overall aesthetic, which, as realtors confirm, directly translates to increased property value. In fact, landscape redesign projects, including retaining walls, have shown an average of 105% value recovery! We've seen how homeowners in areas like Orlando, Lake Nona, and Winter Garden find greater enjoyment in their homes (up to 65% more, according to surveys) once these thoughtful landscape additions are complete.
Choosing the Right Materials
The material you choose for your retaining wall project impacts its appearance, durability, and the ease of retaining wall installation, especially if you're considering a DIY approach. Each material comes with its own set of pros and cons:
| Material Type | Pros for DIY Project | Cons for DIY Project |
|---|---|---|
| Interlocking Concrete Blocks | Widely available, often designed for DIY, no mortar needed, consistent size, durable, versatile in aesthetics. | Can be heavy, require precise leveling, limited height for DIY. |
| Natural Stone | Classic, rustic look, extremely durable, no two stones alike. | Irregular shapes make installation challenging, heavy, requires skill to fit, may need mortar. |
| Wood (e.g., Railroad Ties) | Relatively inexpensive, easy to cut and handle, natural appearance. | Susceptible to rot, shorter lifespan, can warp, requires annual treatment. |
For most DIY homeowners in Central Florida, interlocking concrete blocks are often the go-to choice. They are specifically engineered with lips or pins that create a natural setback and interlock, simplifying the stacking process. Our Interlocking Retaining Wall Blocks Complete Guide provides an in-depth look at these versatile options. While natural stone offers undeniable charm, its irregular nature can make precise leveling and stacking a real challenge for the uninitiated. Timber, such as railroad ties, can be a more budget-friendly option, but its susceptibility to rot means a shorter lifespan and more frequent maintenance. If you're curious about timber options, check out our guide on How to Install a Railroad Tie Retaining Wall. For larger, more dramatic landscape features, we sometimes incorporate Large Boulders for Retaining Walls, though these are typically best handled by professionals due to their weight and placement requirements.
The best material for your retaining wall balances your aesthetic preferences, budget, and the structural demands of your specific project.
Essential Tools & Pre-Installation Checks
Before we pick up a single block, proper preparation is paramount. This isn't just about having the right tools; it's about safeguarding your project and your property.
Here's a list of essential tools and materials you'll likely need:
- Measuring Tools: Tape measure, string line, grade stakes, spray paint (for marking layout)
- Digging Tools: Shovel (trenching shovel recommended), pickaxe (for tough soil)
- Leveling Tools: 4-foot level, torpedo level (for individual blocks), line level
- Compaction Tools: Hand tamper (for small walls), plate compactor (rentable, essential for larger projects)
- Cutting Tools (if needed): Masonry chisel and hammer, circular saw with masonry blade, or a wet masonry saw (rentable, for precise cuts)
- Other: Rubber mallet, gloves, safety glasses, wheelbarrow, gravel rake, utility knife (for geogrid/drainage fabric), concrete adhesive, caulking gun, perforated drain pipe with sleeve, crushed gravel (wall rock), paver base, topsoil.
Safety is non-negotiable. Always wear appropriate personal protective equipment (PPE), including work gloves, sturdy boots, safety glasses, and hearing protection when using power tools. If you're cutting blocks, a respirator mask is vital to avoid inhaling masonry dust.
Crucially, before any digging commences, you must call 811. This free service helps locate underground utility lines (gas, water, electric, communication) on your property. Digging without knowing where these lines are can lead to dangerous and costly accidents.
Next, check local building codes and obtain any necessary permits. In Central Florida, walls exceeding a certain height--often 3 to 4 feet (or 36 inches in some areas)--typically require a building permit and may even necessitate review by a professional engineer. Ignoring these regulations can lead to fines, forced removal, or structural issues.
Finally, assess your soil type. Central Florida soils can vary significantly, from sandy to clay-rich. Sandy soils generally drain well, which is ideal for retaining walls. Clay soils, however, retain water, which can exert immense pressure on a wall. Understanding your soil type helps us plan for proper drainage and reinforcement. For calculating material quantities, a good rule of thumb is to measure your wall's length, height, and desired depth, then add about 10% extra for cuts, errors, and future repairs. Many block manufacturers also offer online estimating tools to help with this.
The Complete Retaining Wall Installation Process
Now that we've covered the crucial planning stages, let's dive into the hands-on steps of a successful retaining wall installation. Each stage is vital for the longevity and stability of your wall.
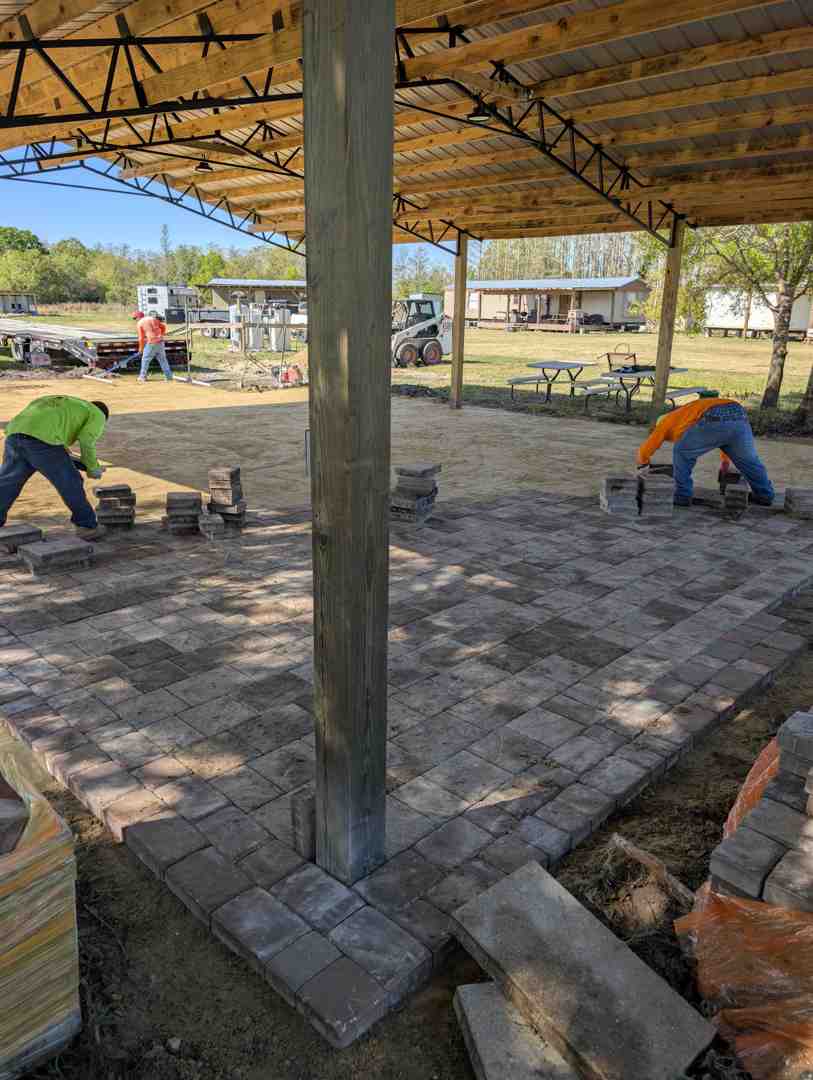
Step 1: Site Prep and Trench Excavation
The foundation of any great retaining wall begins long before the first block is laid, right in the soil beneath.
First, we mark the layout of your proposed wall. For straight walls, stakes and a string line work perfectly. For those beautiful, flowing curves that improve so many Central Florida landscapes, a garden hose can be an excellent tool to visualize and mark the desired shape with spray paint. Once the outline is clear, we excavate all surface vegetation, organic materials, and any unsuitable soils. Organic materials decompose over time, creating voids that can compromise your wall's stability, so they must be removed.
Next comes the trench. This isn't just a shallow ditch; it's the anchor for your entire wall. The depth and width of the trench are critical. For a typical DIY wall under 4 feet, we aim for a trench that's at least 4-8 inches deep (depending on your block size and how much you want buried) and roughly twice the width of your retaining wall block. This depth ensures that at least half the height of your first course of blocks is buried below ground, providing essential stability. For taller walls or those requiring geogrid reinforcement, the trench will need to be wider and potentially deeper, often around 24 inches wide and 6 inches deep plus an additional 1 inch for every foot of wall height.
Once the trench is dug, we compact the base thoroughly. Using a hand tamper for smaller areas or a rented plate compactor for larger projects, we ensure the soil at the bottom of the trench is firm and solid, eliminating any soft spots or air pockets. This compacted base is crucial for preventing future settling of the wall.
Step 2: Building a Stable Foundation
The saying "a chain is only as strong as its weakest link" certainly applies here, but for retaining walls, it's more like "a wall is only as strong as its base." This step is arguably the most critical.
We start by laying down a layer of crushed gravel, often referred to as "wall rock" or "paver base," into the compacted trench. This layer should be a minimum of 6 inches deep for most projects. We spread this material evenly and then compact it thoroughly with a hand tamper or plate compactor. The goal here is a perfectly level and stable base, both front-to-back and side-to-side. If your ground slopes significantly along the wall's path, we create a stepped leveling pad, ensuring each section is individually level.
Now comes the moment of truth: laying the first course of blocks. We begin at the lowest elevation point of your wall. Each block is placed onto the compacted gravel base. For blocks with a raised front lip (common in many interlocking systems), this lip should face up and forward. We carefully check each block with a torpedo level to ensure it's perfectly level in all directions. Minor adjustments can be made by tapping the block with a rubber mallet or adding a small amount of coarse sand beneath it. This first course is the foundation for the entire structure, and any irregularities here will be magnified as you build upwards, affecting the stability and alignment of the whole wall. It's a painstaking process, but absolutely worth the effort. For more insights into creating strong bases, our Build Paver Stone Retaining Wall Guide offers valuable tips.
Step 3: Stacking Courses and Managing Drainage
With the base course firmly in place, we begin building upwards, course by course.
For subsequent courses, best practices dictate that we stagger the joints. This means that the vertical seams between blocks in one course should not line up with the seams in the course directly above or below it. This "running bond" pattern significantly improves the structural integrity of the wall, distributing weight and pressure more effectively. For most block systems, this means offsetting each block by at least 1/4 of its length from the block below. Many interlocking blocks come with built-in lips or pins that guide this staggering and provide a secure connection between courses. For block styles that don't use pins or lips, a construction adhesive can be applied between courses for added stability, typically every other course. We constantly check each new block for level and alignment, making minor adjustments as needed to maintain a consistent setback and a straight or smoothly curved wall.
Now, let's talk about the unsung hero of any retaining wall: drainage. Water is the number one cause of retaining wall failure. When rainwater saturates the soil behind a wall, it creates immense hydrostatic pressure, pushing against the wall and eventually leading to bowing, cracking, or collapse. That's why proper drainage is not just important; it's absolutely crucial.
We install a perforated drainage pipe--often a flexible, corrugated pipe with a fabric sleeve--behind the first course of blocks, at the lowest point, making sure it slopes slightly to vent to daylight or a storm sewer system. This pipe collects water that infiltrates the backfill material and channels it away from the wall's base. We then surround this pipe with a generous layer of crushed gravel (wall rock), extending at least 12 inches behind the blocks. This gravel acts as a permeable zone, allowing water to drain quickly to the pipe and preventing hydrostatic pressure from building up.
Step 4: Reinforcement and Backfilling
As we continue stacking courses, we introduce two more critical elements: reinforcement and backfilling.
For taller retaining walls (typically over 3-4 feet), or those subjected to heavy loads, slopes above, or poor soil conditions, reinforcement becomes essential. This is where geogrid comes in. Geogrid is a high-strength, flexible synthetic mesh that is laid horizontally between courses of blocks and extends back into the soil mass behind the wall. It acts like a tensile reinforcement, tying the wall blocks to the soil behind them. This creates a unified, stronger mass that can effectively resist the immense pressure exerted by the retained soil and any surcharges (like a patio or driveway above the wall). We lay geogrid according to specific engineering plans, often on every other course, ensuring it's pulled taut and free of wrinkles before the next layer of backfill is placed. Our guide on Segmental Retaining Walls digs deeper into this type of construction.
Simultaneously with laying blocks and geogrid, we backfill the area behind the wall. This process is done in "lifts," or layers, typically no more than 6-8 inches deep. The material used for backfill is crucial. We use clean, 3/4-inch crushed gravel (wall rock) immediately behind the blocks and around the drainage pipe. Beyond this drainage zone, we can use approved on-site soils or infill material, as long as it's free of organic matter.
After each lift of backfill material is placed, we compact it thoroughly using a plate compactor. We start compacting directly on the blocks (if they are solid enough) and then work our way backward across the entire backfill area. This meticulous compaction removes air pockets and ensures the backfill is dense and stable, providing proper support for the wall and minimizing future settlement. It's important to avoid heavy ride-on compaction equipment too close to the wall (within 3 feet), as this can exert excessive pressure on the newly built structure.
Step 5: Finishing Your Retaining Wall Installation
The final steps bring your retaining wall to its aesthetic and functional completion.
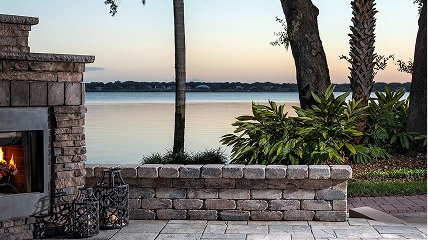
Once all the courses of retaining wall blocks are laid and the backfilling is complete, it's time for the capstones. These are the finishing pieces that sit on top of the last course of blocks, providing a clean, polished look and protecting the wall from weather. Before placing them, we brush off any debris from the top course of blocks. We then secure each capstone with a high-strength construction adhesive, ensuring they are perfectly aligned and, ideally, overhang the retaining blocks by about 1 to 1.5 inches for a professional finish. Our guide on Retaining Wall Stone Facade can offer inspiration for these finishing touches.
After the capstones are set, we perform final grading around the wall. This involves shaping the landscape in front of and behind the wall to ensure proper water runoff, directing it away from the structure. Finally, we add a layer of nutrient-rich topsoil, often followed by sod or plants, to blend the new retaining wall seamlessly into your Central Florida landscape. For the very last course of backfill behind the wall, we can use organic soils to better support plantings and assist with water management for your chosen greenery.
Advanced Techniques and Common Pitfalls
While the basic steps provide a solid foundation, some projects require a bit more finesse. Understanding advanced techniques and common pitfalls can save you time, money, and headaches.
Building on Slopes and with Curves
Central Florida's varied terrain often calls for creative solutions when it comes to retaining walls.
When building a retaining wall on a slope, we often create a stepped-down foundation. Instead of one long, level trench, we excavate a series of level sections, each stepping down to accommodate the change in grade. This ensures that each section of the wall has a perfectly level base, maintaining structural integrity across the entire slope. You can find more details on this in our article How to Build a Stone Retaining Wall on a Slope.
Creating beautiful curves adds a soft, organic feel to your garden design. For laying out curves, a garden hose is invaluable for visualizing the path. When installing curved walls, we pay close attention to the block connections. For inside curves, we maintain consistent spacing between the backs of the blocks. For outside curves, some blocks may require one or both "wings" (the small tabs on the back) to be removed to achieve the desired radius. For very tight radii, we might need to cut blocks using a masonry saw, ensuring a smooth, continuous line. Gentle, sweeping curves generally produce the most aesthetically pleasing results.
Common Mistakes to Avoid in Retaining Wall Installation
Even with the best intentions, mistakes can happen. Being aware of the most common pitfalls can help us avoid them.
- Inadequate Foundation: This is perhaps the biggest mistake. A base that isn't perfectly level, deep enough, or properly compacted will lead to a wall that settles unevenly, cracks, bows, or even collapses over time. The first course sets the stage for everything that follows.
- Forgetting Drainage: As we've emphasized, water is the primary enemy of retaining walls. Skipping the drainage pipe or not providing adequate gravel backfill for proper water flow is an invitation for hydrostatic pressure to build up, leading to wall failure. Our guide on Inspect Your Retaining Wall for Water Damage highlights the importance of this.
- Improper Compaction: Whether it's the trench base, the gravel layer, or the backfill material, insufficient compaction allows for voids and future settlement. Compacting in small lifts (6-8 inches) is key.
- Skipping Reinforcement: For walls exceeding the DIY height limits (typically 3-4 feet) or those under heavy loads, geogrid reinforcement is not optional; it's a structural necessity. Ignoring this can lead to catastrophic failure.
- Ignoring Building Codes and Permits: Failing to check local regulations in your Central Florida community (be it Winter Park, Sanford, or Kissimmee) can result in legal issues, fines, or being forced to dismantle your wall. Always verify requirements before starting.
Long-term maintenance is also a consideration. While concrete block walls are relatively low maintenance, it's wise to periodically check for any signs of cracking or shifting. If you've used wood, remember it requires annual treatment to prevent rot.
Frequently Asked Questions about Retaining Wall Installation
We often get asked similar questions about retaining wall installation. Here are some common inquiries we hear from homeowners in Central Florida:
How high can I build a retaining wall myself?
Generally, for DIY retaining wall installation projects, we recommend limiting the height to 3 to 4 feet (about 36-48 inches). Walls within this height range can often be built using interlocking concrete blocks without the need for extensive engineering or specialized equipment. However, it's crucial to consult your local building codes in any of our service areas like Lake Nona, Windermere, or Oviedo, as regulations can vary. For any wall exceeding 4 feet, we strongly advise against a DIY approach. Taller walls exert immense soil pressure and require professional engineering, potentially geogrid reinforcement, and almost certainly a building permit to ensure safety and structural integrity.
Why is the first course of blocks so important?
The first course of blocks is absolutely critical because it serves as the foundation for the entire retaining wall. Any slight deviation from level or alignment in this initial layer will be magnified with every subsequent course, leading to a visibly crooked wall and, more importantly, a structurally unstable one. If the first course isn't perfectly level and properly embedded, the entire wall will be compromised, making it susceptible to shifting, bowing, or even collapse. It's the anchor that keeps your wall strong and straight for years to come.
What is the purpose of geogrid?
Geogrid is a vital component for reinforcing retaining walls, particularly those that are taller, supporting heavy loads, or built on challenging slopes. It's essentially a high-strength synthetic mesh that acts as a soil reinforcement. When layers of geogrid are laid between courses of blocks and extended back into the soil mass behind the wall, they tie the wall blocks to the soil. This creates a much larger, unified, and stronger mass that can effectively resist the immense lateral pressure exerted by the retained soil. Without geogrid, taller walls would be much more prone to overturning or sliding due to soil pressure. It's a key element in ensuring the long-term stability and safety of reinforced retaining wall structures.
Conclusion: When to Call a Professional
We've explored the comprehensive journey of retaining wall installation, from initial planning and material selection to the intricate steps of construction, drainage, and reinforcement. A well-installed retaining wall offers undeniable benefits: it prevents soil erosion, creates beautiful terraced gardens, levels sloped yards for greater utility, and significantly improves your property's aesthetic appeal and value.
For smaller walls, typically under 3-4 feet in height, a DIY approach using interlocking concrete blocks can be a rewarding project for the enthusiastic homeowner. However, respect the inherent complexities and forces at play in retaining wall construction.
Knowing when to call a professional is paramount for the safety, longevity, and success of your investment. We strongly recommend seeking professional assistance for:
- Walls exceeding 4 feet in height.
- Projects on complex slopes or with challenging site conditions.
- Properties with poor or unstable soil types.
- Walls that will support significant loads, such as driveways, patios, or structures.
- Any project where local building codes require a professional engineer's stamp or specific permits.
For homeowners in St. Cloud, FL, and surrounding Central Florida areas like Lake Nona, Winter Park, or Doctor Phillips, looking for expert craftsmanship and a stress-free experience, Alliance Pavers offers 25 years of experience in hardscaping and retaining wall solutions. Our team is dedicated to delivering exceptional results, on time and on budget, ensuring your retaining wall is not only beautiful but built to last.
For professional retaining wall services that transform your outdoor living space, explore our comprehensive retaining wall solutions. We're here to help you build the landscape of your dreams.