Mastering the Art of Paver Stone Wall Installation
Learn how to build a paver stone retaining wall with our expert guide. Plan, dig, stack, and create a beautiful, durable landscape feature.
Transform Your Sloped Yard with Proper Retaining Wall Construction
Learning how to build a paver stone retaining wall can solve your property's erosion problems while creating beautiful, functional outdoor spaces. Here's the essential process:
Quick Steps to Build a Paver Stone Retaining Wall:
- Plan and prepare - Call 811, check permits, calculate materials
- Dig the trench - Twice the block width, half block height plus 6 inches deep
- Create the base - Add 6 inches of compacted gravel base
- Lay first course - Bury blocks halfway, level perfectly
- Stack remaining courses - Stagger joints, backfill with drainage gravel
- Finish with capstones - Apply adhesive, ensure proper overhang
Most Central Florida homeowners can successfully build walls up to 3 feet tall using interlocking paver blocks. The key is proper foundation preparation and drainage - without these, even the best materials will fail over time.
Why build a paver stone retaining wall? These structures control soil erosion, create usable flat spaces on slopes, and can increase your property value significantly. A well-constructed retaining wall with proper drainage can last 50+ years with minimal maintenance.
The most critical step is getting that first course perfectly level and properly buried. As one experienced builder shared: "I spent nearly three hours on just the first row of my 50-foot wall, but that careful work made the rest go smoothly and the wall has stood strong for over five years."
Planning & Preparation: The Blueprint for Success
Think of building a retaining wall like baking your grandmother's famous cake – you wouldn't start mixing ingredients without reading the recipe first! How to build a paver stone retaining wall successfully starts long before you pick up that shovel.
Your site assessment is where the magic begins. Walk your property and really look at what you're working with. Is the soil clay-heavy (which holds water like a sponge) or sandy (which drains faster than your morning coffee disappears)? Notice the natural slope and any existing plants or features you'll need to work around.
Here's something that could save you thousands of dollars and a major headache: call 811 before you dig. This free service locates underground utilities, and trust me, you don't want to find your gas line with a shovel. It's the kind of surprise nobody wants at their housewarming party.
Checking local building codes might sound boring, but it's your friend. Most walls under 3 feet don't need permits, but regulations vary. In Florida communities, walls over 4 feet typically require permits and sometimes an engineer's stamp. Better to spend a few minutes on a phone call than deal with code enforcement later.
When calculating materials, measure your planned wall length and height, then add 10% extra blocks to your order. Blocks can break, you might need to cut some for perfect fits, and having extras means you won't be making emergency runs to the supply store when you're in the zone.
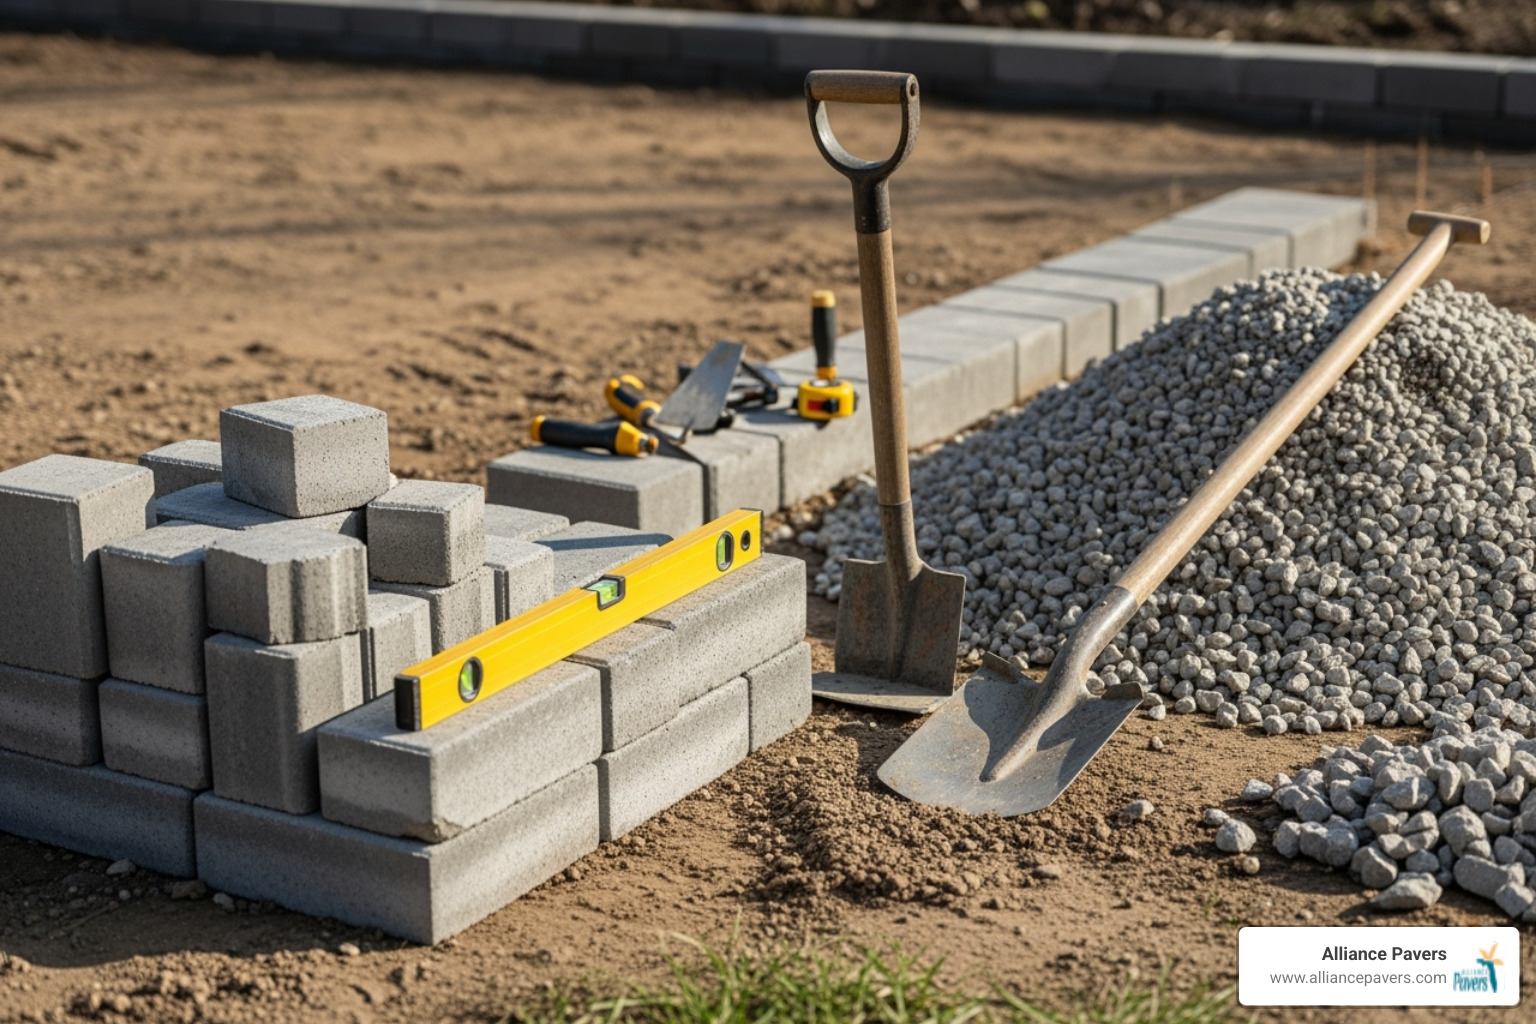
Essential Tools for the Job
Having the right tools transforms this project from frustrating to satisfying. Your shovel will be your workout partner for trench digging. A hand tamper becomes crucial for creating that rock-solid base – you'll use this more than you think.
Your level (both a standard 4-footer and a smaller torpedo level) ensures everything sits perfectly straight. A rubber mallet lets you make gentle adjustments without cracking blocks. Don't forget your tape measure for accuracy and mason line with a string level to keep your wall straight as an arrow.
A wheelbarrow saves your back when moving materials, while safety glasses and gloves protect you from debris and blisters. For applying construction adhesive, you'll need a caulk gun. If you're tackling a larger project, consider renting a plate compactor – your future self will thank you for the time and effort saved.
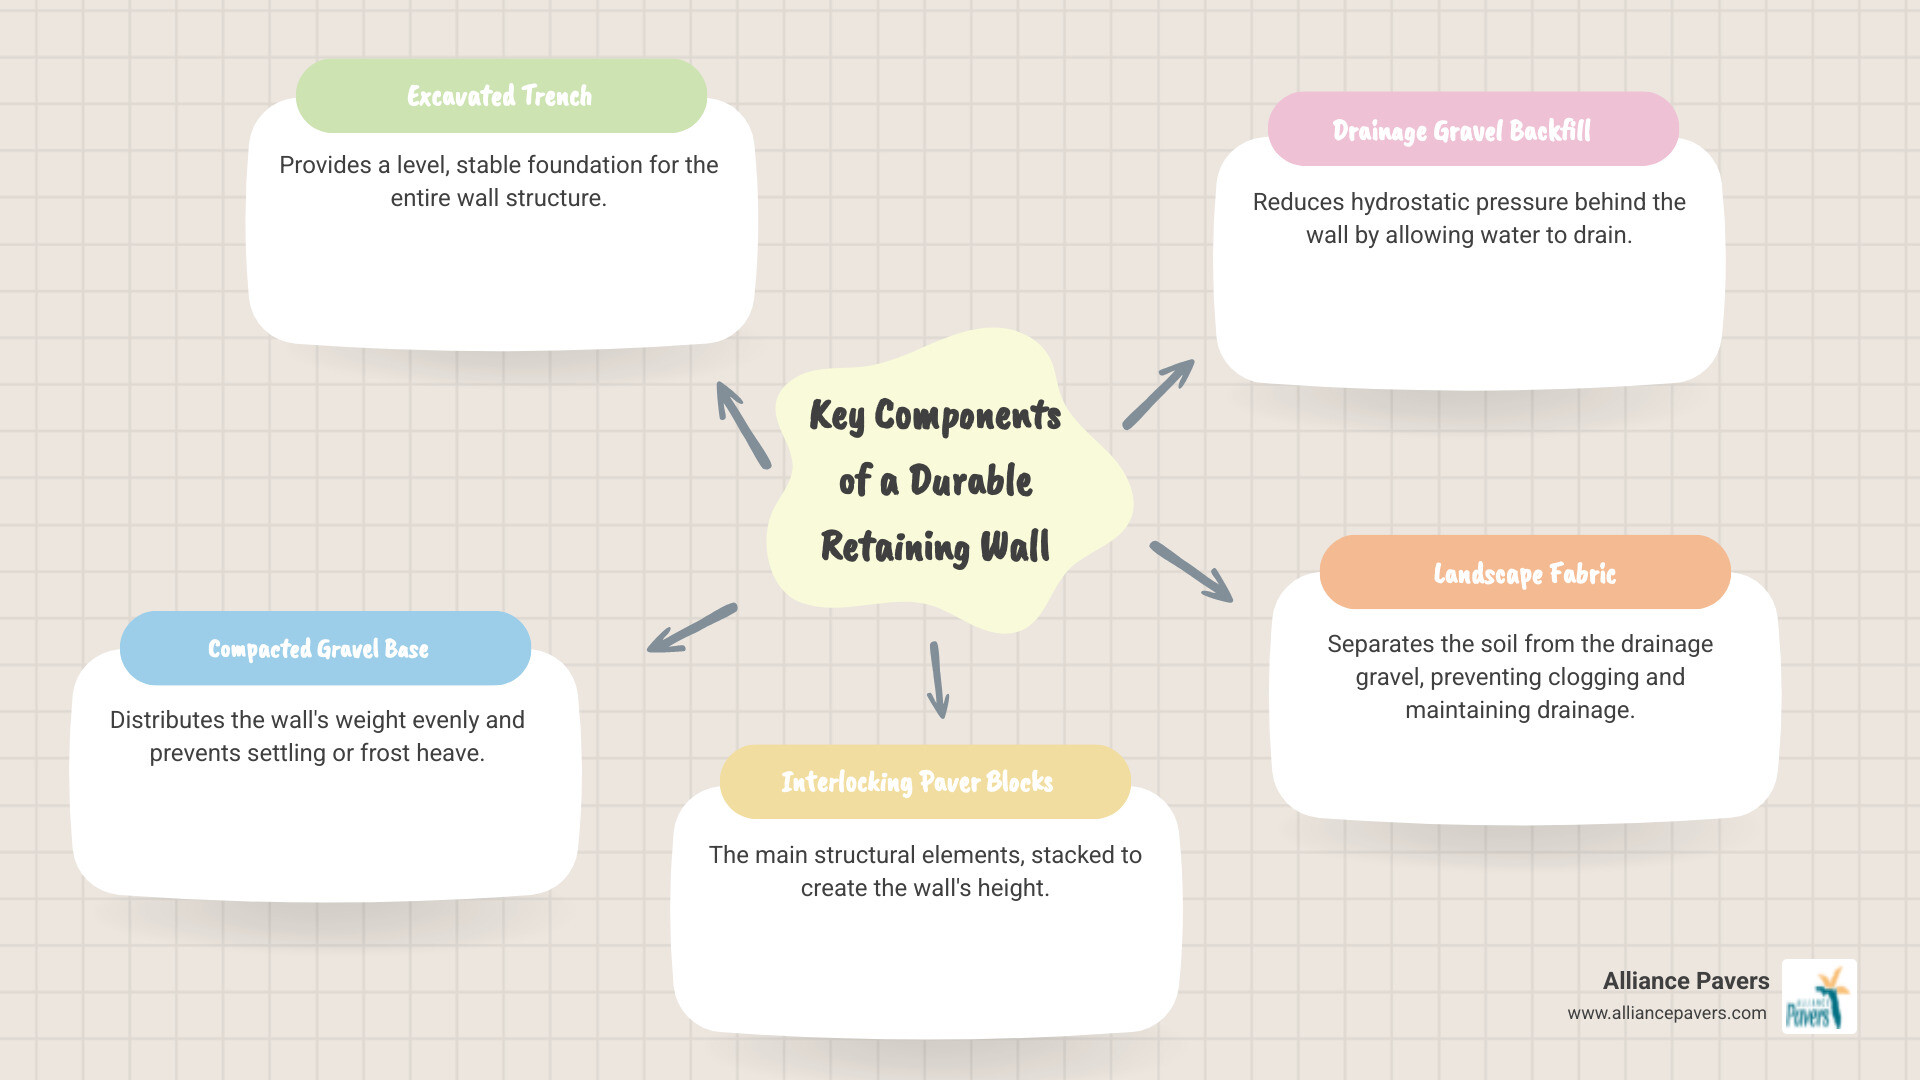
Key Materials You'll Need
Quality materials make the difference between a wall that lasts decades and one that needs repairs next season. Paver blocks or dedicated retaining wall blocks form your wall's backbone – we'll dive deeper into choosing between these options later.
Your paver base (crushed stone) creates the stable foundation everything else depends on. Drainage gravel (3/4" rough gravel) manages water flow behind your wall, preventing the hydrostatic pressure that topples poorly built walls.
Landscape fabric keeps soil from clogging your drainage system, while construction adhesive secures your capstones for that finished, professional look. A small bag of leveling sand handles those minor adjustments that make everything perfect.
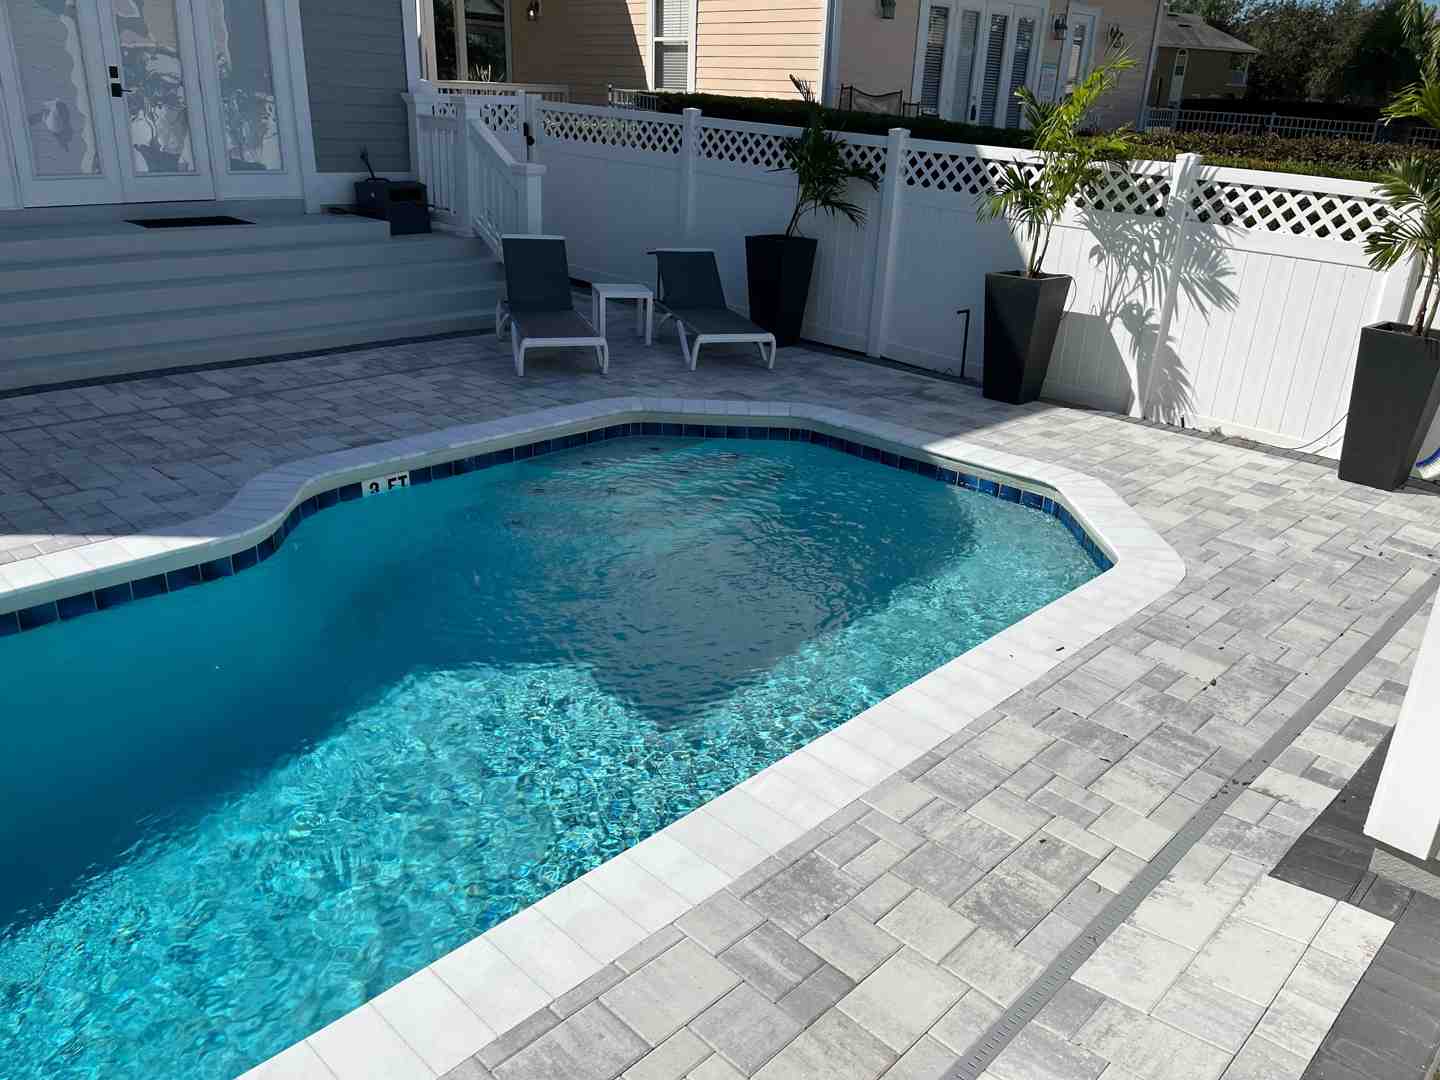
For comprehensive outdoor changes beyond retaining walls, explore our Hardscaping Services to see how we can improve your entire landscape.
Step-by-Step Guide: How to Build a Paver Stone Retaining Wall
Now that we're planned and prepared, let's roll up our sleeves and get to the heart of how to build a paver stone retaining wall. This process, while labor-intensive, is incredibly rewarding when you see that first beautiful, functional wall taking shape in your yard.
The beauty of building with paver stones is that you're creating something that will last for decades when done right. Each step builds on the previous one, so taking your time early on will save you headaches down the road.
For more background on retaining wall structure and design, visit the Retaining wall Wikipedia page.
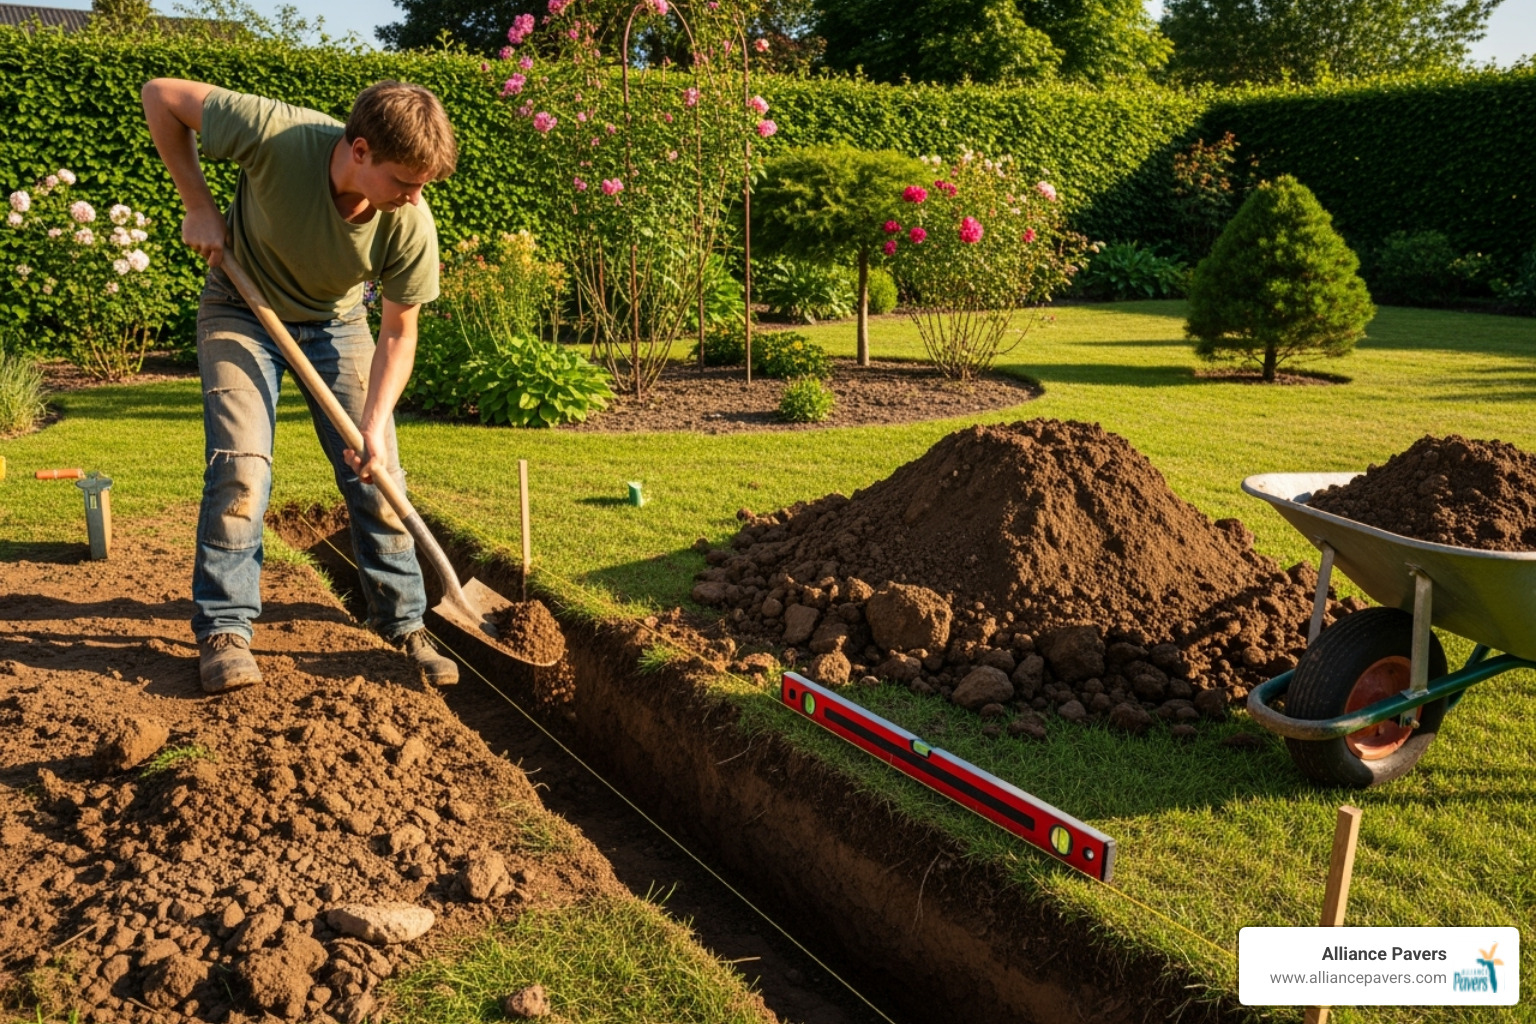
Step 1: Preparing the Foundation and Trench
Think of this step as laying the groundwork for everything that follows. A solid foundation is what separates a wall that stands strong for 50 years from one that starts leaning after the first heavy rain.
Start by marking your wall's path using stakes and mason line. This gives you a clear visual guide and helps ensure your wall runs exactly where you want it. Once marked, it's time to dig.
Your trench width should be twice the depth of your paver blocks - so if you're using 10.5-inch deep blocks, dig about 21 inches wide. This extra width isn't wasted space; it's essential room for the drainage materials that will keep your wall stable for years to come.
Trench depth requires a bit of math, but it's simple. Take half the height of your first block and add your planned paver base depth (usually 3-6 inches). For 6-inch tall blocks with a 3-inch base, you'll dig about 6 inches deep total.
Here's where patience pays off big time. After digging, compact that soil thoroughly with your hand tamper. Don't skip this step - loose soil will settle over time and create problems. Then add your paver base material in 2-inch layers, compacting each lift until it's rock solid.
Leveling the base is your final foundation task, and it's crucial. Use your string level across the entire trench length. Every inch of that paver base needs to be perfectly level. Any high or low spots here will throw off your entire wall.
Step 2: Laying the First Course: The Most Critical Step in How to Build a Paver Stone Retaining Wall
If there's one step where perfectionism pays off, this is it. The first course of blocks determines whether your wall will stand straight and strong or develop problems later.
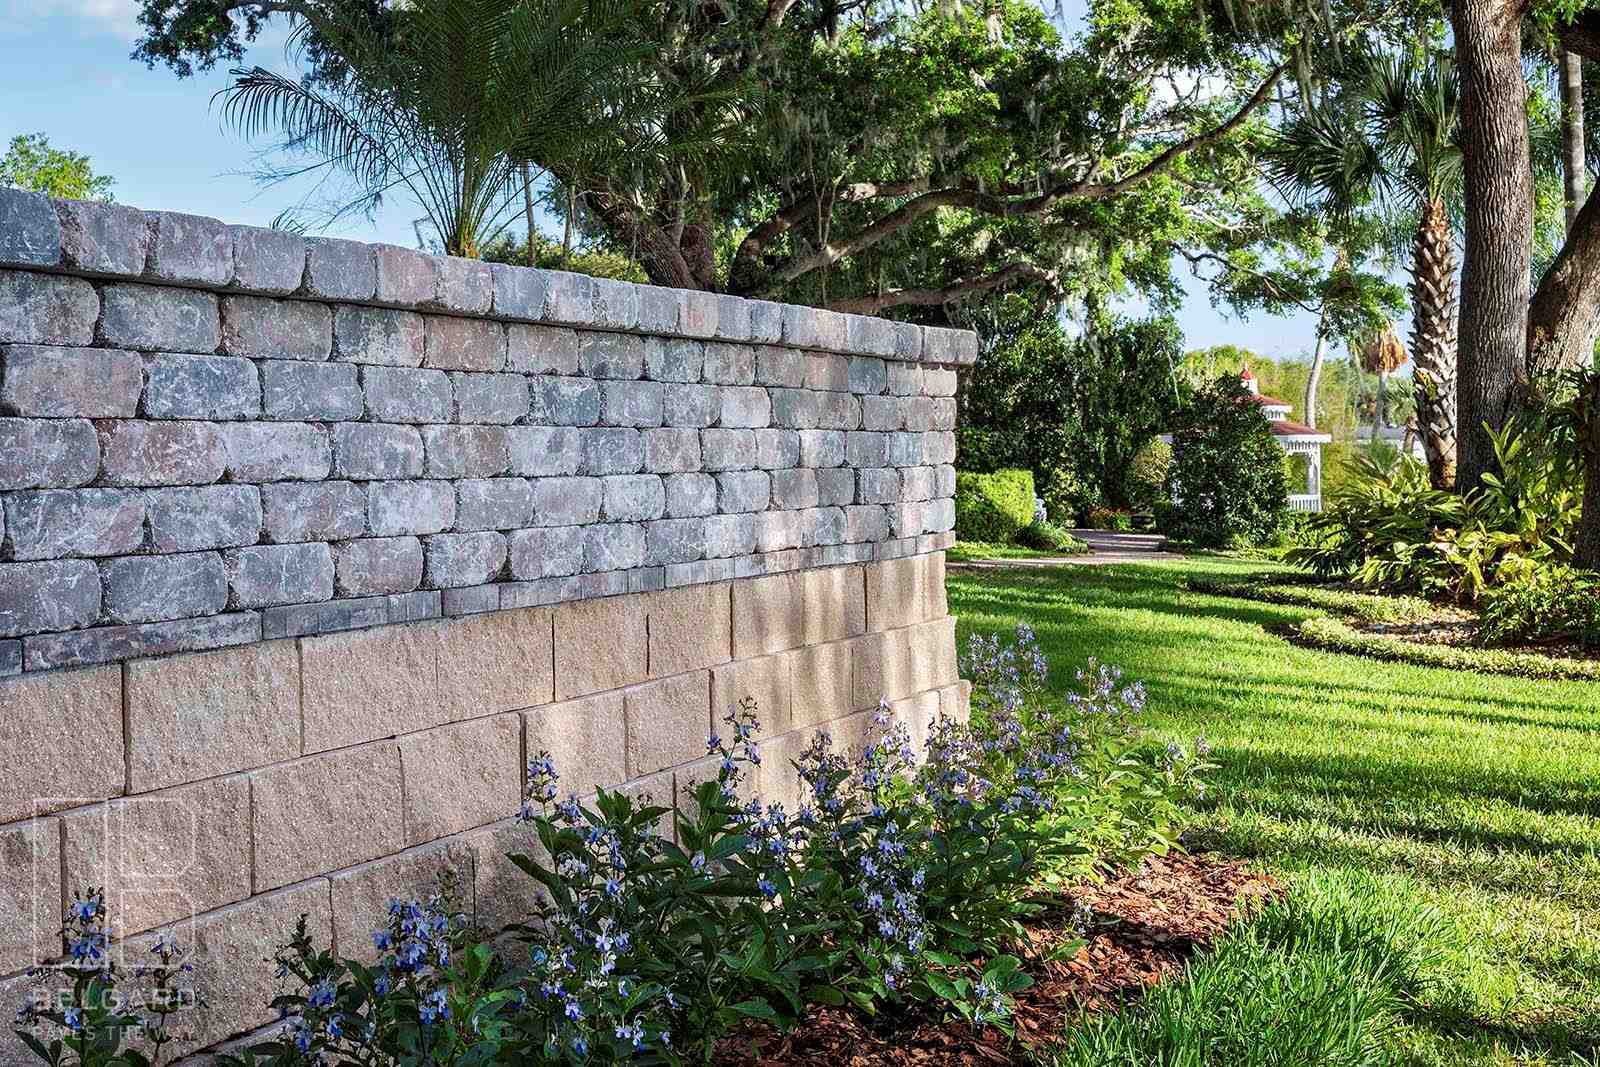
Burying the first course is absolutely essential - typically by half the block's height. This isn't just tradition; it's physics. That buried portion anchors your entire wall and prevents it from sliding or kicking out when soil pressure builds up behind it.
Start with your first block at the lowest point of your planned wall. Here's where your patience gets tested, but trust us, it's worth it. Each block must be level in every direction - front to back, side to side, and level with its neighbors.
Use your rubber mallet for gentle adjustments rather than forcing blocks into place. If a block sits too high, tap it down carefully. If it's too low, lift it out, add a small amount of paver base or leveling sand underneath, then reset and check again.
Check for level across multiple blocks as you go. It's easier to fix one slightly off block than to find three blocks later that you've been building on a slope. This meticulous attention to the first course is what separates amateur work from professional results.
Learn more about the structural benefits of these walls in our guide to Segmental Retaining Walls.
Step 3: Stacking Subsequent Courses and Backfilling
With that perfect first course in place, the rest of your wall building becomes much more enjoyable. You'll start seeing real progress as each new course adds height and definition to your landscape.
Staggering joints is your key to structural strength. Think of it like laying bricks - you never want vertical seams lining up between courses. The overlap creates an interlocking pattern that distributes weight and stress throughout the wall. Aim for at least 4 inches of overlap between joints.
Cutting blocks for end pieces often helps achieve the perfect stagger. Don't worry if you need to cut blocks - it's completely normal and often necessary for both structural integrity and aesthetics.
Before laying each new course, sweep the top of your previous blocks clean. Even small bits of debris can throw off your level and create gaps that weaken the wall's stability.
Backfilling with drainage gravel happens as you build, not after you finish. After every course or two, add 3/4-inch rough gravel directly behind your blocks. This drainage layer is what keeps water from building up pressure behind your wall - and water pressure is what destroys most retaining walls.
Compact your backfill in layers using your hand tamper. Well-compacted drainage gravel can reduce soil pressure by up to 30%, significantly extending your wall's life. This continuous process of building and backfilling creates the strong, well-drained structure that makes retaining walls effective at Preventing Soil Erosion with Retaining Walls.
Advanced Techniques and Finishing Touches
Now that we've mastered the basics of how to build a paver stone retaining wall, let's dive into the techniques that separate a good wall from a truly exceptional one. These finishing touches and advanced methods will ensure your wall not only functions perfectly but looks professionally crafted.
Managing Drainage: How to Build a Paver Stone Retaining Wall That Lasts
Here's something we've learned after decades in the business: water is your retaining wall's biggest enemy. When water builds up behind your wall, it creates what engineers call hydrostatic pressure. Think of it like a dam – the more water that accumulates, the more force pushes against your beautiful new wall.
The secret to a long-lasting retaining wall lies in giving water somewhere to go. We start by installing landscape fabric along the back of our trench and behind the blocks. This smart barrier lets water pass through while keeping soil particles from clogging up our drainage system. It's like a coffee filter for your retaining wall!
Next comes our perforated drain pipe. For areas that see heavy rainfall (and here in Central Florida, we know all about that!), we nestle this pipe at the base of the wall, right behind that crucial first course of blocks. The pipe gets wrapped in filter fabric and slopes gently toward an outlet, carrying water away from the wall like a highway for moisture.
Our drainage gravel – that rough 3/4-inch stone we've been talking about – creates the backbone of our water management system. We pack this behind the wall and even fill the hollow cores of our blocks with it. This creates countless pathways for water to flow freely instead of building up pressure.
When we get the drainage right, we can reduce soil pressure by up to 30%. That's the difference between a wall that lasts five years and one that's still standing strong after fifty! Regular maintenance matters too – we recommend Inspecting Your Retaining Wall for Water Damage to catch any issues before they become expensive problems.
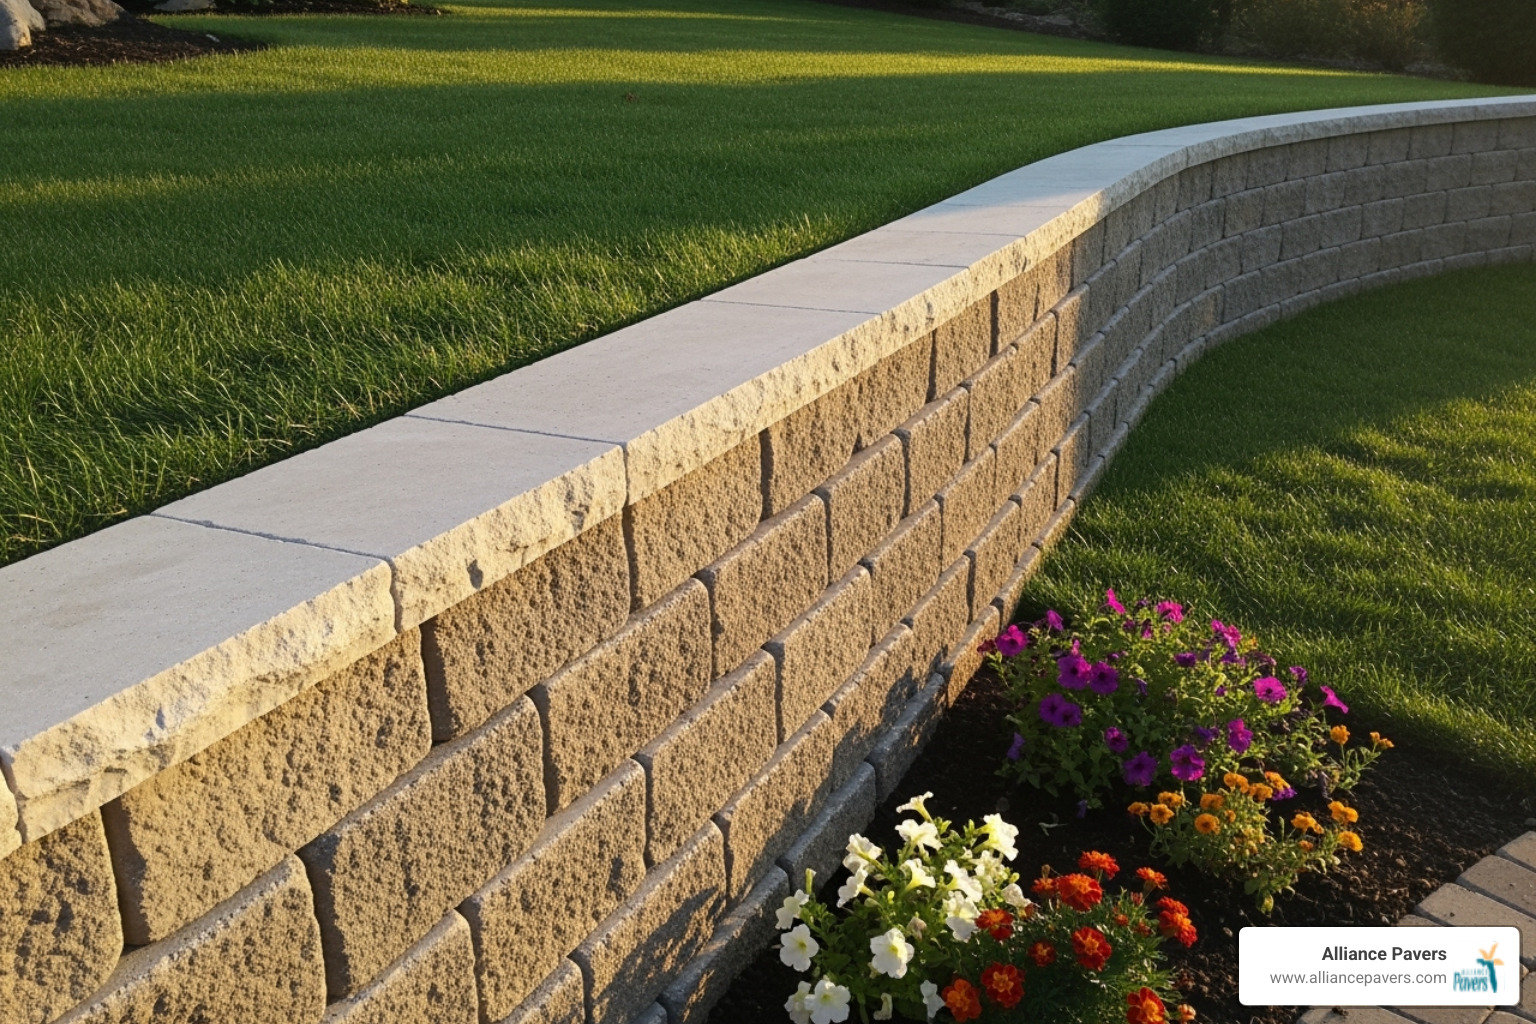
Adding Capstones and Using Adhesive
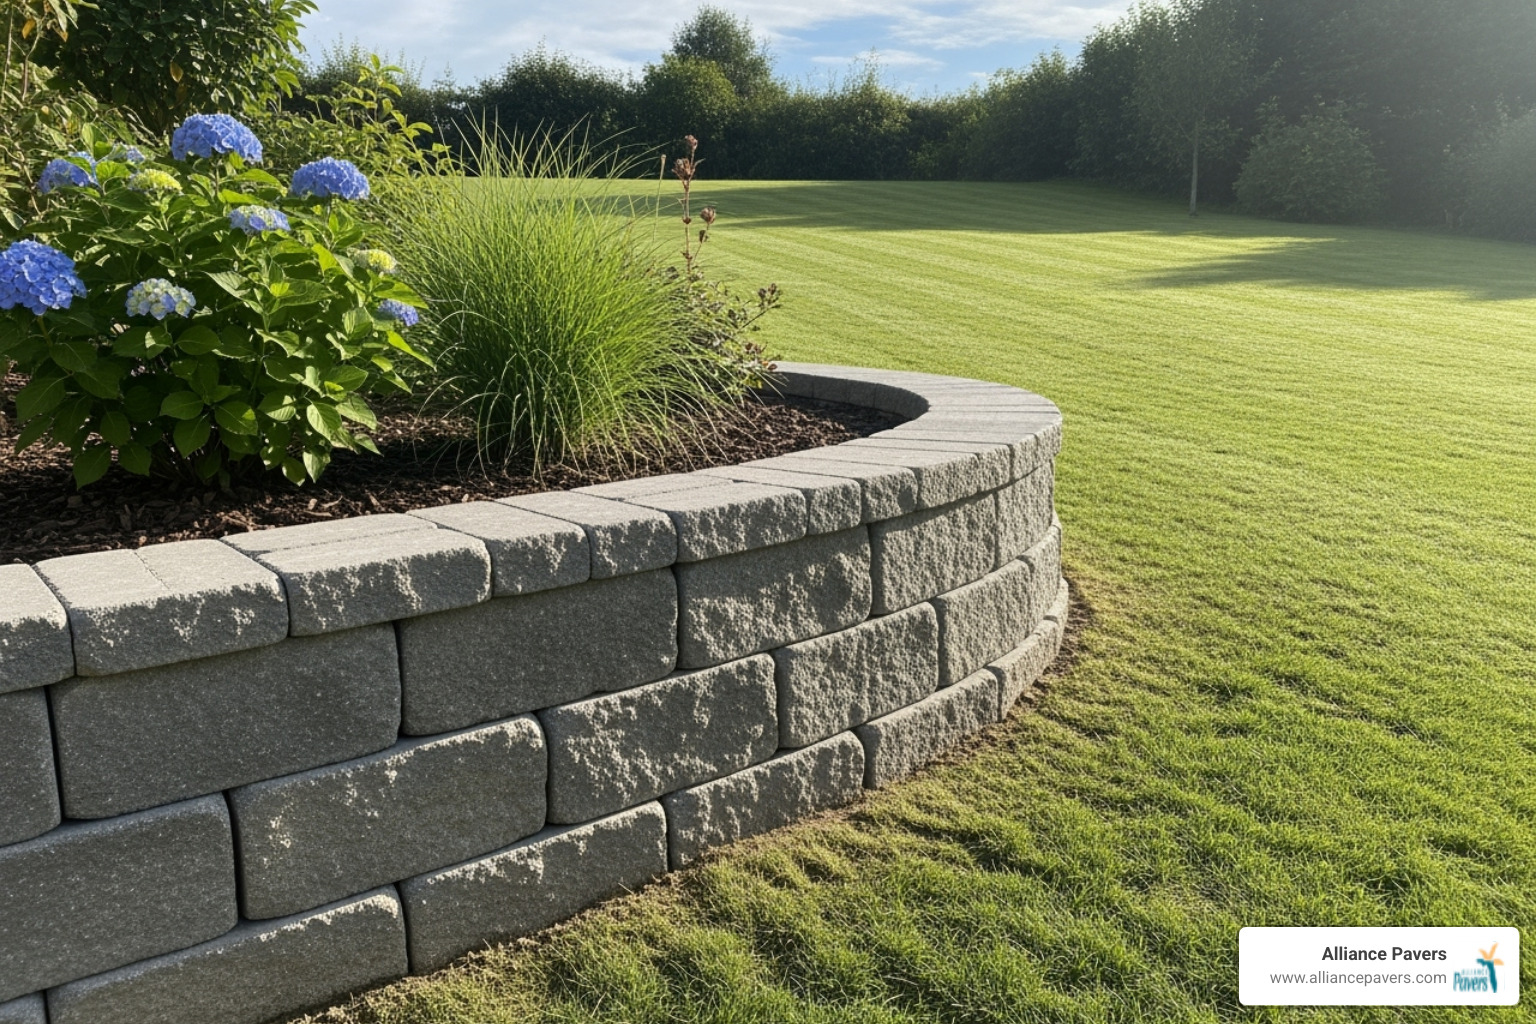
The capstones are like the cherry on top of your retaining wall sundae. They're not just decorative – these finishing pieces add crucial weight and stability while protecting the top course from weather.
Before we apply our construction adhesive, we make sure the top surface is spotless and completely dry. Nobody wants a capstone sliding off because of a bit of leftover dirt! We run a generous bead of adhesive along the top of our blocks, then carefully position each capstone.
Here's a pro tip from our years of experience: aim for a slight overhang of about 1 to 1½ inches. This creates a beautiful shadow line that makes your wall look professionally built, plus it helps direct rainwater away from the wall face. We also make sure our capstones line up straight across without gaps – it's these little details that make all the difference.
The adhesive prevents your capstones from shifting over time, which is especially important if you're planning to use your wall as garden seating. Speaking of learning more techniques, this youtube video offers some excellent additional insights into retaining wall construction that we've found helpful over the years.
Paver Blocks vs. Dedicated Retaining Wall Blocks
When people ask us about how to build a paver stone retaining wall, we often need to clear up some confusion about materials. Not all blocks are created equal, and using the wrong type can lead to disappointing results.
Standard paver blocks are designed for flat surfaces like patios and walkways. They're smooth-sided and rely on sitting next to each other on level ground. While they might seem like they'd work for a small garden border, they lack the structural features needed for true retaining work. They're prone to shifting and don't handle soil pressure well, especially when our Florida weather brings freeze-thaw cycles.
Dedicated retaining wall blocks, on the other hand, are engineered specifically for holding back soil. These clever blocks often feature an interlocking lip system on the back that hooks onto the block below. This creates a naturally stable wall that leans slightly into the hillside – exactly what you want for maximum strength.
Most gravity-held walls rely on the weight of the blocks combined with this slight backward lean to resist soil pressure. The blocks we typically recommend for DIY projects are those 6" x 16" x 10.5" interlocking concrete blocks. They're widely available, reasonably priced, and that back lip makes installation almost foolproof.
The structural integrity difference is night and day. While paver blocks rely on surrounding materials for stability, retaining wall blocks are designed to transfer loads and create a cohesive structure that can handle significant soil pressure. Yes, they generally cost more per block due to their specialized engineering, but they're worth every penny when you want a wall that will still look great decades from now.
For more creative approaches to retaining wall design, check out our collection of Paver Retaining Wall Ideas to see how these structures can transform outdoor spaces into something truly special.
Frequently Asked Questions about Building Retaining Walls
We get a lot of questions from homeowners who are excited about tackling this project themselves. After helping countless families transform their yards over the past 25 years, we've noticed the same concerns come up again and again. Let's address the big ones that can make or break your success.
How high can I build a paver stone retaining wall myself?
This is probably the most important question we hear, and honestly, it's one you don't want to get wrong. The good news is that interlocking blocks can typically be used for walls up to 24-36 inches high without an engineer - perfect for most DIY projects.
Those popular concrete garden wall blocks (you know, the 6" x 16" x 10.5" ones you see at home improvement stores) work beautifully for walls up to three feet tall. They're designed for homeowners like you, and when installed properly, they'll hold strong for decades.
Here's where things get serious though: walls over 3-4 feet often require a permit and professional design. Once you go higher than that, the soil pressure increases dramatically, and you're looking at engineering requirements in most areas. Trust us, the last thing you want is to spend a weekend building a beautiful wall only to have the city make you tear it down.
Always check local regulations in Florida cities like Oviedo or Winter Park. Each municipality has its own rules, and some are stricter than others. A quick call to your local building department can save you major headaches down the road.
Why does the first course of blocks need to be buried?
This is one of those things that might seem unnecessary when you're hot, tired, and just want to get your blocks stacked. But burying the first course (typically by half its height) provides crucial stability that you absolutely cannot skip.
Think about it this way - all that soil behind your wall is pushing forward constantly. Without that buried foundation, your beautiful wall becomes a domino waiting to fall. It anchors the entire wall into the ground and creates a solid base that won't shift or slide.
Prevents the base from sliding or kicking out due to soil pressure and frost heave is the technical way to say it, but really, it's like giving your wall roots. Just like a tree needs roots to stay upright in a storm, your retaining wall needs that buried first course to handle all the pressure from the soil behind it.
We've seen too many DIY walls fail because someone thought they could skip this step. Don't be that person - take the extra time to bury that first course properly.
How do I handle a slope when building the wall?
Building on a slope definitely adds a challenge, but it's totally doable with the right approach. For sloped terrain, the base trench should be "stepped up" rather than trying to follow the natural incline of the ground.
This involves creating level sections for the base course rather than trying to follow the slope. Picture it like building a staircase for your blocks - each section is perfectly level, but they step up to follow the general slope of your yard.
Here's how it works: Start at the lowest point and dig your first level section. As the ground rises, you'll dig the next section at a higher elevation, but still dead level within itself. Each step-up requires digging a new level trench section, ensuring the wall remains stable and level.
This method also comes in handy when you hit obstacles like tree roots. Instead of trying to cut through a major root (which could harm the tree), you can create a step-up to go over it. Just make sure each level section gets the same careful attention to compacting and base preparation.
The key is patience - rushing this part will show up as problems later. Take time to get each stepped section perfectly level, and your finished wall will look professionally built.
Your Partner in Creating Lasting Outdoor Beauty
Building a paver stone retaining wall is one of those projects that makes you step back and admire your handiwork for years to come. Whether you're tackling erosion issues, carving out usable space from a slope, or simply adding that finishing touch to your landscape design, there's something deeply satisfying about creating something both beautiful and functional with your own hands.
The difference between a retaining wall that stands strong for decades and one that starts showing problems within a few years often comes down to proper planning and technique. We've walked you through every critical step - from that all-important buried first course to the finishing touches of capstone installation. When you follow these proven methods, you're not just building a wall; you're creating a lasting improvement to your property.
That said, we know that not every project is a perfect fit for the DIY approach. Complex designs, taller walls, or challenging site conditions can quickly turn an enjoyable weekend project into a frustrating ordeal. Sometimes the slope is too steep, the drainage requirements too complex, or the local building codes too stringent for a straightforward DIY solution.
Here at Alliance Pavers, we've been helping Florida families transform their outdoor spaces for 25 years. As a family-owned business right here in St. Cloud, we understand the unique challenges that come with our sandy soils, intense summer rains, and occasional freeze events. We've seen what works long-term in our climate and what doesn't.
Our team specializes in creating retaining walls that not only solve your immediate needs but improve your entire outdoor living experience. We handle everything from the initial design and permit applications to the final cleanup, ensuring your project stays on schedule and on budget without the stress of managing multiple contractors or navigating building codes yourself.
For complex projects or to ensure a professional finish that stands the test of time, expert help can save you both time and money in the long run. We're proud to serve communities throughout Central Florida, bringing the same attention to detail and craftsmanship to every project, whether it's a simple garden wall or an elaborate terraced landscape.
Contact us to discuss your stone retaining wall project in St. Cloud, FL – we'd love to help you create the outdoor space you've been dreaming of, with the peace of mind that comes from working with experienced professionals who stand behind their work.