Your Guide to a Rock-Solid Retaining Wall on a Slope
Untuk menulis deskripsi meta yang dioptimalkan untuk SEO untuk artikel "Panduan Anda untuk Dinding Penahan Batu yang Kuat di Lereng", saya perlu memastikan bahwa deskripsi tersebut memenuhi semua pedoman yang Anda berikan: * **Di bawah 130 karakter:** Ini adalah batasan karakter yang ketat. * **Gunakan suara aktif dan buat dapat ditindaklanjuti:** Dorong pengguna untuk mengklik. * **Berisi kata kunci "cara membangun dinding penahan batu di lereng" secara harfiah:** Tidak ada kata atau tanda baca di antara mereka. * **Cocok dengan isi kerangka:** Ringkas poin-poin utama artikel. Mari kita buat drafnya: **Draf 1:** Kuasai cara membangun dinding penahan batu di lereng. Dapatkan panduan langkah demi langkah untuk menstabilkan lereng, mencegah erosi, & mempercantik halaman Anda. * Karakter: 147 (Terlalu panjang) **Draf 2:** Pelajari cara membangun dinding penahan batu di lereng. Tundukkan kemiringan, cegah erosi & ciptakan ruang. Panduan DIY langkah demi langkah. * Karakter: 129 (Pas!) * Suara aktif, dapat ditindaklanjuti: "Pelajari", "Tundukkan", "cegah", "ciptakan". * Kata kunci "cara membangun dinding penahan batu di lereng" ada secara harfiah. * Cocok dengan konten: mencakup perencanaan, pembangunan, drainase, dan manfaat seperti pencegahan erosi dan penciptaan ruang. Ini adalah pilihan yang bagus. --- ``` Pelajari cara membangun dinding penahan batu di lereng. Tundukkan kemiringan, cegah erosi & ciptakan ruang. Panduan DIY langkah demi langkah. ```
Why Building a Stone Retaining Wall on a Slope Can Transform Your Property
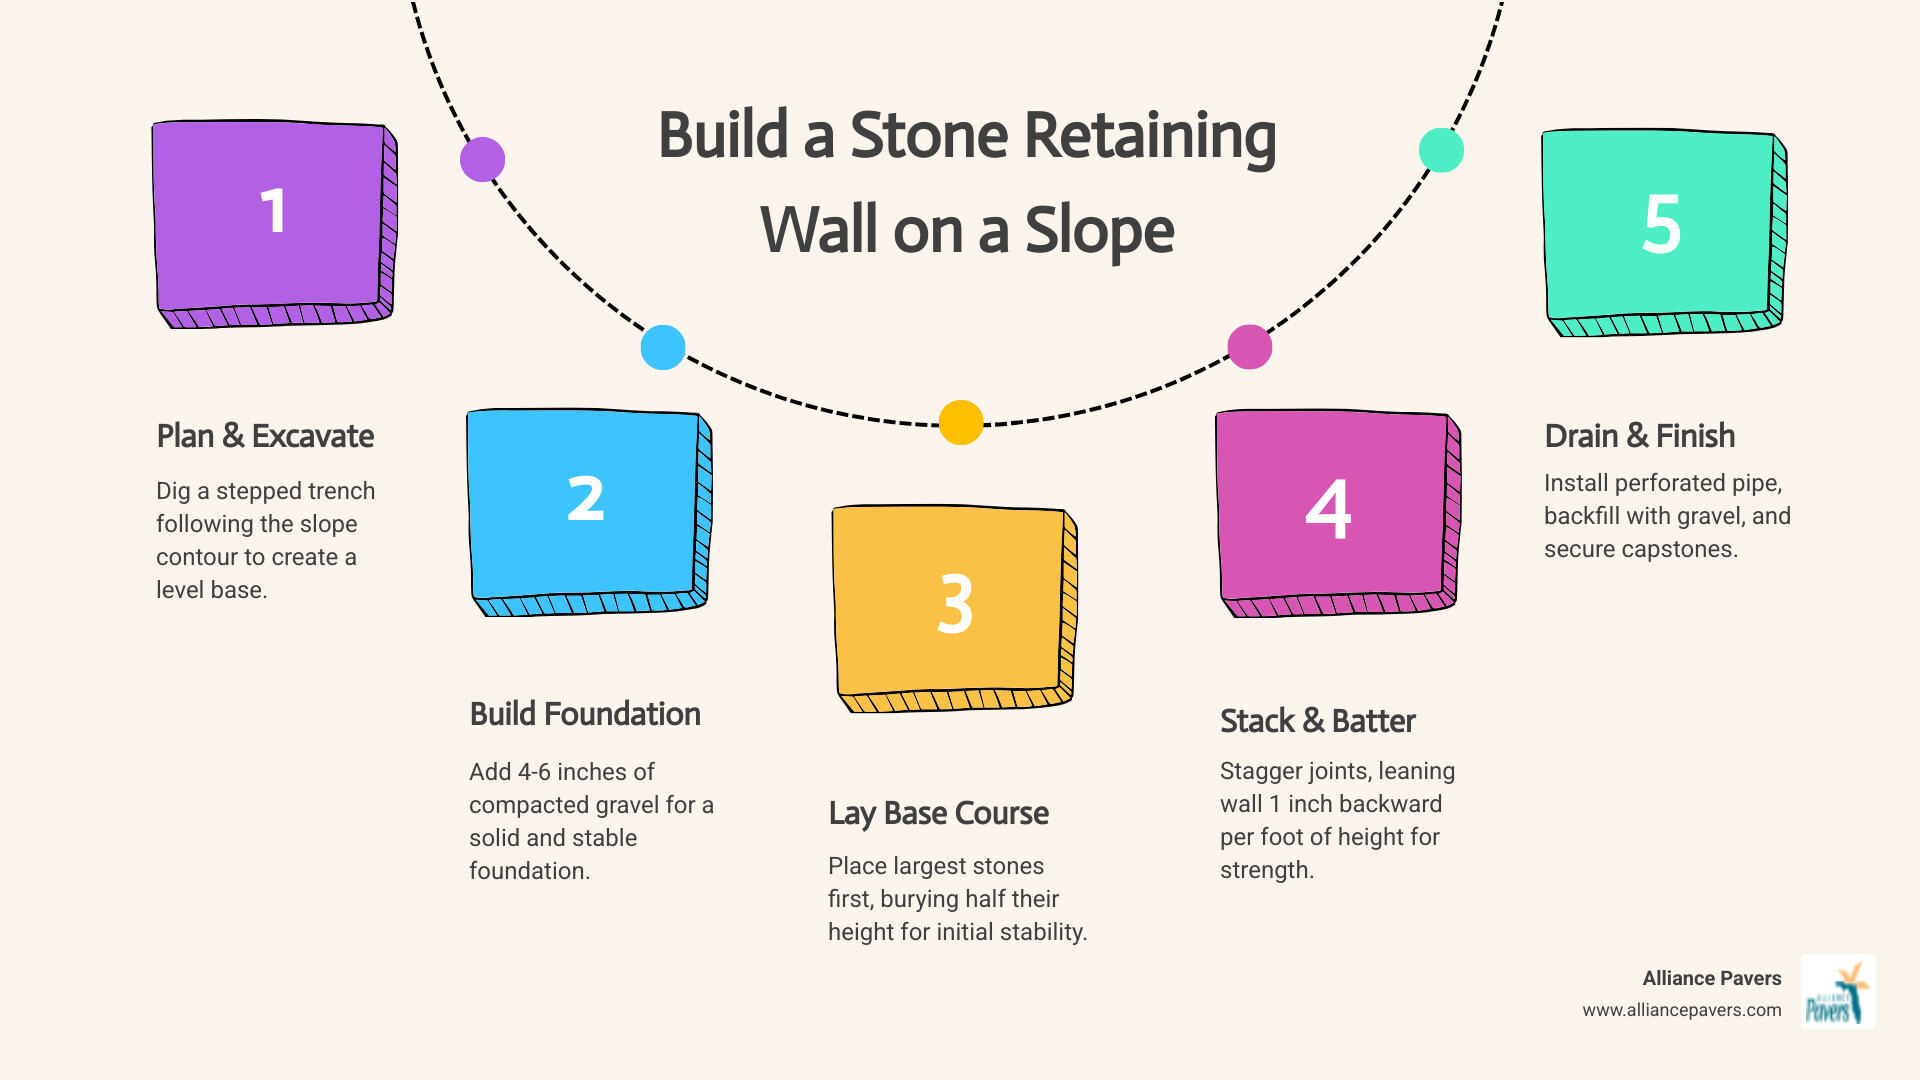
How to build a stone retaining wall on a slope starts with proper planning, excavation, and foundation preparation. Here's the essential process:
Quick Steps:
- Plan and excavate - Dig a stepped trench following the slope contour
- Build foundation - Add 4-6 inches of compacted gravel base
- Lay base course - Place largest stones, burying half their height
- Stack courses - Stagger joints with 1-inch backward lean per foot of height
- Install drainage - Add perforated pipe and gravel backfill
- Finish top - Secure capstones with construction adhesive
Sloped yards in Central Florida can feel like wasted space. That soil keeps washing away after every storm, your landscaping slides downhill, and you're left staring at an unusable mess where you could have beautiful outdoor living areas.
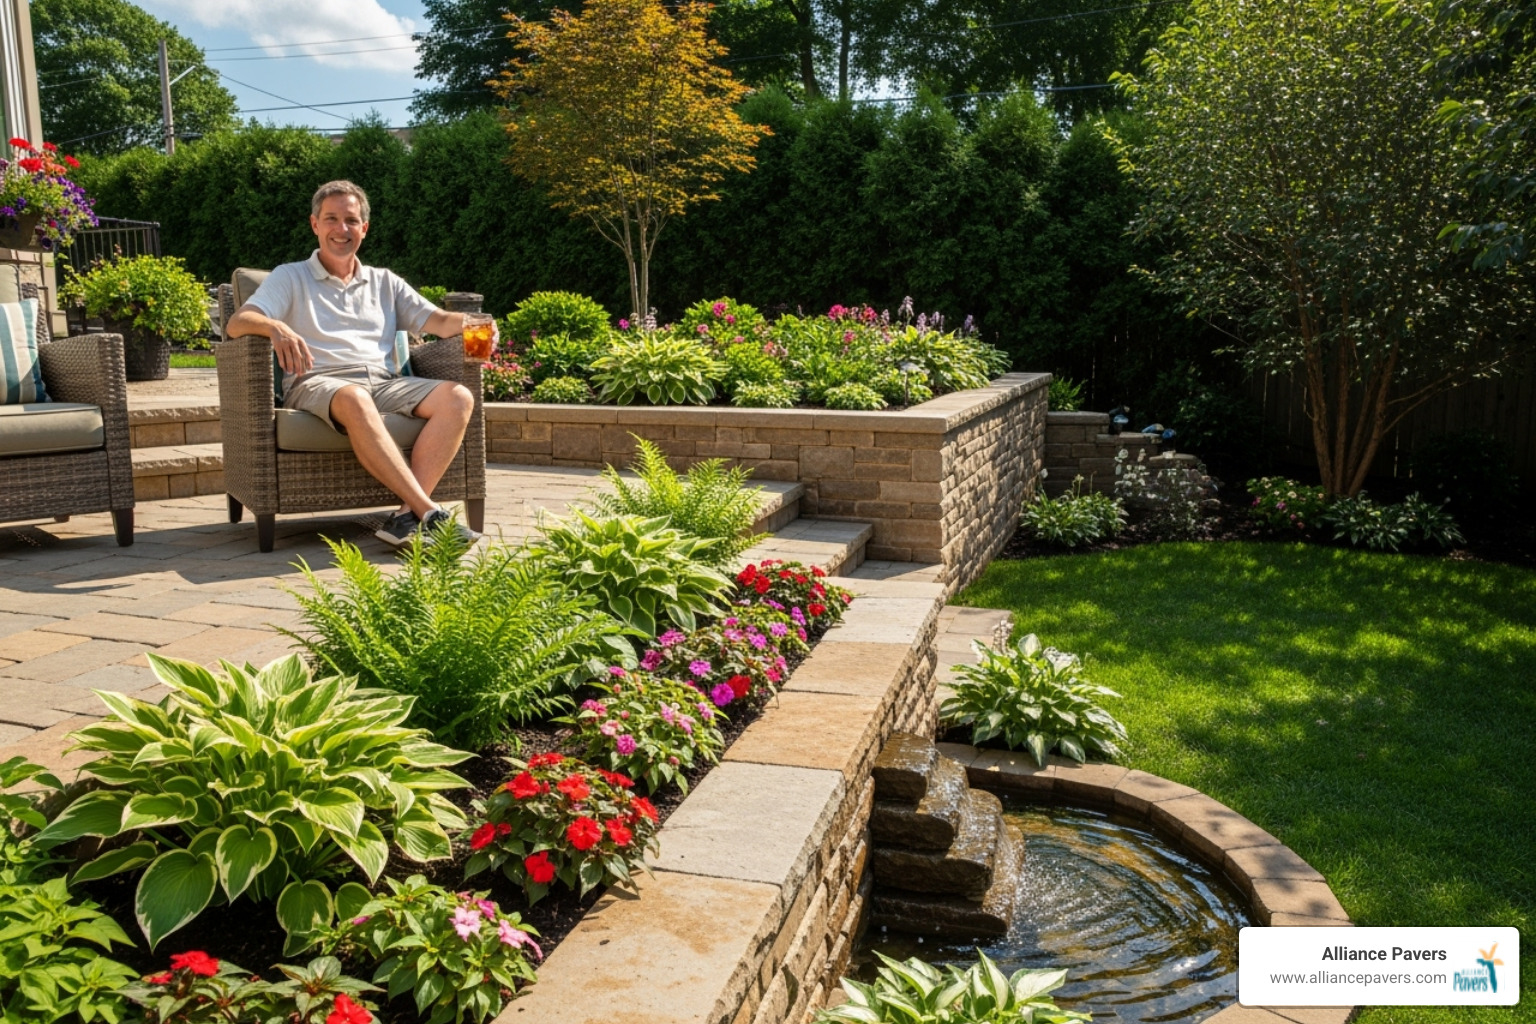
A well-built stone retaining wall solves these problems while adding serious value to your property. It stops erosion, creates level terraces for gardens or patios, and gives you that structural backbone your landscape needs to look intentional and polished.
The key difference with slope construction is managing the grade changes. You'll need to step your foundation trench, account for proper drainage, and maintain that critical backward lean (called "batter") that keeps tons of soil from pushing your wall over.
This isn't just stacking rocks - it's engineering that has to work against gravity, water pressure, and Florida's shifting soils. But with the right approach, you can build something that'll last decades while changing your outdoor space.
Planning Your Slope-Side Masterpiece
Good planning is essential when tackling a challenging slope. How to build a stone retaining wall on a slope starts long before you pick up your first stone – it begins with understanding what you're trying to accomplish and mapping out every detail.
Building on a slope isn't like working on flat ground. The stakes are higher (literally), the drainage is trickier, and one small miscalculation can send your beautiful wall tumbling down the hill. With proper planning, you'll avoid headaches, backaches, and structural problems.
Why Build a Retaining Wall?
If you're dealing with a sloped yard in Central Florida, you've probably watched your topsoil and landscaping investment wash away after summer storms.
Soil erosion control is usually the biggest motivator for homeowners. A well-built stone retaining wall acts like a guardian, holding back all that precious soil and keeping it where it belongs. This isn't just about aesthetics – it's about protecting your property investment. Our guide on Preventing Soil Erosion with Retaining Walls dives deeper into this critical function.
But erosion control is just the beginning. Creating level terraces transforms unusable steep slopes into functional outdoor living spaces. Imagine turning that awkward hillside into beautiful garden beds, or even a level area for a patio where you can actually set down a chair without it rolling away. This kind of thoughtful design is what Working with Slopes in Hardscape Design is all about.
Improved drainage is another huge benefit that many people don't consider upfront. By managing the slope properly, retaining walls direct water runoff more effectively. No more pooling water that drowns your plants or, worse yet, threatens your home's foundation.
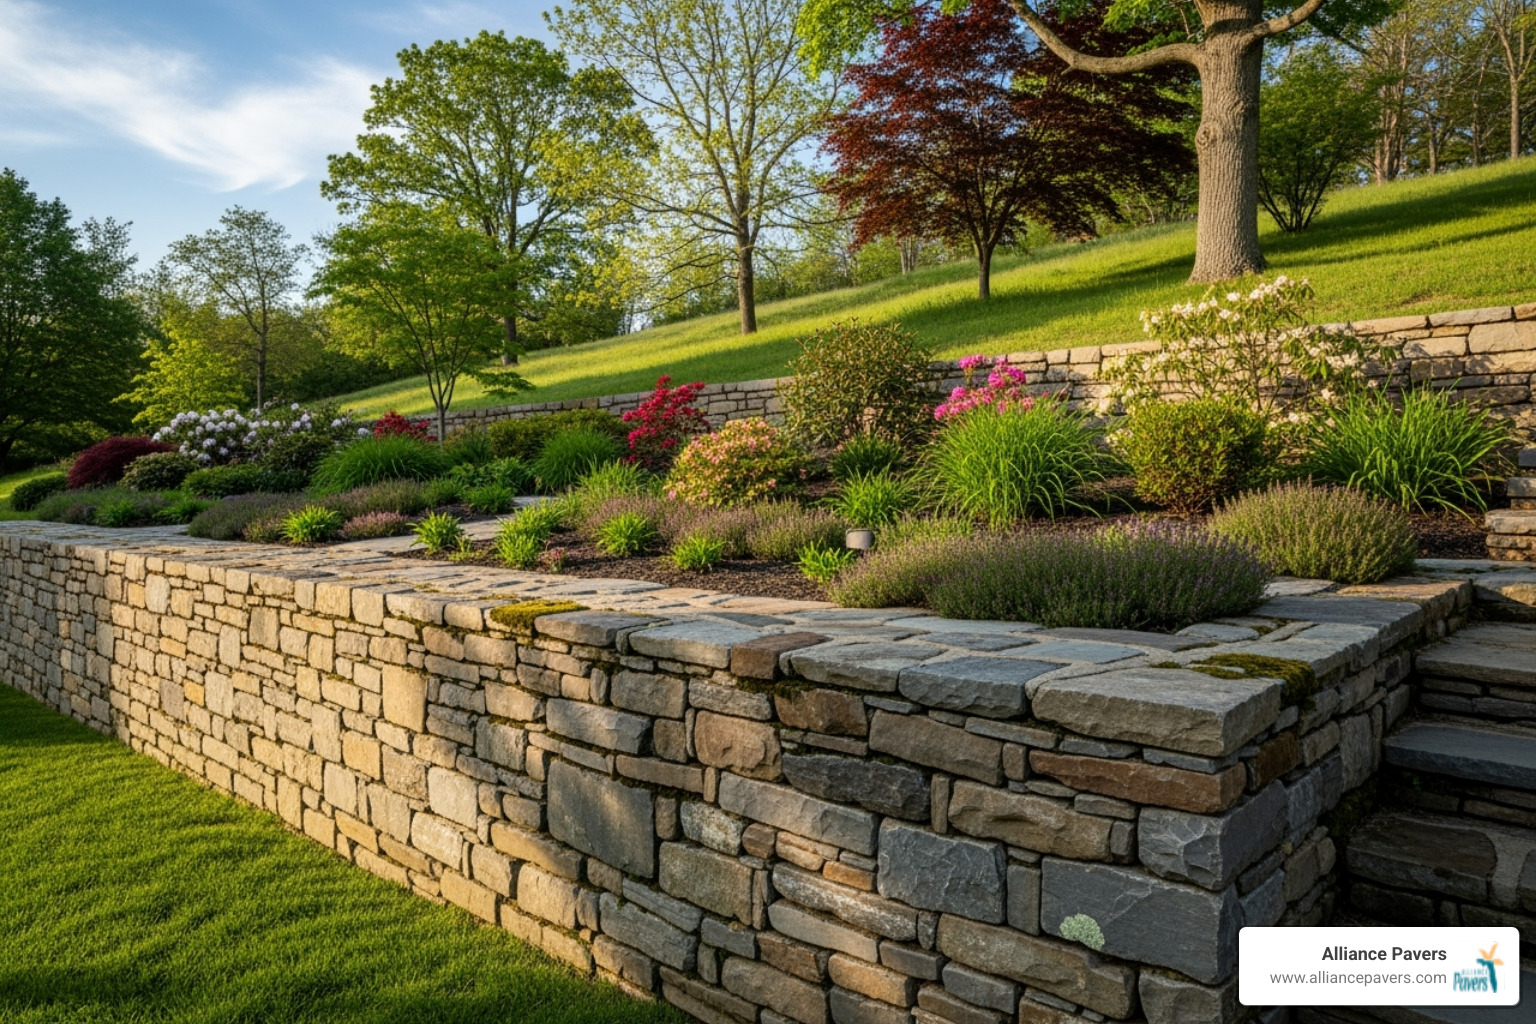
And let's not forget the aesthetic appeal. A well-built stone wall doesn't just solve problems – it creates focal points, defines spaces, and adds that architectural backbone that makes a landscape look intentional and professionally designed.
Choosing the Right Stone and Calculating Materials
Here's where things get interesting. Not all stones are created equal, especially when you're building on a slope where every stone needs to pull its weight – literally.
Angular stones with flat faces are your best friends in this project. Think of them as nature's building blocks. These stones stack naturally, lock together better, and won't try to roll away when you're not looking. Avoid rounded river rocks or perfectly flat flagstones – they're beautiful, but they're also slippery customers that don't play well with others in a retaining wall.
When selecting stone, compressive strength matters more than you might think. If you're using manufactured stone blocks, look for a minimum compressive strength of 3000 psi. For natural stone, this translates to choosing dense, solid pieces without obvious cracks or soft spots that crumble under pressure.
Now, let's talk numbers – because running out of stone halfway through your project is nobody's idea of fun. Calculating stone volume starts with a simple formula: height × width × length of your wall. For a 2-foot high, 1.5-foot wide, 20-foot long wall, you're looking at roughly 60 cubic feet of stone.
But stone is just part of the equation. You'll need crushed stone for the base – about 0.4 cubic feet for every square foot of wall face. Behind the wall, gravel backfill requires roughly 0.35 cubic feet per square foot of wall face. This isn't optional – it's what keeps your wall from becoming a very expensive pile of rocks after the first big rain.
Here's the golden rule: order 10-20% extra material. Trust me on this. Stones break, measurements get adjusted, and there's always that one oddball rock that just won't fit anywhere. Better to have extras than to scramble for matching stone mid-project.
FeatureNatural StoneInterlocking Concrete BlocksAestheticsOrganic, timeless, uniqueUniform, modern, variety of colorsInstallationMore skill required, slowerEasier for DIY, faster setupDurabilityExtremely long-lastingVery durable, consistentDesign FlexibilityExcellent for curves, natural lookGood for curves, easy patternsDrainageNatural seepage when dry-stackedRequires engineered drainageCostVaries widely by stone typeGenerally more budget-friendly
Essential Tools and Safety Equipment
Let's talk tools – because the right equipment makes the difference between a satisfying project and a back-breaking ordeal. You don't need to buy everything, but you do need access to the right gear.
Safety comes first, always. Safety glasses protect your eyes from flying chips, work gloves save your hands from sharp edges, and steel-toed boots are non-negotiable when you're moving heavy stones. Add a respirator mask if you're cutting any manufactured blocks.
For the actual work, a good shovel and mattock handle most of the digging. The mattock is especially handy for breaking up compacted soil and cutting through stubborn roots. A wheelbarrow saves your back when moving stones and materials – and trust me, your back will thank you.
Hand tampers or plate compactors are crucial for properly compacting your base and backfill. For larger projects, renting a plate compactor is worth every penny. A 4-foot level keeps your courses straight and true, while line levels with stakes and string help maintain alignment across longer walls.
Don't forget measuring tools – a good measuring tape and torpedo level for tight spaces. A rubber mallet gently persuades stubborn stones into place, while a mason's hammer and chisel handle any shaping that's needed.
How to plan and mark the layout for a retaining wall on a slope
This is where how to build a stone retaining wall on a slope gets really specific. You can't just draw a line and start digging – slopes demand more thoughtful planning.
Call 811 first – no exceptions. Underground utilities and retaining walls don't mix well, and the consequences of hitting a gas line or electrical cable go way beyond project delays.
Marking your layout on a slope requires thinking in three dimensions. Use tall stakes and string line to mark the front edge of your wall, but remember – this won't be a single level line. Instead, you'll create stepped sections that follow the slope's contour while keeping each individual section level.
The cut and fill technique is your friend here. Dig into the higher part of the slope where your wall will sit, then use that excavated soil to build up the lower areas. This approach backs your wall with solid, undisturbed earth – the kind of foundation that won't shift or settle over time.
Avoid running your wall parallel to the slope – that's asking for trouble. Instead, run it perpendicular or diagonally, or step it down the grade. This creates visual interest while maintaining structural integrity.
For curved walls, the planning gets more complex but the results can be stunning. Every stone needs to fit snugly around the curve while maintaining that critical backward lean. It's like solving a three-dimensional puzzle, but the payoff in visual appeal is worth the extra effort.
How to Build a Stone Retaining Wall on a Slope: A Step-by-Step Guide
With planning complete, it's time to build. Building a stone retaining wall on a slope is a rewarding process that demands patience and precision. We'll go step-by-step to ensure each layer contributes to a rock-solid, beautiful structure.
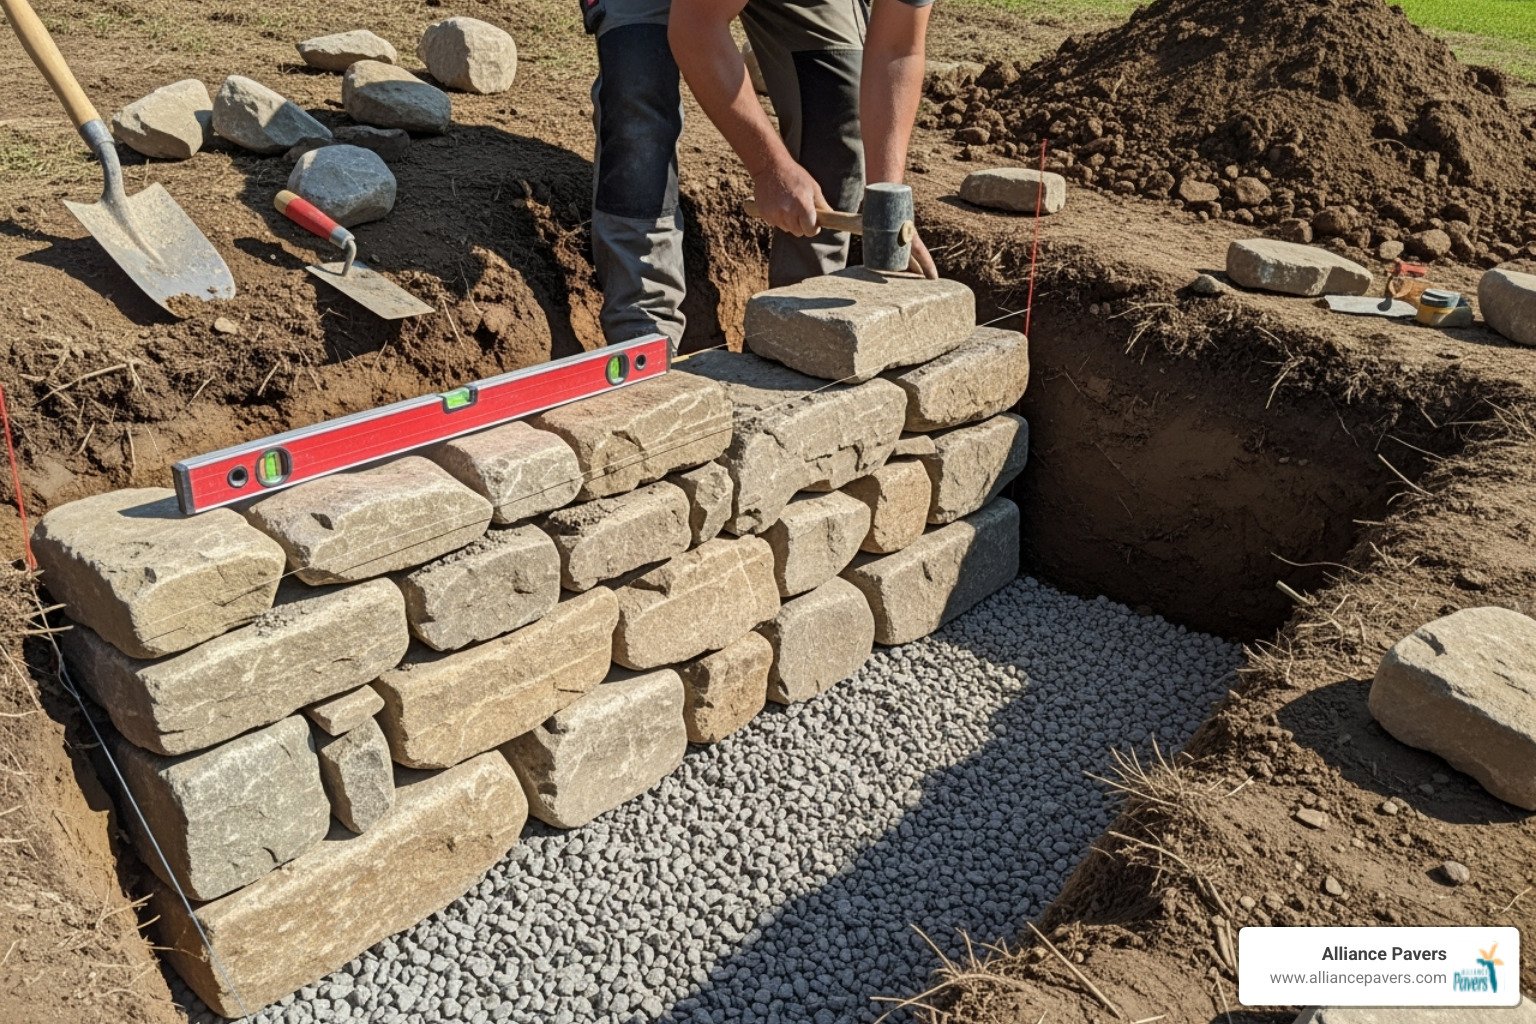
Step 1: Excavate a Level Trench for the Base
This is the most critical step. A strong wall requires a strong foundation, which means a properly excavated trench.
- Trench Depth: For our base course, we'll want a trench deep enough to bury at least half the height of our first stones, plus about 4-6 inches for the compacted gravel base. So, if our first stones are 8 inches tall, we're looking at a trench roughly 8-10 inches deep. Stone Center suggests carving out a trench about a foot deep to give enough room for the drainage rock and the initial anchoring blocks.
- Trench Width: The trench should be about twice the width of the stone we're using for the base. For example, if our base stones are 10 inches wide, the trench should be around 20 inches wide. This provides ample space for the stone and the crucial backfill material.
- Stepping the Trench Down the Slope: Since we're working on a slope, our trench won't be one continuous level line. We'll need to create "steps" in the trench. Each step should be perfectly level horizontally. The transition between steps needs to be smooth and stable, ensuring that the higher section of the trench flows into the lower section without creating weak points. This ensures the top of our finished wall will appear level, or follow a gentle, intentional grade.
- Undisturbed Soil: Wherever possible, we want to dig into undisturbed soil. This provides the most stable foundation for our wall. If we're working with a "cut and fill" scenario, the cut side will naturally have undisturbed soil behind it.
Step 2: Prepare the Foundation with Compacted Gravel
With the trench excavated, it's time to create the sub-base that will support the wall and facilitate drainage.
- Crushed Stone Base: We'll fill the bottom of our trench with 4-6 inches of crushed stone (often called paver base or drainage gravel). This layer serves multiple purposes: it provides a stable, uniform surface for the first course of stones, and it allows water to drain away from the wall's base, preventing hydrostatic pressure buildup.
- Compacting in Layers: Don't just dump all the gravel in at once! We'll add the crushed stone in 2-inch layers, compacting each layer thoroughly with a hand tamper or a plate compactor. This eliminates air pockets and creates a dense, stable foundation. For a dry-stacked wall, Fine Gardening suggests a trench depth of about 4 inches and width of at least 2 feet, with the base course being solid and tightly fitted.
- Leveling the Base: After compaction, we'll use our 4-foot level to ensure the gravel base is perfectly level, both lengthwise and front-to-back, within each stepped section of the trench. This meticulous leveling now will prevent a lot of frustration later. Mother Earth News offers additional insights on Building a Stone Retaining Wall – Mother Earth News.
Step 3: Laying the Base Course for Maximum Stability
The first course of stones anchors the wall. Its stability dictates the stability of everything above it.
- Largest Stones First: We'll select the largest, most durable, and flattest stones for this foundational layer. These heavyweights will provide the necessary mass and footprint.
- Burying Half the First Course: To ensure maximum stability and prevent undermining, we'll bury approximately half the height of our first course of stones into the compacted gravel base and surrounding soil. This acts as a "toe" for the wall.
- Leveling Each Stone: As we place each stone, we'll use our torpedo level to ensure it's level front-to-back and side-to-side. We'll also check that it's level with the adjacent stones. We can make small adjustments by adding or removing a bit of gravel or tapping the stone with a rubber mallet.
- Tightly Fitting Stones: The goal is to minimize gaps between stones. The tighter the fit, the more stable the wall. For dry-stacked walls, Fine Gardening emphasizes that the base course must be solid and tightly fitted. We'll shovel dirt behind the stones and tamp it into any spaces, as this acts as "mortar" for stability.
Step 4: Stacking Subsequent Courses and Achieving Batter
This is where our wall starts to take shape! Stacking requires a keen eye and a bit of artistry.
- Staggering Joints: Never stack stones directly on top of each other with vertical joints. This creates weak points. Instead, we'll "stagger" our joints, meaning each stone in a new course should bridge the seam of the two stones below it. Think of it like bricklaying.
- Overlapping Seams: As we lay each subsequent course, the stones should slightly overlap the seams from the course below. This interlocking pattern distributes weight and pressure evenly, enhancing the wall's structural integrity.
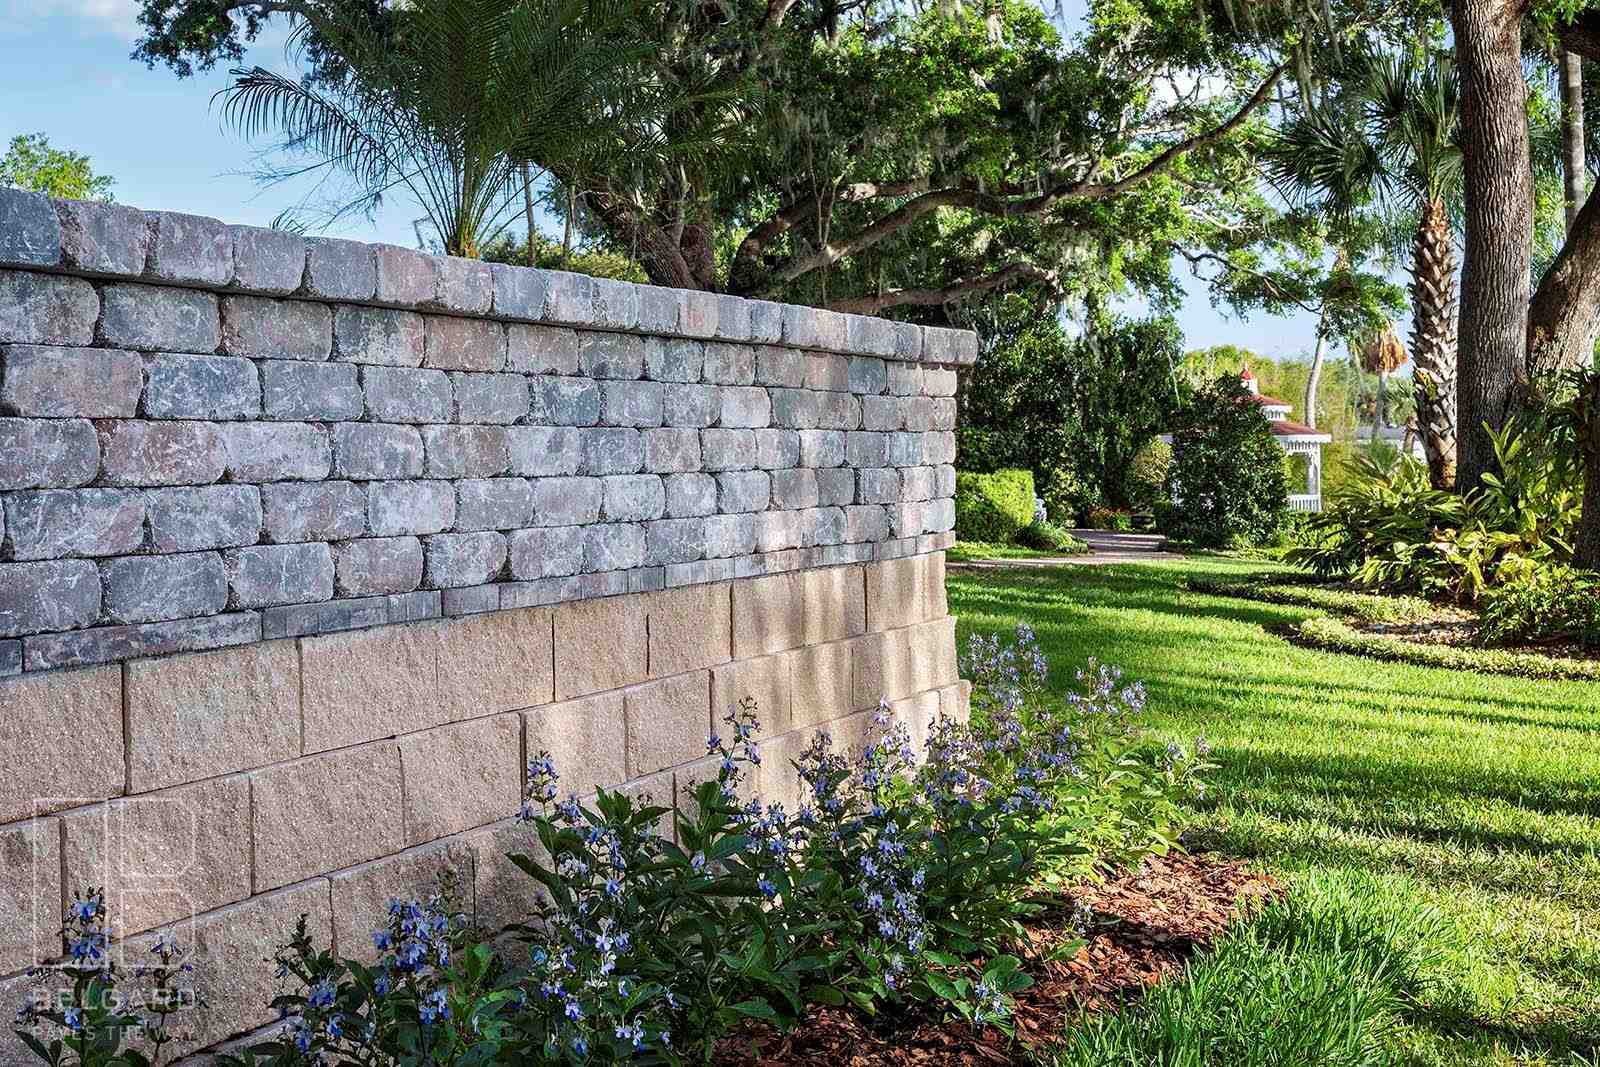
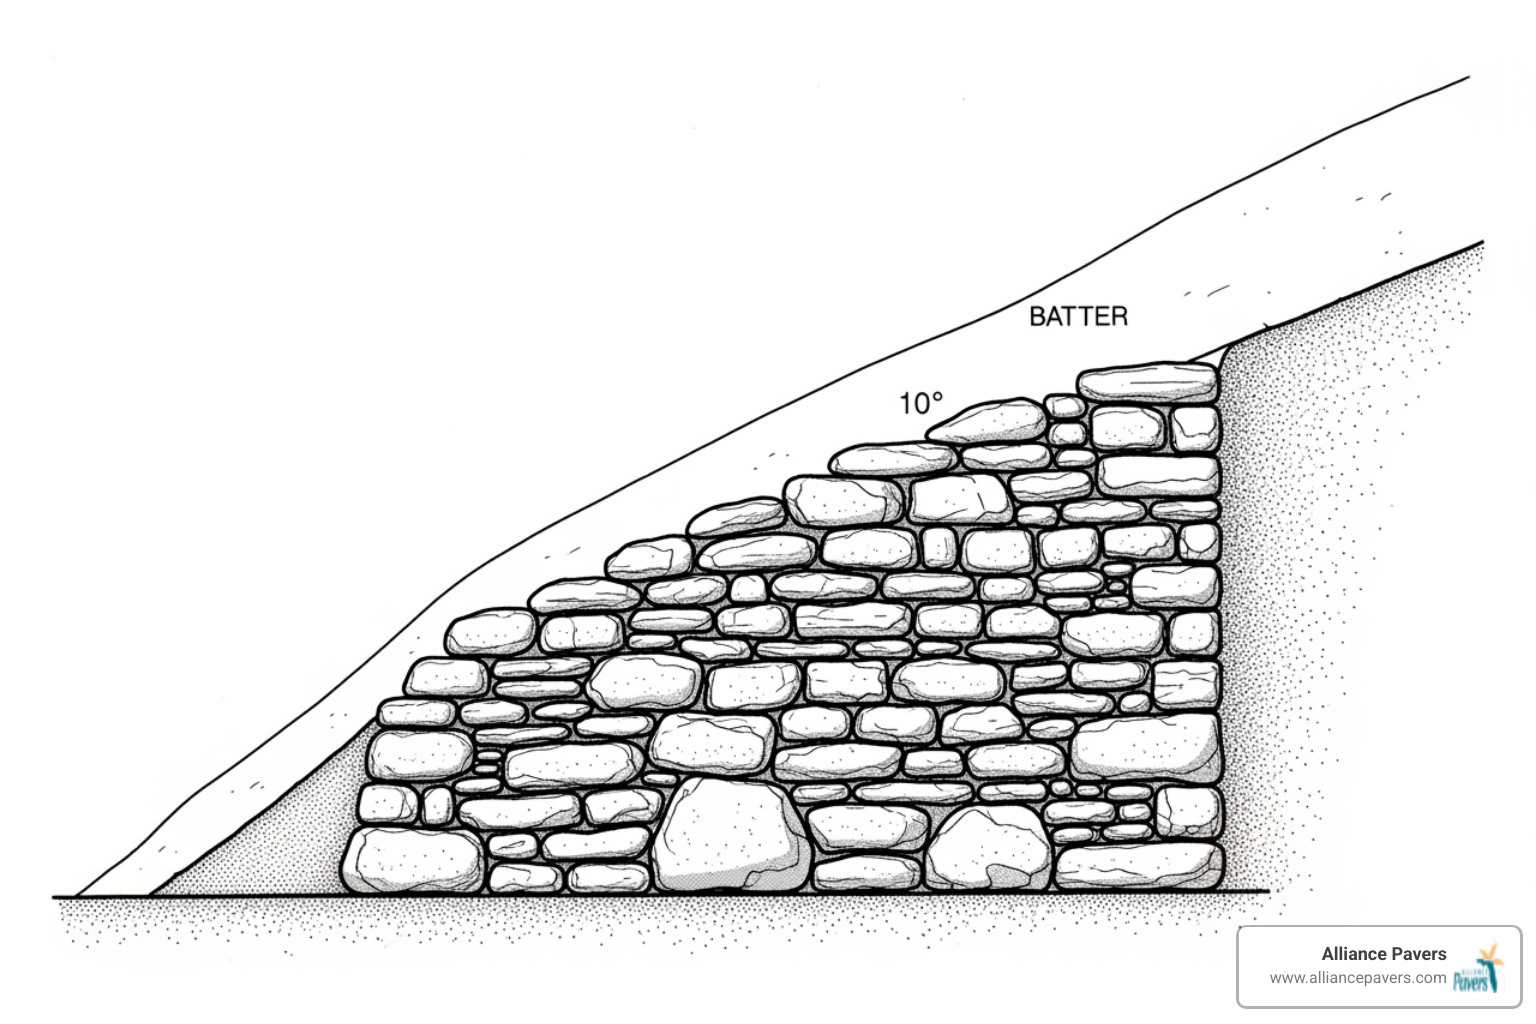
- Batter (Backward Lean): This is crucial for a retaining wall, especially on a slope. All retaining walls should lean into the hill, or "batter," by about 1 inch for every 12 inches of height. This backward lean helps the wall resist the enormous pressure of the soil behind it. We can achieve this by setting each successive layer back slightly from the front line (about a thumb's width or 1/2 inch per course).
- Through-Stones for Strength: For added stability, especially in taller walls, we'll periodically incorporate "through-stones." These are long stones that run the full depth of the wall, anchoring the front face to the backfill and integrating the wall with the slope itself. For irregular stones, we can place a large rock behind a face rock every 3 feet or so.
Step 5: How to implement drainage for a retaining wall on a slope
Water is the retaining wall's biggest enemy. Without proper drainage, hydrostatic pressure can build up behind the wall, leading to bulging, cracking, and eventual failure. This is why drainage is paramount.
- Hydrostatic Pressure: When soil behind a wall gets saturated with water, it becomes significantly heavier and exerts immense pressure. This "hydrostatic pressure" is a primary cause of retaining wall failure.
- Perforated Drain Pipe: We'll install a 4-inch perforated PVC drain pipe (often called a French drain) behind the first course of stones, at the very base of the wall. This pipe collects water that seeps through the soil. The pipe should be laid with a slight slope (1 inch for every 4 feet) to direct water away from the wall, ideally daylighting it at an open end of the wall or connecting it to a storm drain.
- Gravel Backfill: Surrounding our drain pipe and filling the space directly behind the wall (at least 8-12 inches thick, or more for taller walls) will be clean, crushed gravel. This gravel is highly permeable, allowing water to quickly drain down to the perforated pipe. We'll fill this in as we build each course of stones, compacting it in layers.
- Landscape Fabric: To prevent soil and sediment from clogging our gravel and drain pipe, we'll line the back of our excavated trench and wrap it over the gravel backfill with a heavy-duty landscape fabric. This acts as a filter, letting water through but keeping fine soil particles out. Learn more about effective Drainage Solutions for Commercial Hardscaping.
Step 6: Backfilling and Finishing with Capstones
With our wall built, drainage installed, and batter achieved, it’s time for the final touches that make our wall both functional and beautiful.
- Backfilling in Layers: As we built each course of stones, we should have been backfilling with gravel behind the wall. Now, for the final layers, we'll continue this process, using the excavated soil (or a mix of soil and gravel) to fill the remaining space behind the wall, up to about 6-12 inches from the top. We'll compact this backfill thoroughly in small layers to prevent future settling.
- Tamping Soil Firmly: Each layer of backfill needs to be tamped down firmly. This minimizes voids and ensures the soil behind the wall provides solid support, preventing movement and settling.
- Selecting Capstones: The capstones are the crowning glory of our wall. We'll choose the most aesthetically pleasing, flat, and often larger stones for this top course. These stones should ideally overhang the front of the wall by 1 to 1 1/2 inches to create a finished look and shed water away from the wall face.
- Securing Top Course: For dry-stacked walls, well-selected, heavy, and tightly fitted capstones are often enough. However, for added security, especially in areas with seismic activity or where the wall might be sat upon, we can use a construction adhesive specifically designed for masonry to secure the capstones to the course below. We’ll ensure surfaces are clean and dry before applying. If using mortar for the main wall, the capstones would be mortared in place.
Frequently Asked Questions about Building Stone Retaining Walls
After years of helping homeowners tackle their slope challenges, we've heard just about every question you can imagine about how to build a stone retaining wall on a slope. Let's explore the most common concerns that come up during planning.
How high can I build a DIY stone retaining wall?
This is hands-down the most important safety question we get, and for good reason. The simple answer? Keep it under 4 feet for DIY projects, and honestly, we'd feel more comfortable recommending 3 feet as your upper limit.
Here's the thing - every foot of height dramatically increases the forces your wall has to handle. That soil behind a 4-foot wall weighs a lot more than you might think, especially when it gets saturated during Florida's rainy season.
Local building codes in Central Florida communities like St. Cloud, Winter Park, and Orlando typically require permits and engineered plans for walls over 30 to 36 inches. These aren't just bureaucratic problems - they're there because load-bearing considerations become serious business at those heights.
When should you consult an engineer? If you're planning anything over 4 feet, dealing with particularly steep slopes, or building near your home's foundation, it's time to call in the pros. The peace of mind alone is worth it, and you'll sleep better knowing your wall won't become a very expensive pile of rocks after the next big storm.
What is the most important part of building a retaining wall on a slope?
Without hesitation, it's the foundation and drainage working together as a team. We've seen too many beautiful walls fail because someone skipped corners on these two critical elements.
Your solid foundation - that carefully excavated, stepped trench with its compacted gravel base - is what keeps everything from shifting and settling. Think of it as the roots of a tree. No matter how gorgeous the trunk and branches are, weak roots mean the whole thing's coming down eventually.
But proper drainage is equally crucial. Poor drainage causes more retaining wall failures than anything else we see. When water builds up behind your wall, the hydrostatic pressure is like having an invisible giant constantly pushing against your beautiful stonework.
The combination of your level base course, compaction at every step, perforated drain pipe, and gravel backfill creates a system that manages both weight and water. These factors prevent wall failure from the two biggest threats: shifting foundations and water pressure buildup.
Do I need a permit to build a retaining wall?
The short answer is: probably yes, and definitely check first! This varies so much by location that we always tell folks to make that phone call before buying their first stone.
Local regulations change from city to city, even here in Central Florida. What's allowed in Heathrow might be completely different from the rules in Windermere or Lake Nona. Permit requirements for wall height typically kick in around 30 to 48 inches, but don't assume anything.
Don't forget about HOA rules either! Your homeowners association might have their own aesthetic guidelines or approval processes that go beyond city permits. We've seen projects delayed because someone forgot to check with the HOA first.
Checking with your municipality is crucial before starting any excavation work. A quick phone call to your local building department can save you from having to tear down a finished wall that doesn't meet code. Trust us - we've seen it happen, and it's heartbreaking for everyone involved.
Conclusion: Enjoy Your New Landscape or Call the Pros
You did it! Standing back and looking at your completed stone retaining wall, you've got every right to feel proud. How to build a stone retaining wall on a slope isn't just about moving rocks around - it's about engineering, problem-solving, and creating something beautiful that'll last for decades.
That sloped yard that used to wash away every storm season? Now it's a series of gorgeous terraces ready for your dream garden beds or maybe even a cozy patio area. The soil stays put, water drains properly, and your property value just got a serious boost.
But let's be honest - this project isn't for everyone. Maybe you started reading through all these steps and realized you'd rather spend your weekends doing literally anything else. Or perhaps you're looking at a wall over 4 feet high, dealing with steep slopes that make you nervous, or working with poor soil conditions that seem beyond your comfort zone.
That's completely okay! Recognizing when a project needs professional expertise isn't giving up - it's being smart.
Some retaining wall projects require engineering calculations, specialized equipment, and years of experience reading slopes and soil conditions. When you're dealing with significant grade changes or walls that need to support heavy loads, the stakes are too high for trial and error.
For a stress-free experience with guaranteed results, the expert team at Alliance Pavers has the expertise to design and build a durable, beautiful stone retaining wall for your property. As a family-owned business with 25 years of experience in Central Florida's unique soil and weather conditions, we've seen every type of slope challenge imaginable.
Whether your project is straightforward or complex, we'll handle everything from permits to final cleanup, delivering that rock-solid solution on-time and on-budget. Sometimes the best DIY decision is knowing when to call the pros.
Get expert help with your stone retaining wall in St. Cloud, FL