Don't Let Your DIY Patio Become a Paving Disaster
Avoid common paver installation mistakes homeowners make. Learn DIY pitfalls, proper base, slope & compaction for a durable Florida patio.
Why So Many DIY Paver Projects Fail Before They Even Get Started
The common paver installation mistakes homeowners make can turn a dream patio into a costly, frustrating disaster — and most of them happen before a single paver is ever laid.
Here's a quick look at the most frequent errors:
- Skipping proper base preparation — the single biggest cause of sinking and shifting pavers
- Poor drainage planning — leads to water pooling, erosion, and foundation damage
- Missing or improperly installed edge restraints — causes pavers to spread and create tripping hazards
- Using regular sand instead of polymeric sand — results in weed growth and unstable joints
- Inadequate compaction — creates soft spots that collapse under weight over time
- Uneven excavation depth — causes surface dips, rocking pavers, and premature wear
- Ignoring paver blending across pallets — leads to patchy, inconsistent color across the surface
- Forgetting to seal — leaves pavers exposed to staining, fading, and weather damage
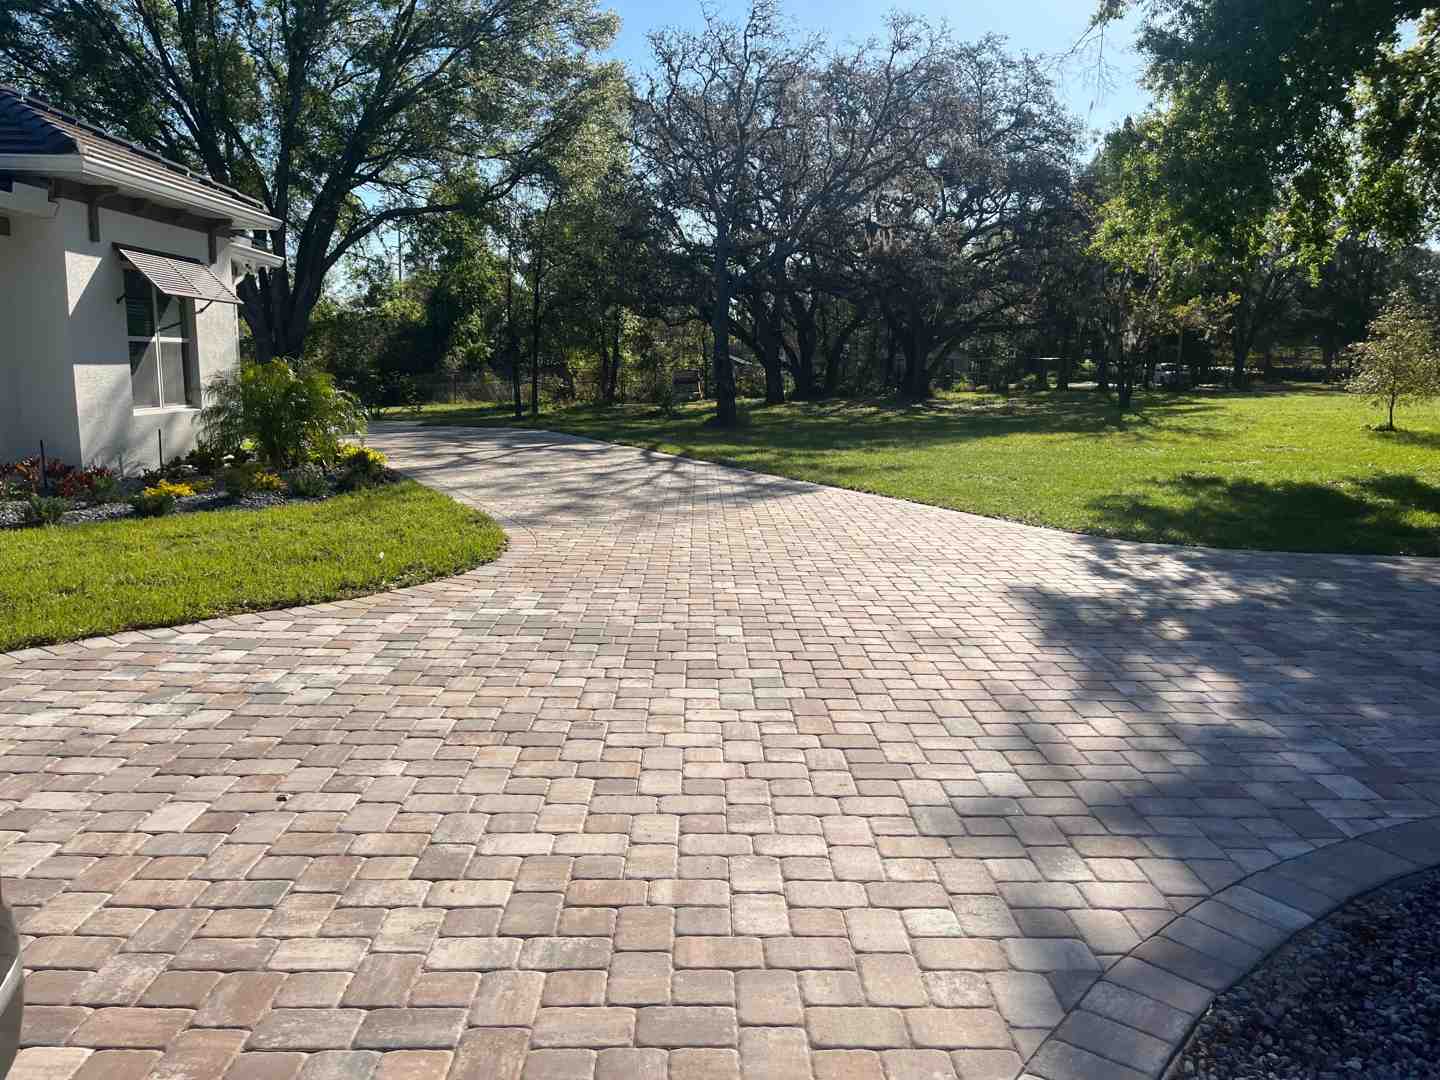
Pavers can completely transform a Central Florida outdoor space — a driveway, patio, or pool deck that looks polished and lasts for decades. But here's the hard truth: even high-quality pavers will fail if the installation underneath them is rushed or done wrong. Paver failures rarely come from the materials themselves. They almost always trace back to shortcuts taken during prep and installation.
In Florida, the stakes are even higher. Heavy seasonal rainfall, sandy or clay-heavy soil, and intense heat put extra stress on every layer of a paver system. A small error that might go unnoticed in a drier climate can become a sunken, flooded, or crumbling surface within a single rainy season.
This guide walks through the most common mistakes — and exactly how to avoid them.

The Foundation Fail: Why Base Preparation is the Most Common Paver Installation Mistake Homeowners Make
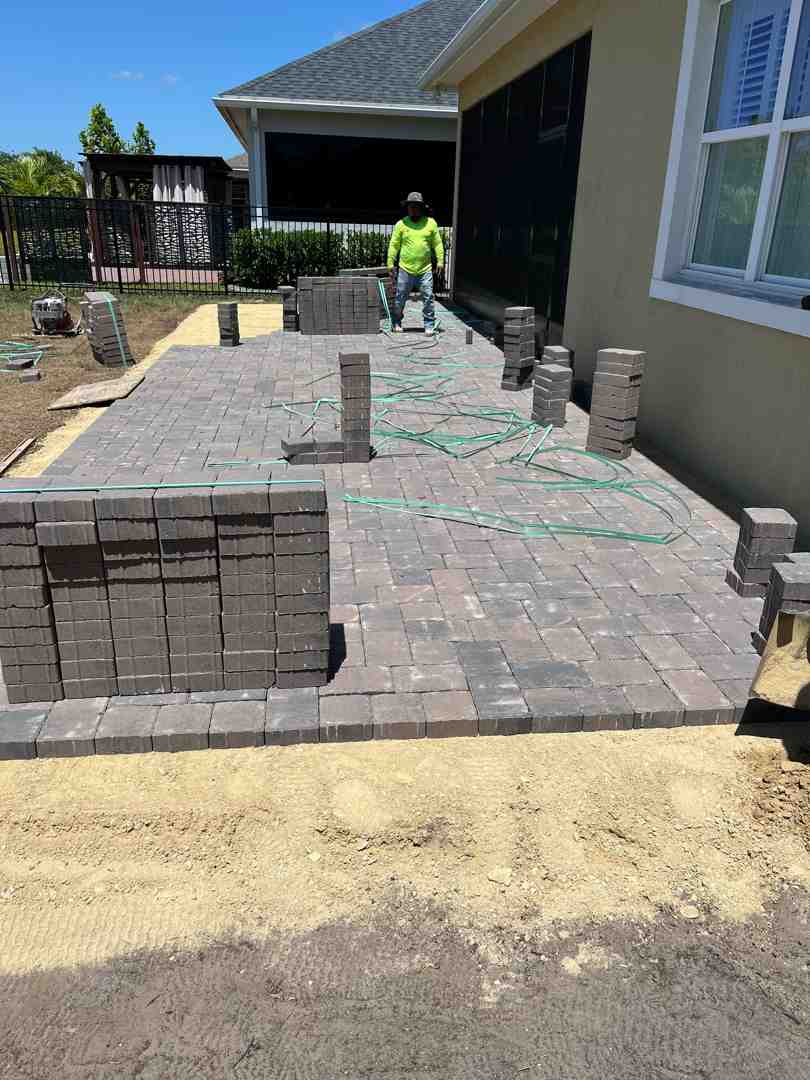
If there is one thing we have learned in our 25 years of experience at Alliance Pavers, it is that a paver project is only as good as what lies beneath it. The most common paver installation mistake homeowners make is treating the base as an afterthought. Many DIYers assume that if the ground looks flat, they can just throw some sand down and start laying stones. This is a recipe for a "rollercoaster" patio within six months.
Subsoil Compaction and the "Dirt" Myth
One of the biggest pitfalls is backfilling or leveling with plain old dirt. Research shows that loose dirt can shrink by as much as 30% over time. If you don't excavate deep enough to reach stable subsoil and then compact that subsoil with a mechanical plate compactor, your entire project is sitting on a sponge. In areas like St. Cloud or Orlando, our soil can vary from sugar sand to heavy clay. Clay, in particular, requires even deeper excavation because it holds moisture and expands, which can heave your pavers upward.
The Magic of Geotextile Fabric
We always recommend using geotextile fabric between the soil and your base material. Think of it as a structural "skin" for your yard. It prevents the heavy crushed stone from sinking into the soft Florida soil while still allowing water to drain through. Without it, your base material eventually migrates into the ground, leading to those unsightly dips and "birdbaths" in your patio.
Choosing the Right Base Material
Another error is using the wrong stone. You need a "well-graded" aggregate, like crushed concrete or a Class II road base. These materials contain a mix of different stone sizes that lock together when compacted. If you use smooth river pebbles or pea gravel, they will just roll around under the pavers like ball bearings.
For homeowners looking to upgrade their curb appeal, proper base preparation for driveways is even more critical because of the immense weight of vehicles.
| Project Type | Recommended Excavation Depth | Compacted Base Thickness |
|---|---|---|
| Pedestrian Patio/Walkway | 7 – 9 inches | 4 – 6 inches |
| Residential Driveway | 12 – 15 inches | 8 – 10 inches |
| Pool Deck | 8 – 10 inches | 6 inches |
Ignoring the Incline: How to Avoid Drainage and Slope Errors
Water is the ultimate enemy of hardscaping. In Central Florida, where afternoon thunderstorms can drop inches of rain in minutes, poor drainage isn't just a nuisance—it's a threat to your home's foundation.
The 2% Rule
A flat patio is actually a failing patio. Every paver surface must have a slight pitch to guide water away from your house and toward a proper drainage area. The industry standard is a minimum slope of 2%, which translates to a 1/4-inch drop for every foot of length. If you are building a 10-foot patio, the far edge should be 2.5 inches lower than the edge touching the house.
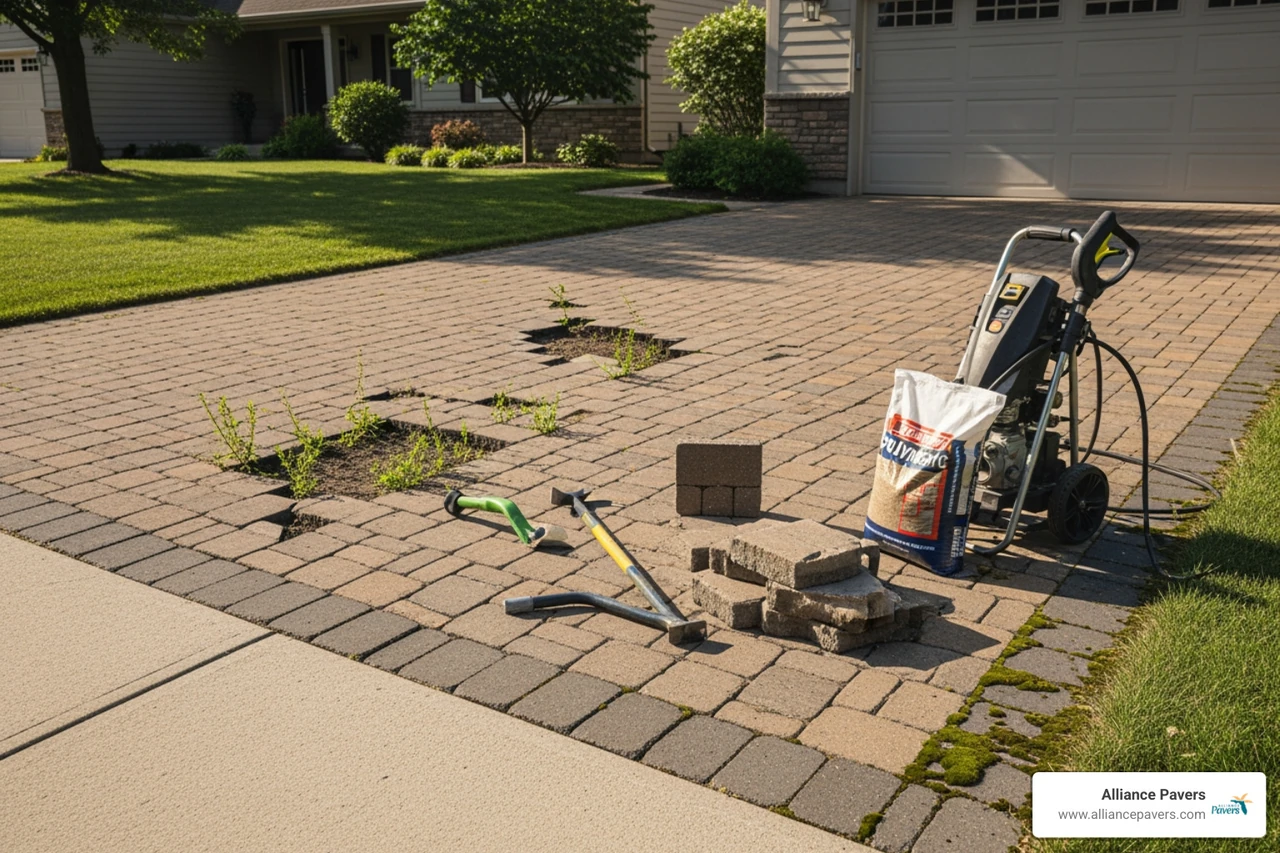
Signs of Poor Drainage
If you've already finished a project and are worried, look for these "red flags":
- Standing water that remains for more than 24 hours after rain.
- A white, powdery substance on the pavers (efflorescence) caused by constant moisture.
- Moss or algae growth in the joints.
- Erosion or "washouts" at the edges of the paver stones.
To ensure your outdoor living space remains dry and functional, check out our expert patio design and installation services. We use laser levels to ensure the grade is perfect before the first stone is set.
Common Paver Installation Mistakes Homeowners Make with Edge Restraints
Imagine your pavers are like a puzzle. If there's nothing holding the edges, the pieces will naturally slide apart as you walk or drive on them. This "lateral shifting" is a classic DIY blunder.
We see many homeowners try to "toe-in" the edges with a thin strip of concrete or, worse, just pack dirt against the side. This will fail. You need professional-grade edge restraints—usually heavy-duty plastic or aluminum—secured with 10-inch steel spikes driven every 12 inches. If your patio has a raised edge or sits against a slope, properly engineered retaining walls are often necessary to provide the perimeter stability the project requires.
Avoiding Aesthetic Common Paver Installation Mistakes Homeowners Make
Even if your base is perfect, your patio can still look "off" if you don't pay attention to the details.
Pallet Blending: Pavers are made in batches, and colors can vary slightly from one pallet to the next. A common mistake is using one entire pallet before opening the next. This creates "blocks" of slightly different shades on your patio. The pro trick? Pull pavers from three different pallets simultaneously to blend the colors naturally.
Joint Spacing: Don't butt pavers tight against each other. They need a tiny gap (usually 1/8 inch) to allow for sand and minor settling. If they touch, they can chip as they expand in the Florida heat. This is especially important for pool deck installations, where temperature fluctuations are extreme.
The Sand Trap: Getting the Bedding and Joint Layers Right
The sand you see on top isn't the only sand involved. There are actually two distinct layers, and getting them mixed up is a common paver installation mistake homeowners make.
The Bedding Layer
This is a 1-inch layer of coarse, washed sand that sits on top of your compacted stone base. Its only job is to provide a smooth "bed" for the pavers to sit in. A frequent error is making this layer too thick (over 1.5 inches). If the bedding sand is too deep, the pavers will shift and "float" rather than staying locked in place.
Why Polymeric Sand is Non-Negotiable
When it comes to filling the joints, regular play sand or beach sand won't cut it. We exclusively use polymeric sand. This is a high-tech mix of sand and special additives that hardens into a flexible "glue" when activated with water.
- Weed Prevention: It creates a barrier that makes it nearly impossible for weeds to take root.
- Ant Protection: It stops ants from mining the sand out from under your pavers.
- Stability: It locks the pavers together, preventing them from wobbling or shifting.
For more details on the materials that make a project last, visit our main paver services page.
Skipping the Final Step: Compaction and Sealing for Longevity
You've laid the pavers and swept in the sand. You're done, right? Not quite. Skipping the final compaction is a major error.
Mechanical Compaction
Once the pavers are down and the sand is in the joints, you must run a plate compactor over the surface. This "vibrates" the pavers into the bedding sand and settles the joint sand deep into the gaps. Pro tip: Always use a protective rubber mat on the bottom of the compactor to avoid scuffing or cracking your beautiful new stones.
Sealing: The Sunscreen for Your Stones
In April 2026, as we look at the intense Florida sun, sealing is more important than ever. Sealing does three things: it protects against UV fading, prevents oil and food stains (essential for outdoor kitchens), and helps stabilize the joint sand even further. We generally recommend waiting 60 to 90 days for the pavers to "breathe" out any natural minerals (efflorescence) before applying the first coat of sealer.
Frequently Asked Questions about Paver Installation
What is the most common paver installation mistake homeowners make?
The most frequent error is inadequate base preparation. Whether it's not digging deep enough, skipping mechanical compaction, or using the wrong type of stone, a weak foundation is the root cause of 90% of paver failures.
How deep should the base be for a Florida patio?
For a standard pedestrian patio in Central Florida, you should excavate about 7 to 9 inches. This allows for 4 to 6 inches of compacted stone base, 1 inch of bedding sand, and the thickness of the paver itself (usually about 2 3/8 inches).
When is the best time to seal new pavers?
While you can seal them as soon as they are dry and clean, we recommend waiting about 2-3 months. This allows the pavers to go through a natural "weathering" process that ensures the sealer bonds perfectly to the surface without trapping minerals underneath.
Conclusion
Installing a paver patio is a rewarding way to enhance your home, but as we've seen, the common paver installation mistakes homeowners make can quickly turn a weekend project into a multi-thousand-dollar repair job. From the depth of the base to the type of sand in the joints, every detail matters for long-term durability.
At Alliance Pavers, we’ve spent a quarter-century perfecting the art of hardscaping in St. Cloud, Kissimmee, and across the Orlando area. We understand the unique challenges of Florida’s soil and climate, and we pride ourselves on delivering "stress-free, on-time, and on-budget" results. If the thought of excavating 10 tons of dirt and operating a heavy plate compactor feels like a bit much for your weekend, we are here to help.
Ready to stop worrying about DIY disasters and start enjoying your backyard? Transform your outdoor space with professional paver installation and let us build you a foundation that lasts a lifetime.