Garden Wall Goals: How to Build a Dry Stacked Slate Masterpiece
Create a timeless dry stacked slate garden wall with our expert DIY guide. Learn planning, building steps, and care for lasting beauty.
Why a Slate Garden Wall is Worth Building
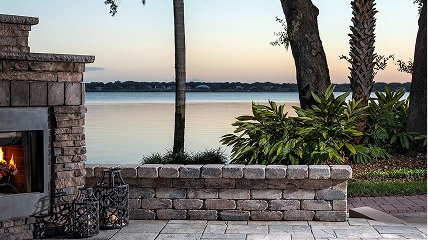
A slate garden wall combines natural beauty with lasting durability, making it one of the most rewarding DIY landscaping projects you can tackle. Whether you're looking to add structure to your garden, create a stunning focal point, or manage sloping ground, slate offers a timeless solution that requires minimal maintenance once installed.
Quick Answer: Building a Slate Garden Wall
- Choose your wall type - Freestanding walls work on flat ground for dividing spaces; retaining walls need footings for slopes and structural support
- Select your slate - Natural slate comes in various sizes (small, medium, large) and styles (dry stack, mosaic flagstone, cladding slips)
- Prepare the foundation - Excavate and create a compacted gravel base for stability
- Stack the stones - Place deepest stones at the bottom, break vertical joints, and stagger seams
- Add coping stones - Top the wall to prevent water penetration and frost damage
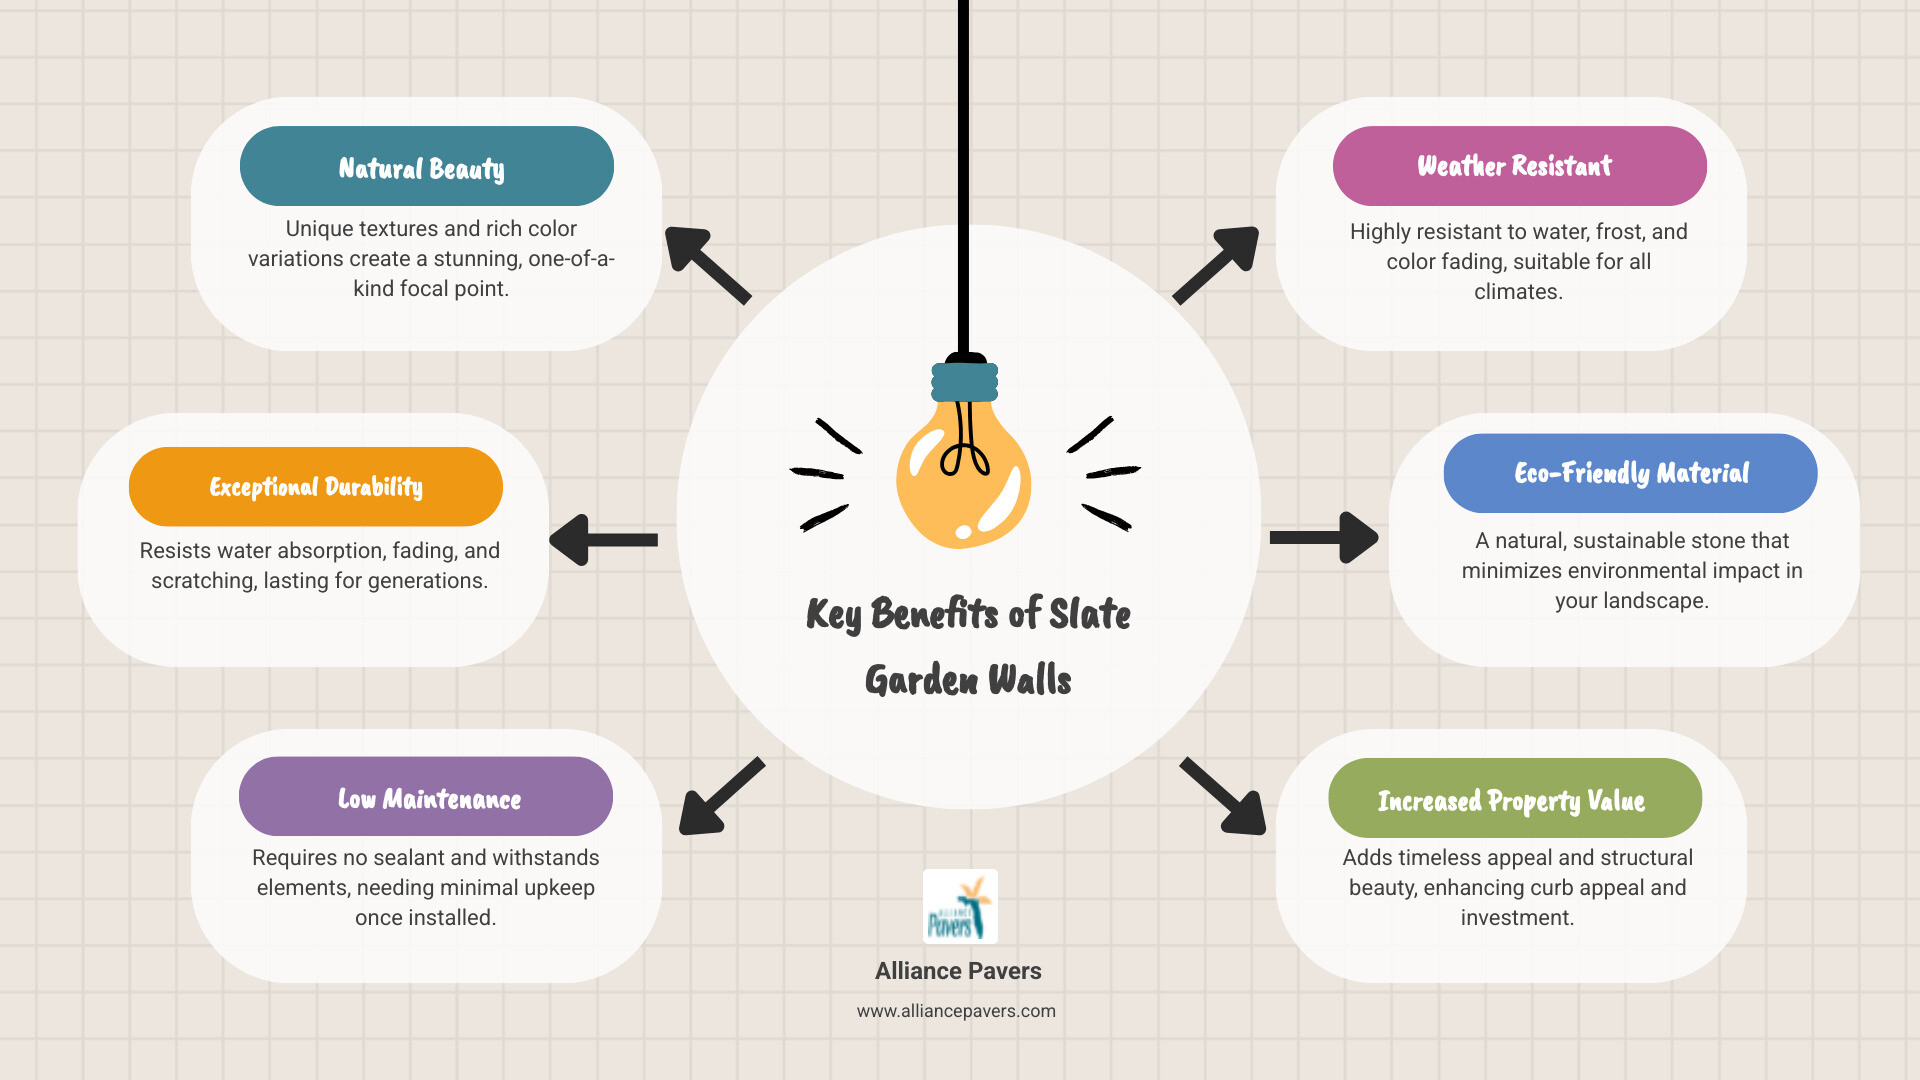
Used for centuries in rural landscapes, natural slate is incredibly durable. It resists water absorption, color fading, and scratching better than many alternatives, requires no sealant, and can last for generations with little maintenance. The material's unique textures and rich color variations mean every wall is one-of-a-kind.
This guide walks you through building a dry stacked slate garden wall from start to finish. We'll cover everything from planning and material selection to laying techniques and finishing touches. Whether you're creating raised beds, a decorative garden feature, or a functional retaining wall, you'll learn the professional methods that ensure your project stands the test of time.
Why Choose Slate for Your Garden Wall?
After decades in the hardscaping business, we've found that slate consistently delivers a combination of beauty and performance that's hard to beat. When you're planning a slate garden wall, you're not just adding a functional structure—you're creating a feature that will age gracefully and require remarkably little maintenance over the years.
Beyond aesthetics, slate offers environmental benefits as a natural material free of manufactured chemicals. A well-built slate garden wall also typically increases property value by adding curb appeal and functional outdoor living space. Our hardscaping services often incorporate slate walls for exactly these reasons—they're investments that pay dividends in beauty and durability.
The Best Beauty and Character of Natural Stone
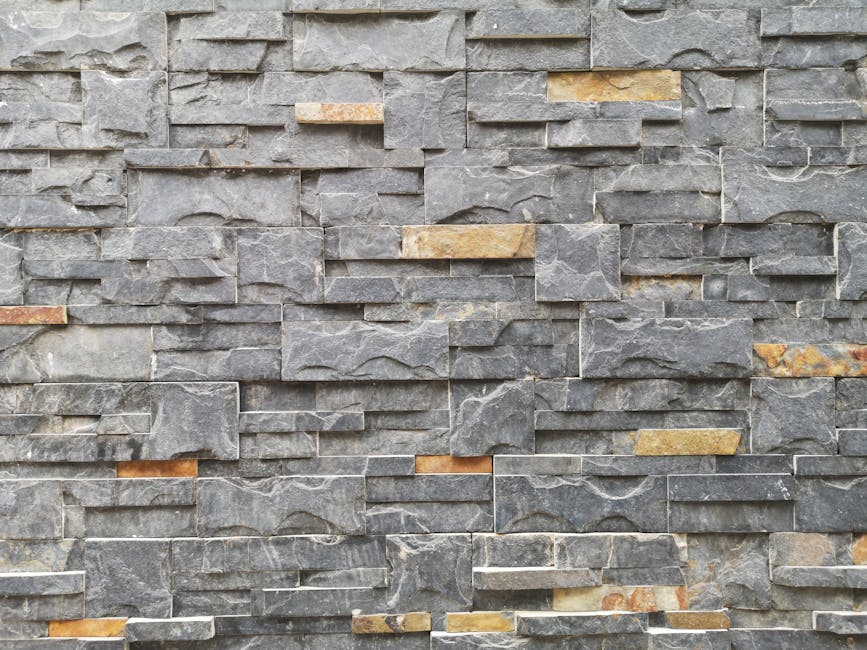
What makes slate genuinely exciting is that no two pieces are identical. Each stone has its own unique textures, natural clefts, and color variations that range from deep charcoal and slate gray to rich greens, warm browns, and even subtle purples. When you stack these stones, you're creating a completely one-of-a-kind wall.
The natural variations catch light differently throughout the day, making your wall a living part of the garden. This timeless appeal ensures slate looks stunning today and will continue to impress for decades. The organic nature of slate also means it naturally improves landscape contours. Whether on a flat garden bed or a sloping yard, slate walls feel like they belong, adding structure without overwhelming the plantings. For inspiration, see how slate can transform outdoor spaces in these examples of stone walls in gardens.
Whether you're going for a rustic or contemporary design, slate adapts beautifully. This flexibility, combined with its natural character, makes slate a top recommendation for garden walls.
Durability and Low Maintenance
Once your slate garden wall is built, it's refreshingly low-maintenance. Unlike many outdoor materials, slate requires no annual sealing, treatments, or special cleaners. It simply stands strong against the elements.
Slate's durability comes from its dense, layered composition, making it highly resistant to water absorption. This is crucial outdoors, as it prevents a cascade of problems like salt buildup, limescale deposits, and frost damage. When water in porous materials freezes and expands, it causes cracks; slate's resistance prevents this cycle.
The stone also resists color fading remarkably well, so its rich, natural hues will last for years. Slate doesn't bleach in the sun and is naturally resistant to scratching and wear, maintaining its appearance even in high-traffic areas.
This combination of weather resistance and longevity makes slate an exceptionally smart choice. Our experience with stone installation has taught us to appreciate materials that perform reliably over decades, and slate consistently tops that list. Build your slate garden wall right, and it will take care of itself for years to come.
Planning Your Project: From Concept to Foundation
Before you pick up your first piece of slate, a little time spent planning will save you countless headaches later. Every beautiful slate garden wall starts with a clear vision and careful preparation.

First, define your wall's purpose. Are you creating a simple garden divider, a raised planter bed, or a retaining wall to tame a slope? The answer shapes everything that follows, from the foundation you'll need to the slate you'll choose.
Next, assess your site. Is the ground level or sloped? How is the drainage? Are there obstacles like tree roots or utility lines? We always recommend checking with your local utility company before digging to avoid hitting a water or electrical line.
Once you have a plan, calculate how much slate you'll need. Here's a pro tip: always order at least 10% more material than your calculations suggest. Some stones will break or not fit, and having extra gives you the luxury of being selective, preventing the frustration of running short.
Freestanding vs. Retaining Walls
Understanding whether you need a freestanding or retaining wall is crucial, as they are built differently.
Freestanding walls are simpler and work on flat ground where they don't hold back soil. They create visual separation, add height to your landscape, and can even provide seating. A freestanding slate garden wall might outline a patio or create a backdrop for flower beds. Because they aren't retaining soil, they need a less substantial foundation—typically a well-compacted gravel base is sufficient.
Retaining walls, on the other hand, are structural. They hold back soil, prevent erosion, and make sloped areas usable. If your property has significant grade changes, a retaining wall is likely what you need. These walls require robust footings and proper engineering to handle soil pressure. Depending on the wall's height and soil type, you might need geogrid reinforcement, which can support up to six feet of soil.
Foundation requirements differ significantly. While a freestanding wall rests on a simpler base, retaining walls demand deeper footings to resist soil pressure. Proper backfilling and drainage are also critical for retaining walls to prevent water pressure from compromising the structure. We've seen how effective they can be for preventing soil erosion with retaining walls and turning challenging terrain into functional spaces.
Choosing the Right Style for Your Slate Garden Wall
The style you choose for your slate garden wall sets the tone for your garden. Natural slate comes in several forms:
Dry stack wall stone is a traditional approach using irregular slate pieces stacked without mortar for a rustic look. Mosaic flagstone and dry stack options let you create completely customized designs, making each wall a unique puzzle of natural stone.
For a bolder statement, large decorative slabs make a dramatic impact. These substantial pieces of slate work well for retaining walls where you want a strong architectural presence.
Slate cladding slips are thinner pieces applied to an existing structural wall, giving you the look of slate with less bulk. They are low-maintenance, resistant to water, fading, and scratching, and typically don't need sealant.
If natural slate isn't feasible, slate-effect walling products are a stunning alternative. These manufactured blocks mimic slate's appearance but offer predictable sizing for easier installation. They're versatile enough for retaining walls, raised beds, and more.
Size also matters. Small slate bricks work well in tight spaces. Medium-sized pieces are versatile and stable. Large bricks bring a solid, robust appearance perfect for outdoor retaining walls.
Finally, consider color. Natural slate ranges from deep charcoals to rich greens, browns, and purples. The right color can tie your wall into your home's exterior or contrast with plantings. Our experience with outdoor living spaces shows that choosing materials that complement your overall design creates the most satisfying results.
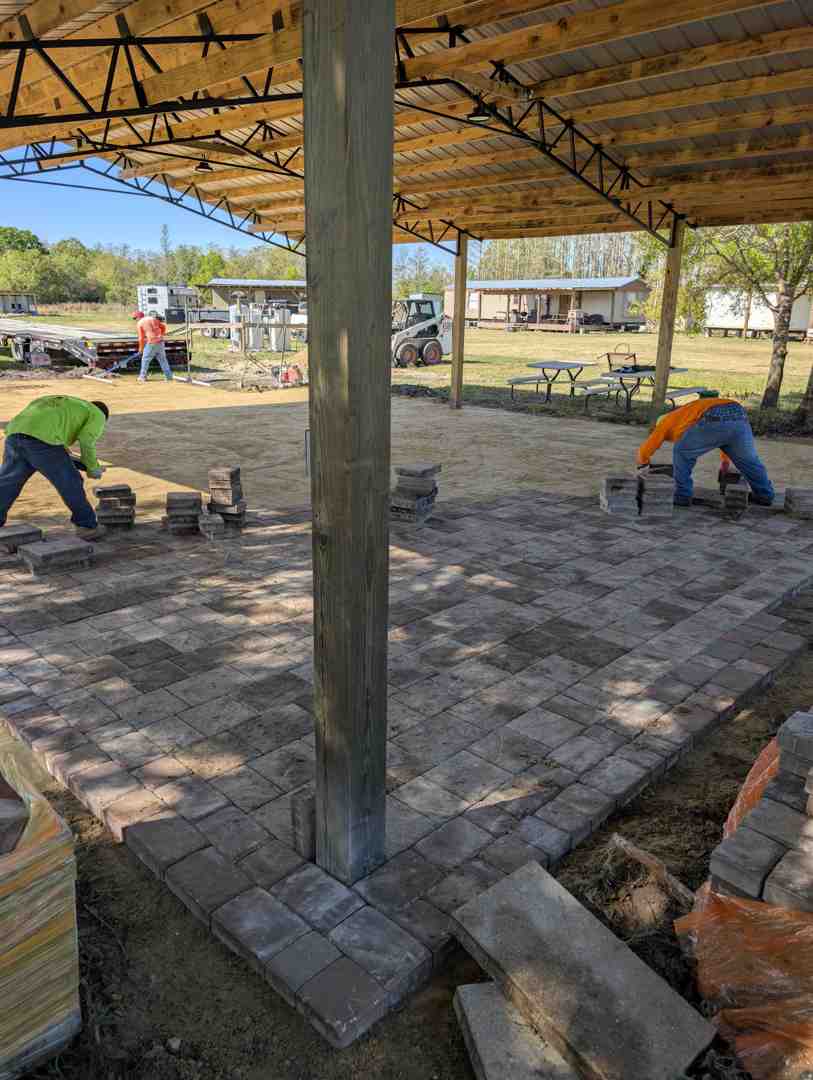
How to Build Your Dry Stacked Slate Garden Wall: A Step-by-Step Guide
Building a dry stacked slate garden wall is a project that rewards patience with lasting beauty. While it takes physical effort and attention to detail, the sense of accomplishment is special, and it's an achievable project for a dedicated DIYer.
Before starting, prioritize safety. Always wear sturdy gloves, safety glasses, and solid work boots. You'll need basic tools: a shovel, wheelbarrow, tamper or plate compactor, a level, string line, measuring tape, and a rubber mallet. For cutting stones, an angle grinder with a diamond blade is essential.

Step 1: Preparation and Foundation
A beautiful wall starts with a solid foundation. Rushing this step will lead to future repairs, so it's crucial to do it right the first time.
Start by clearing your work area of all grass, plants, and debris. Dig a trench that's wider than your widest stone. For a typical dry-stacked wall, dig deep enough for a good gravel base plus having the first course of stones sit partially below ground for stability. Retaining walls require an even deeper and wider trench for proper footings.
Fill the trench with crushed gravel—like ¾" Crusher Run. For gravity walls up to 24 inches tall, plan on at least 6 to 8 inches of compacted gravel; taller retaining walls need more. The key is compaction. Use a hand tamper or rent a plate compactor to compact the gravel in layers until it's firm and level. This creates the stable, well-draining foundation your wall needs.
Once your base is solid and level, set up a string line between stakes as a guide for straightness and height. Lay out your slate stones nearby and sort them by depth, reserving the deepest and broadest pieces for the bottom courses. This is when you'll appreciate having 10% extra material to choose from.
Step 2: Laying the Slate
Laying the slate is like putting together a three-dimensional puzzle that you create as you go.
Start your first course with your deepest stones, laying each piece with its broadest side down for maximum stability. As you position each stone, angle it slightly so the face slopes downward toward the outside of the wall to help water run off.
The most important technique in dry stacking is breaking vertical joints. Like bricks in a wall, each stone should bridge the joint between two stones below it. Never stack stones so their vertical edges line up from one course to the next. This interlocking pattern gives a dry-stacked wall its strength.
Similarly, avoid long horizontal lines where stones are the same height. After every three to five stones, vary the height and length of the pieces you choose. This creates a natural appearance and improves structural integrity.
Your goal is the tightest possible fit between stones. Test different pieces until you find the perfect one, then gently tap it into place with a rubber mallet. If a stone doesn't quite fit, use your angle grinder to cut it or score it for breaking. For more insights on working with natural stone, a guide to natural building stone is a valuable resource.
Check your work constantly with a level, both horizontally and vertically. For a retaining wall, backfill behind each course with drainage gravel as you go to prevent hydrostatic pressure buildup.
Step 3: Finishing with Coping Stones
Don't skip this final step. Coping stones are the protective cap that keeps your slate garden wall beautiful and structurally sound.
Coping prevents water from penetrating the top of your wall, which can cause salt buildup and serious frost damage in winter when freezing water expands and cracks stones. Proper coping acts like an umbrella for your wall.
Choose coping stones that complement your wall and overhang slightly on both sides to direct water away from the face. You'll likely need to cut some pieces to fit using your angle grinder.
While the wall is dry-stacked, coping stones should be secured with a strong, exterior-grade adhesive. This prevents them from being knocked loose. Apply adhesive to both the top course of your wall and the underside of each coping stone for a maximum hold.
Finally, ensure your coping stones have a slight slope to allow water to run off freely. Get this detail right, and your wall will shed water beautifully, staying dry and damage-free for years.
Creative Uses and Long-Term Care
Once your slate garden wall is complete, you'll find it's a surprisingly versatile structure. The elegance and durability of slate open up creative possibilities beyond a simple boundary wall. Best of all, you'll spend more time enjoying these features than maintaining them.
Decorative Ideas Beyond the Wall
The skills and materials from your wall project can transform your entire outdoor space.
Raised garden beds are a favorite application. A low slate wall creates defined planting areas that look stunning while improving drainage and making gardening easier.
For entertaining, consider integrated seating. Build your wall a bit wider and lower to create a sturdy, stylish bench that becomes a natural gathering spot.
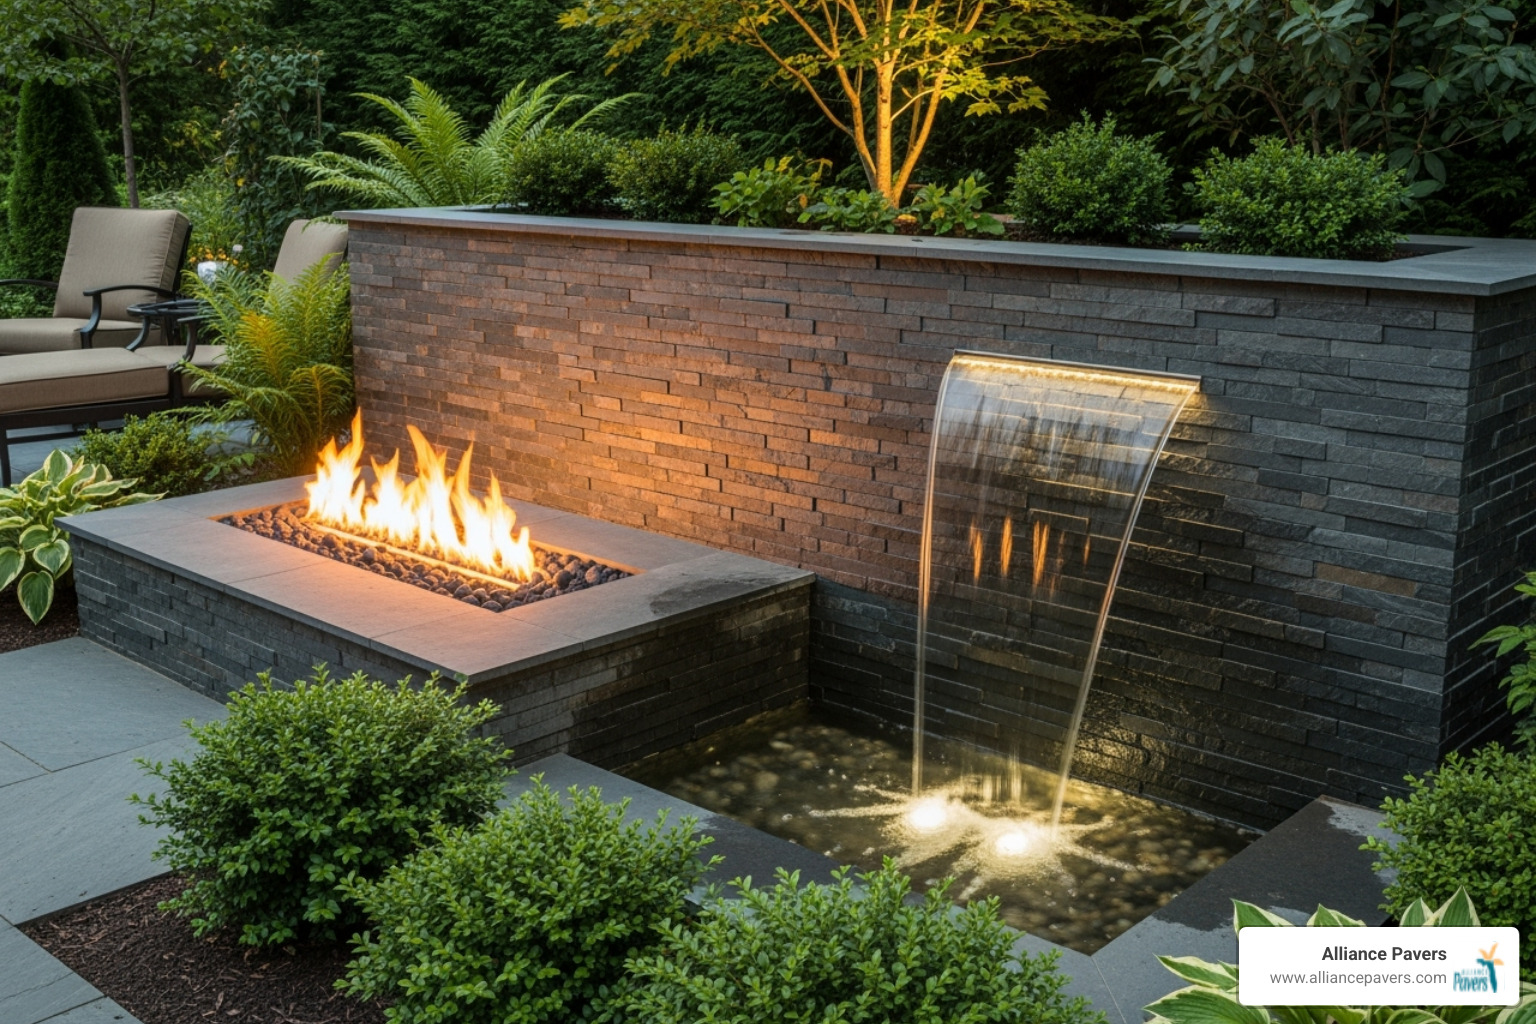
The heat-resistant properties of slate make it perfect for custom fire pits. The stone's earthy tones create an inviting atmosphere. We've helped many homeowners create custom fire pits that become the heart of their outdoor areas.
Water features and garden ponds take on a new dimension when edged with slate. The stone's natural appearance blends seamlessly with water, adding depth and interest.
Pillars and columns can mark garden entrances or add vertical interest, working as standalone features or as bookends to wall sections.
For the ultimate in outdoor living, slate can form the foundation of outdoor kitchens. The material's durability is ideal for constructing bases that withstand the elements. Our experience creating outdoor living spaces shows how slate can tie different elements into one cohesive design.
Long-Term Maintenance for Your Slate Garden Wall
Your slate garden wall shines when it comes to maintenance—it practically takes care of itself. Natural slate is genuinely low-maintenance, requiring little attention to remain beautiful for years.
That said, a little periodic attention is beneficial.
Periodic inspection is your first line of defense. A quick walk around your wall once or twice a year, especially after storms or freezes, helps you catch small issues. For retaining walls, watch for bulging or leaning, which could signal drainage issues.
Cleaning your wall is simple. A stiff brush and plain water usually work. For stubborn spots, use a mild, pH-neutral cleaner. Avoid harsh chemicals or high-pressure washers, which can cause damage.
Checking for shifts is important for dry-stacked walls. Minor settling is normal. If a stone has shifted, carefully reset it. This is why keeping a few extra stones is a good idea.
Managing vegetation requires a light touch. While a little moss adds character, plants growing in the joints can push stones apart. Gently remove any aggressive growth.
Finally, check your coping stones regularly. Ensure they're firmly in place and that water runs off properly.
With these simple steps, your slate garden wall will remain a source of pride for decades, improving your property's beauty and value.
Conclusion
There's something deeply satisfying about stepping back and admiring a slate garden wall you've built with your own hands. It's more than just stacked stones—it's a lasting addition to your property that combines natural beauty with real, practical value. Throughout this guide, we've walked through why slate is such an exceptional choice for garden walls, from its unique textures and rich colors to its remarkable ability to withstand weather, resist fading, and require almost no maintenance once it's in place.
We've covered the essential planning steps, helping you understand the difference between freestanding decorative walls and structural retaining walls that manage slopes and prevent erosion. We explored the various styles of slate available—from rustic dry stack to sleek cladding slips—and walked through each construction step, from digging that crucial foundation to carefully placing each stone and finishing with protective coping.
The beauty of a well-built slate garden wall extends beyond its immediate function. It becomes a versatile design element in your landscape, offering opportunities for raised garden beds, integrated seating, custom fire pits, and water features. It's a timeless investment that adds architectural interest, defines spaces, and genuinely improves your outdoor living spaces.
While many homeowners successfully tackle dry-stacked walls as DIY projects, we recognize that some situations call for professional expertise. Complex retaining walls on steep slopes, tall structures requiring engineering calculations, or projects where you simply want the peace of mind that comes with experienced craftsmanship—these are all great reasons to bring in the pros.
At Alliance Pavers, we've spent 25 years helping homeowners throughout St. Cloud, Orlando, Kissimmee, Lakeland, and surrounding communities create beautiful, functional hardscaping features. Our family-owned company brings both technical knowledge and genuine care to every project, whether it's a slate garden wall, comprehensive hardscaping services, or stone installation. We're committed to exceptional craftsmanship and delivering projects on time and on budget—no surprises, no stress.
If you're ready to transform your landscape with the enduring beauty of natural stone, we'd love to help you bring your vision to life. Contact our expert Stone Retaining Wall contractors today! Whether you're looking for guidance on your DIY project or prefer to have professionals handle everything from start to finish, we're here to ensure your slate garden wall becomes a source of pride for years to come.