Build a Retaining Wall Like a Pro: Step-by-Step Instructions
Learn how to build a retaining wall step-by-step. Get expert tips on planning, foundation, drainage, and finishing for a durable, beautiful wall.
Why a Well-Built Retaining Wall Transforms Your Outdoor Space
How to build a retaining wall requires careful planning, proper drainage, and a solid foundation. Here's what you need to know:
The Essential Steps:
- Call 811 to locate underground utilities before digging
- Dig a level trench at least 6 inches deep plus 1 inch for every foot of wall height
- Install a compacted gravel base (minimum 6 inches) for drainage and stability
- Lay the first course below ground level, ensuring it's perfectly level
- Stack additional courses with offset seams (at least 1/4 block length)
- Add drainage behind the wall using gravel and perforated pipe
- Backfill in 8-inch layers, compacting thoroughly between layers
- Install capstones with construction adhesive for a finished look
If you're a Central Florida homeowner dealing with a sloped yard, soil erosion, or dreaming of terraced garden beds, a retaining wall solves real problems. These structures prevent soil from washing away during heavy rains, create usable flat spaces on hillsides, and can significantly boost your property's curb appeal and value. According to landscape professionals, properly designed retaining walls can even achieve a 105% value recovery when homes are sold.
But here's the reality: around 30% of retaining walls fail within just a few years. The difference between a wall that lasts decades and one that fails comes down to understanding what happens behind and below the structure. Water pressure, soil weight (over 100 pounds per cubic foot), and improper compaction are the silent enemies of retaining walls. Getting the foundation right, managing drainage effectively, and following proven construction techniques are non-negotiable.
For expert guidance on outdoor projects, explore our comprehensive hardscaping services. When you're ready to start your project with professional support, request a free consultation.

Step 1: Planning, Preparation, and Materials
Before we even think about moving dirt, meticulous planning, site assessment, and material selection are paramount. This initial phase sets the stage for a successful and long-lasting retaining wall.
Before You Dig: Codes, Utilities, and Permits
One of the most critical steps before starting any outdoor project is to ensure safety and compliance. We always emphasize checking local regulations and utility lines.
First and foremost, always call 811 a few days before you plan to dig. This free service helps locate underground utility lines such as water, sewer, gas, and electrical. Striking one of these lines can lead to serious injury, costly repairs, and service interruptions. In Central Florida, this is especially important as our communities are growing, and utility infrastructure is extensive.
Beyond safety, we need to consider local building codes and any homeowner association (HOA) restrictions. While many low-level retaining walls (typically under 3 or 4 feet high) might not require a permit, this varies significantly by municipality, even within our service areas like St. Cloud, Orlando, or Lakeland. For walls exceeding 4 feet in height, it's almost always necessary to obtain a building permit, and often, professional engineering plans are required. Walls of this size deal with substantial soil pressure, and their design needs to be robust to prevent failure. Ignoring these regulations can lead to fines, forced removal, or even structural issues down the line. It's always best to check with your local planning department to understand the specific requirements for your project.
Choosing Your Materials and Tools
The right materials and tools make all the difference in achieving a professional-looking and durable retaining wall. Here's what we typically recommend:
Essential Tools:
- Shovel: For excavating the trench and moving soil.
- Tape Measure: For accurate measurements of length, width, and depth.
- Wooden Stakes and String Line: To mark the wall's layout and ensure straight lines.
- Line Level or Laser Level: Crucial for ensuring every course is perfectly level.
- Hand Tamper or Plate Compactor: For compacting the trench base and backfill. A walk-behind plate compactor is ideal for larger projects.
- Rubber Mallet or Dead Blow Hammer: For making minor adjustments to blocks.
- Brick Chisel and Hammer, Circular Saw, or Masonry Saw: For cutting blocks to fit.
- Wheelbarrow: For transporting materials.
- Gloves, Safety Glasses, Dust Mask, and Steel-Toe Boots: Essential personal protective equipment (PPE) for safety.
Material Types:
- Interlocking Segmental Retaining Wall (SRW) Blocks: These are highly recommended for DIY projects, especially for walls under 4 feet. They are designed to be dry-stacked without mortar, relying on their weight and interlocking features (like raised lips or pins) for stability. Their flexibility allows them to move slightly with ground conditions, reducing the risk of cracking compared to traditional mortared walls.
- Paver Base or Wall Rock: This is a clean, granular material (like crushed gravel) used for the trench foundation and as drainage fill behind the blocks. It provides a stable, compacted base and excellent drainage. We recommend a minimum of 6 inches for the base trench.
- Drainage Pipe: A perforated corrugated pipe, often with a fabric sleeve, is essential for directing water away from behind the wall.
- Landscape Fabric (Filter Fabric): Used to prevent soil from migrating into the drainage gravel and clogging the system.
- Construction Adhesive: A strong, weather-resistant adhesive is used to secure capstones to the top course, preventing them from shifting.
- Infill or Approved On-Site Soils: For backfilling behind the drainage layer.
- Organic Soils: For the top course, especially if you plan on planting.
When purchasing materials, a good rule of thumb is to buy about 10 percent more than your estimated need. This accounts for any cuts, errors, or future replacements.
Assessing Your Site and Soil
Understanding your site's conditions and soil type is crucial for a successful retaining wall.
Soil Types:
- Sandy Soils: These drain easily, which is good for drainage but can be less stable.
- Clay Soils: Common in many parts of Central Florida, clay soils retain water, which can create significant hydrostatic pressure behind a wall and make root growth difficult if planting. These soils drain poorly, making proper drainage systems even more critical.
- Organic Soils: These are ideal for garden beds and plants but should never be used as backfill directly behind the wall, as they break down and can lead to settling and drainage issues.
The moisture content of the soil directly affects its stability and the pressure it exerts. Saturated soil weighs more and exerts significantly more pressure than dry soil, making drainage a top priority. We recommend building your wall after a long period without rain when the soil is dry.
We also need to assess the slope. A retaining wall should never run parallel to a slope without proper engineering. If you have a significant grade change, creating stepped sections in the wall design can ensure the top of the wall remains level and aesthetically pleasing.
For complex sites, very tall walls (over 4 feet), or areas with particularly challenging soil conditions (like expansive clays or very wet areas), we strongly recommend consulting a professional engineer. They can provide specific design recommendations, including reinforcement needs, to ensure the wall's long-term stability and compliance with local codes.
Step 2: How to Build a Retaining Wall Foundation
The foundation is the unsung hero of any retaining wall. A solid, level base is absolutely critical; any imperfections here will only be magnified as we build higher. This is where we truly begin to build a retaining wall that will stand the test of time.
Digging the Trench
Proper excavation is the first physical step. We start by marking the wall's layout accurately. Use wooden stakes and a string line to outline the exact path of your retaining wall. If the wall is longer than 8 feet, we'll drive additional stakes in the middle to keep the line taut and accurate. A line level or laser level helps ensure your string line is perfectly horizontal, especially if your wall will incorporate steps. You can also use spray paint to clearly mark the trench outline.
Next, we dig the trench. The depth and width of this trench are vital for the wall's stability.
- For walls under 4 feet (1.2 m) tall, we dig the base trench approximately 18 inches (460 mm) wide and 4 inches (100 mm) deep. We then add additional depth to account for burying the first course of blocks.
- For walls over 4 feet (1.2 m) tall, the trench needs to be wider and deeper: about 24 inches (600 mm) wide and 6 inches (150 mm) deep, plus an additional 1 inch (25 mm) for each 1 foot (300 mm) of total wall height. This extra depth ensures enough buried block for gravity walls.
Generally, the trench should be deep enough to bury at least half the height of your first course of blocks, plus 3 inches for the paver base. For walls taller than 3 feet, burying an entire block is often recommended for maximum stability. The width should be at least slightly wider than your blocks, or ideally, twice the width of a single block. This provides ample space for the base material and drainage. As we excavate, we remove all surface vegetation and organic materials from the trench area, as these materials decompose and can compromise the foundation.
Creating a Solid, Level Base
Once the trench is dug, we focus on establishing an unyielding base. First, we tamp down the excavated soil at the bottom of the trench. If we encounter unsuitable foundation soils, such as heavy clay or overly wet areas common in Central Florida, we replace them with compacted granular material, laid in lifts of no more than 8 inches (200 mm).
Next, we add our base material. We place a minimum of 6 inches (150 mm) of wall rock (crushed gravel or paver base) into the trench. This material is critical for drainage and providing a stable foundation. We then rake it smooth and compact it thoroughly using a hand tamper or a walk-behind plate compactor. We make a minimum of two passes with the compactor to ensure maximum density.
After compaction, we carefully check the entire length of the base for levelness, both lengthwise and front-to-back. This is a crucial step; even minor deviations here will cause significant problems as the wall gets taller. We make any necessary adjustments by adding or removing small amounts of base material, ensuring a perfectly flat and level surface for the first course of blocks.
Laying the Critical First Course
Laying the first course of blocks correctly is arguably the most important step in the entire process. It sets the tone for the entire wall, and any errors here will compound as we build upwards. As the saying goes, "As the base goes, so goes the wall."
We always start laying the first course at the lowest elevation of our trench. If using blocks with a raised lip (like some segmental retaining wall blocks), we place them with the lip facing up and forward on the compacted base material.
For each block, we carefully check for levelness using a level, both from side-to-side and front-to-back. We adjust any blocks that are not perfectly level by tapping them gently with a rubber mallet or dead blow hammer. For slight adjustments, we might place up to 0.5 inches (13 mm) of coarse sand under a block. The goal is to ensure every block in this first course is perfectly level and aligned.
Once the first course is laid and leveled, we fill the space in front of the blocks with on-site soils. This helps prevent the blocks from shifting during subsequent construction and provides additional stability. With the first course successfully in place, we've established a strong foundation for the rest of our retaining wall.
Step 3: Building Up, Draining, and Backfilling
With the foundation set, we move on to building the wall's height, implementing crucial drainage, and properly backfilling to ensure long-term stability. This phase is where the wall truly takes shape, becoming a robust barrier against soil pressure and water.
Stacking and Aligning Additional Courses
As we add subsequent courses, maintaining levelness and alignment is key. We stack the next course of blocks so that the vertical seams are offset from the blocks below by at least 1/4 the length of the block. This staggering technique, much like bricklaying, distributes weight and improves the wall's structural integrity. Often, we'll start the second course with a half-cut block to ensure this offset pattern. Many modern segmental retaining wall blocks have interlocking lips or pins that automatically create a slight "setback" or "batter," leaning the wall slightly into the retained soil, which increases stability.
Before laying each new block, we brush off any excess material from the top surface of the blocks below. This ensures a clean, solid contact between courses. We continuously check each block for level and alignment, both side-to-side and front-to-back. Minor adjustments can still be made with a rubber mallet.
How to build a retaining wall with proper drainage
Proper drainage is non-negotiable for a long-lasting retaining wall. Without it, water can accumulate behind the wall, creating immense hydrostatic pressure that can cause leaning, bulging, or even catastrophic failure. This is especially true in Central Florida, where heavy rains are common.
To create an effective drainage zone, we fill the hollow cores of the blocks and the area immediately behind the blocks (typically 12 inches or 300 mm) with wall rock or clean gravel. This permeable material allows water to flow freely.
For any reinforced wall, gravity walls over 4 feet (1.2 m) tall, or sites with poor natural drainage, a perforated drainage pipe is essential. We place this corrugated pipe at the lowest point towards the back of the trench, behind the first course of blocks. It's often easiest to install this pipe when only one or two courses of blocks have been laid. We cover the pipe with a drain sleeve to prevent it from clogging with fine soil particles. To ensure the water has somewhere to go, we make sure the drain pipe is vented to daylight every 50 feet (15 m), directing the water away from the wall and foundation. For gravity walls 3 feet or taller, we might also incorporate 2-inch weep holes spaced at a maximum of 10 feet along the base of the wall to provide additional drainage points.
It's crucial to avoid using plastic sheeting directly behind the wall, as this can trap water and exacerbate the very problem we're trying to solve.
Backfilling and Reinforcing for Strength
After laying each course and ensuring proper drainage material is in place, we proceed with backfilling. We use infill or approved on-site soils (never surface vegetation or organic materials) to backfill behind the wall rock. This is done in lifts, meaning we add soil in layers of no more than 8 inches (200 mm). After each lift, we thoroughly compact the backfill material. We start by compacting the wall rock directly behind the block, then move to compact the backfill in a path parallel to the wall, making at least two passes with a plate compactor. Proper compaction prevents future settling and provides stable support for the wall.
For taller walls (typically over 3-4 feet) or walls retaining significant slopes, geogrid reinforcement becomes necessary. Geogrid is a polymer mesh material that acts as a tieback, extending into the soil mass behind the wall to provide additional stability. When geogrid is required, we excavate behind the wall to accommodate its length. It's typically installed on the back of the wall on top of specific courses (often every other course, as per engineering plans). We roll out the geogrid, pull it taut, and stake it in place. Not all retaining wall blocks are compatible with geogrid; blocks with a mechanical pin system are usually required, as those with a simple lip on the back edge may not allow for proper geogrid placement. Geogrid essentially creates a "reinforced soil mass" that works with the wall to resist the immense pressure of the retained soil, significantly enhancing the wall's stability and longevity.
Step 4: Finishing Touches for a Lasting Wall
The final steps in building a retaining wall are all about aesthetics and protection. These finishing touches not only give the wall a professional appearance but also contribute to its long-term durability.
Cutting Blocks for a Perfect Fit
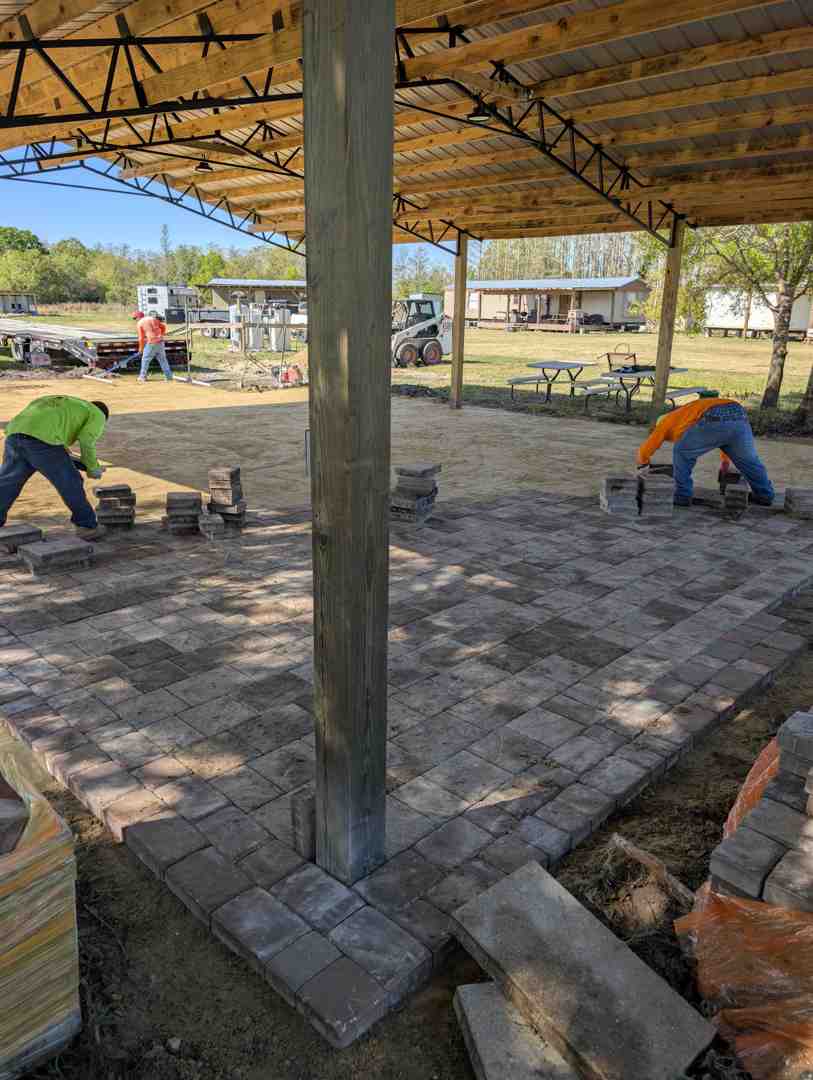
Inevitably, we'll need to cut blocks to fit specific lengths, especially for the ends of the wall or when creating curves or corners. For even-numbered courses, we often need to cut blocks in half to maintain the staggered joint pattern.
To cut blocks, we can use a hammer and masonry chisel to score a guideline around the block and then split it. For cleaner, more precise cuts, especially for curves or more intricate designs, we use a circular saw with a masonry blade or a specialized masonry saw.
Safety Precautions: When cutting blocks, safety is paramount. We always wear appropriate personal protective equipment, including:
- Protective Eyewear: To shield eyes from flying debris.
- Heavy-Duty Gloves: To protect hands.
- Steel-Toe Boots: To protect feet from falling blocks or tools.
- Respirator Mask: Masonry dust can be harmful if inhaled, so a mask is essential.
How to build a retaining wall with a professional finish
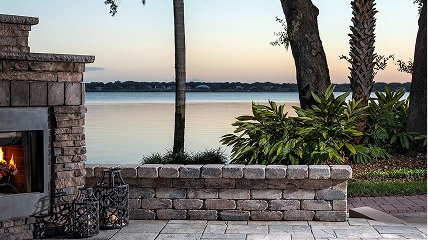
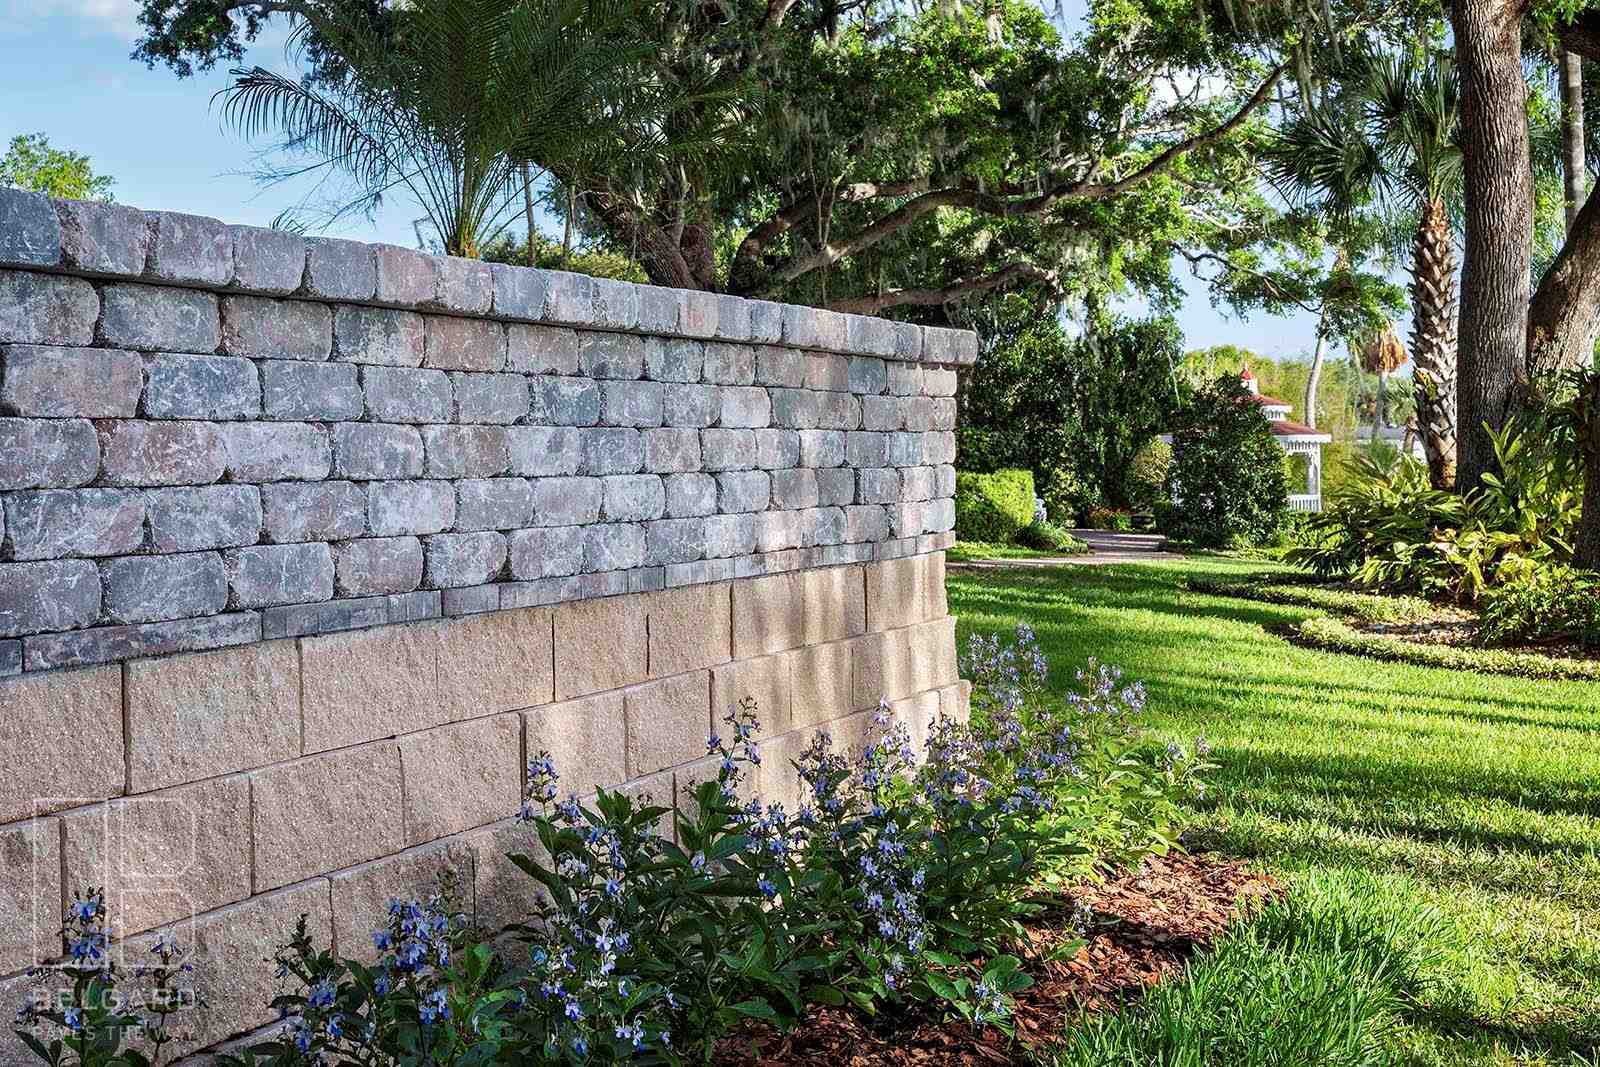
Once all the courses are laid and backfilled, it's time for the capstones. Capstones provide a clean, finished look to the top of the wall and protect the underlying blocks from weathering. Some retaining wall systems also offer the option of filling the hollow cores of the top course with organic soil for planting, which is a great way to integrate greenery directly into the wall.
We typically secure capstone blocks to the top layer of the retaining wall using a strong, exterior-grade construction adhesive. We apply a bead of adhesive to the top of the last course of standard blocks before carefully placing the capstones. For a polished look, we ensure the block caps overhang the retaining blocks by about 1 to 1 1/2 inches (25-38 mm).
After the capstones are in place and the adhesive has set, we perform a final cleanup, brushing off any debris or excess adhesive. Then, we replace any topsoil and sod in front of the wall, and consider accentuating the new wall with plants or other landscaping elements. This final step truly brings the entire project together, creating a beautiful and functional feature in your outdoor space.
Frequently Asked Questions about Retaining Wall Construction
Here, we address some of the most common questions we hear from homeowners considering a retaining wall project.
Why do retaining walls fail?
Retaining walls fail for several key reasons, most of which stem from improper construction or a misunderstanding of the forces at play. We've seen it in Central Florida. The primary culprits include:
- Improper Drainage: This is perhaps the biggest reason. Without adequate drainage, water builds up behind the wall, saturating the soil and creating immense hydrostatic pressure. This pressure can push, lean, bulge, or even topple the wall.
- Inadequate Base: A weak, unlevel, or poorly compacted foundation will lead to settling and shifting from day one. The wall literally has no stable ground to stand on.
- Lack of Reinforcement: For taller walls or those retaining significant slopes, the weight of the soil is simply too much for the blocks alone. Without geogrid or other engineered reinforcement, the wall lacks the tensile strength to resist the soil's outward pressure.
- Poor Compaction: If the backfill behind the wall isn't compacted in layers, it remains loose. This loose soil can erode, settle unevenly, and doesn't provide the stable mass needed to support the wall.
- Saturated Soil Pressure: As mentioned, wet soil is much heavier and exerts far more pressure than dry soil. Walls not designed to handle this increased load are prone to failure, particularly during our heavy rainy seasons.
How tall can I build a retaining wall without a permit?
This is a common and important question. Generally, in many municipalities, you can build a retaining wall up to 3 to 4 feet (about 0.9 to 1.2 meters) high without needing a permit or professional engineering plans. However, this is a general rule of thumb and it is absolutely crucial to check with your specific local building department in your Central Florida community (e.g., St. Cloud, Kissimmee, Lakeland, Orlando, etc.). Regulations can vary even between neighboring towns. For walls exceeding this height, or for any wall that will support a structure, carry a significant load, or is on a complex or unstable site, a permit and professional engineering consultation are almost always required. We always advise homeowners to err on the side of caution and verify local requirements before starting any construction.
What is the most important step in building a retaining wall?
While every step contributes to a successful retaining wall, we would argue that creating a solid, level, and compacted base (including the trench preparation and the first course of blocks) is the single most important step.
Think of it this way: the base is the foundation for everything that comes after.
- If the trench isn't deep enough, the wall won't be adequately buried and anchored.
- If the base material isn't properly compacted, it will settle unevenly over time, causing the wall to shift, lean, or crack.
- Most critically, if the first course of blocks isn't perfectly level and aligned, every subsequent course will amplify that error, resulting in a crooked, unstable, and ultimately failing wall.
Getting this initial phase right ensures that the entire structure has a stable footing, which is essential for resisting the forces of soil pressure and gravity for decades to come.
Conclusion
Building a retaining wall is a significant investment that can dramatically improve your outdoor living space. From preventing erosion and creating valuable usable areas to adding aesthetic appeal and increasing your home's value, the benefits of a well-built wall are undeniable. We've seen how a properly constructed retaining wall can transform a challenging landscape into a beautiful, functional masterpiece that lasts for 50 to 100+ years.
However, as we've discussed, the complexity of managing soil pressure, ensuring proper drainage, and creating a rock-solid foundation means that building a retaining wall is not a task to be taken lightly. While a DIY approach is feasible for smaller, low-level walls, the risks and potential consequences of improper construction – such as premature failure, costly repairs, or even safety hazards – are substantial, especially for taller or more complex designs.
For a guaranteed professional result, one that ensures longevity, stability, and compliance with all local codes, considering expert assistance is a wise decision. At Alliance Pavers, we are a family-owned, full-service hardscaping company with 25 years of experience serving Central Florida homeowners. We specialize in creating stunning and durable retaining walls, delivering exceptional craftsmanship and a stress-free, on-time, on-budget experience.
Ready to transform your yard with a retaining wall that stands the test of time? Build your dream retaining wall with us.