From Concept to Cozy: Your Guide to Fire Pit Installation
Learn fire pit installation step-by-step! Plan, build, and safely enjoy your perfect outdoor oasis with our expert guide.
Transform Your Backyard with the Perfect Fire Pit
Fire pit installation transforms your backyard into a cozy gathering spot. A well-designed fire pit adds warmth, ambiance, and value to your Central Florida home, perfect for roasting marshmallows or enjoying a quiet evening. The process involves careful planning, site preparation, building a stable foundation, and following safety guidelines to create a beautiful and functional outdoor feature.
Key Steps for Fire Pit Installation:
- Plan Your Location - Choose a spot at least 10 feet from structures, considering wind patterns and HOA guidelines
- Gather Materials - Collect pavers or retaining blocks, gravel, sand, fire bricks, and construction adhesive
- Prepare the Site - Excavate 6-12 inches deep and create a level, compacted base
- Build the Structure - Stack blocks in staggered layers, securing with adhesive
- Add Safety Features - Install a fire brick liner or steel ring for protection
- Allow Curing Time - Wait 48 hours before the first fire
Looking to improve your outdoor living space? Explore our guide on creating a cozy fire pit conversation area or learn about custom fire pits in Orlando, FL for professional installation services.
A successful fire pit project requires attention to detail, from understanding local codes to selecting heat-resistant materials that withstand our climate. This guide walks you through every step, helping you create a stunning outdoor feature that becomes the heart of your backyard gatherings.

Planning Your Perfect Fire Pit
A beautiful fire pit installation starts with smart planning. The right location, fuel, and dimensions are key to creating a backyard feature you'll love for years.
Safety is paramount. Position your fire pit at least 10 feet from your house, fences, and other flammable structures; 25 feet is ideal. Clear away any overhanging branches, dried leaves, or nearby shade structures. Also, observe your yard's wind patterns to avoid smoke blowing into your home or seating area. A small hedge or partition can help block drafts.
Check local regulations. Before building, review your local building codes and HOA guidelines. Rules on fire pit types, sizes, and placement vary across Central Florida, and a quick check can prevent future issues.
Plan your seating area with furniture placed 6 to 7 feet from the pit's edge for comfort and safety. For more ideas, explore our insights on positioning your fire pit for maximum enjoyment and the best fire pit designs for your backyard: inspiration and ideas.
Choosing Your Fuel Source
The fuel you choose shapes your fire pit's installation and overall experience. Here are your options:
Wood-burning: Delivers the classic campfire experience with crackling sounds, aroma, and intense heat. Cons include smoke, ash cleanup, storing firewood, and potential for stray embers.
Natural Gas: Offers ultimate convenience with a switch-operated, clean, and adjustable flame. Requires professional installation of a permanent gas line, and heat output is lower than wood.
Propane: Provides clean-burning convenience without a permanent gas line, allowing for portability. The trade-off is managing and hiding propane tanks, and heat is less intense than wood.
Ethanol: A simple, smoke-free, and odorless option using gel fuel canisters. Easy for DIY projects and great for ambiance, but produces minimal heat.
For a deeper dive into this decision, check out our guide on how to choose gas vs. wood-burning fire pits.
Selecting the Right Size and Dimensions
Proper dimensions ensure your fire pit is proportional and functional.
A typical fire pit is 3 to 4 feet across. An interior diameter of 36 to 44 inches is ideal for small groups, allowing everyone to feel the warmth.
Aim for a depth of about 1 foot. This is deep enough to contain the fire safely but shallow enough for a good view of the flames. For in-ground pits, this means excavating 6 to 12 inches.
Remember to account for the entire area, including seating placed 6 to 7 feet from the edge. Measure the space to visualize traffic flow and ensure it doesn't feel cramped. For more guidance, explore our resources on how to select the right size and shape for fire pit and tips for planning your fire pit seating arrangement.
Gathering Your Tools and Materials
A successful fire pit installation requires having the right tools and materials ready. This preparation prevents mid-project delays and ensures a smooth workflow.
Essential tools include a shovel, level, hand tamper, tape measure, caulk gun, work gloves, and safety glasses. A wheelbarrow and garden hose are also helpful for moving materials and compacting the base. A circular saw with a concrete blade may be needed for custom cuts.
Key materials include retaining wall blocks or pavers for the exterior, gravel or crushed rock for the sub-base, and sand for the bedding layer. For the interior, you'll need fire bricks or a steel ring/insert for heat protection, along with heat-resistant construction adhesive. Lava rock is recommended for the bottom of the pit for drainage and insulation.
Choosing Your Building Materials
The materials you choose for your fire pit affect its durability, safety, and appearance.
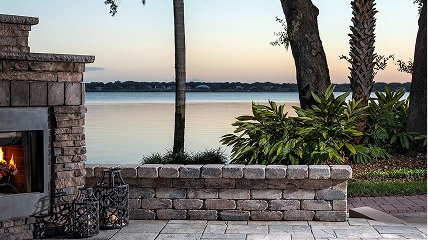
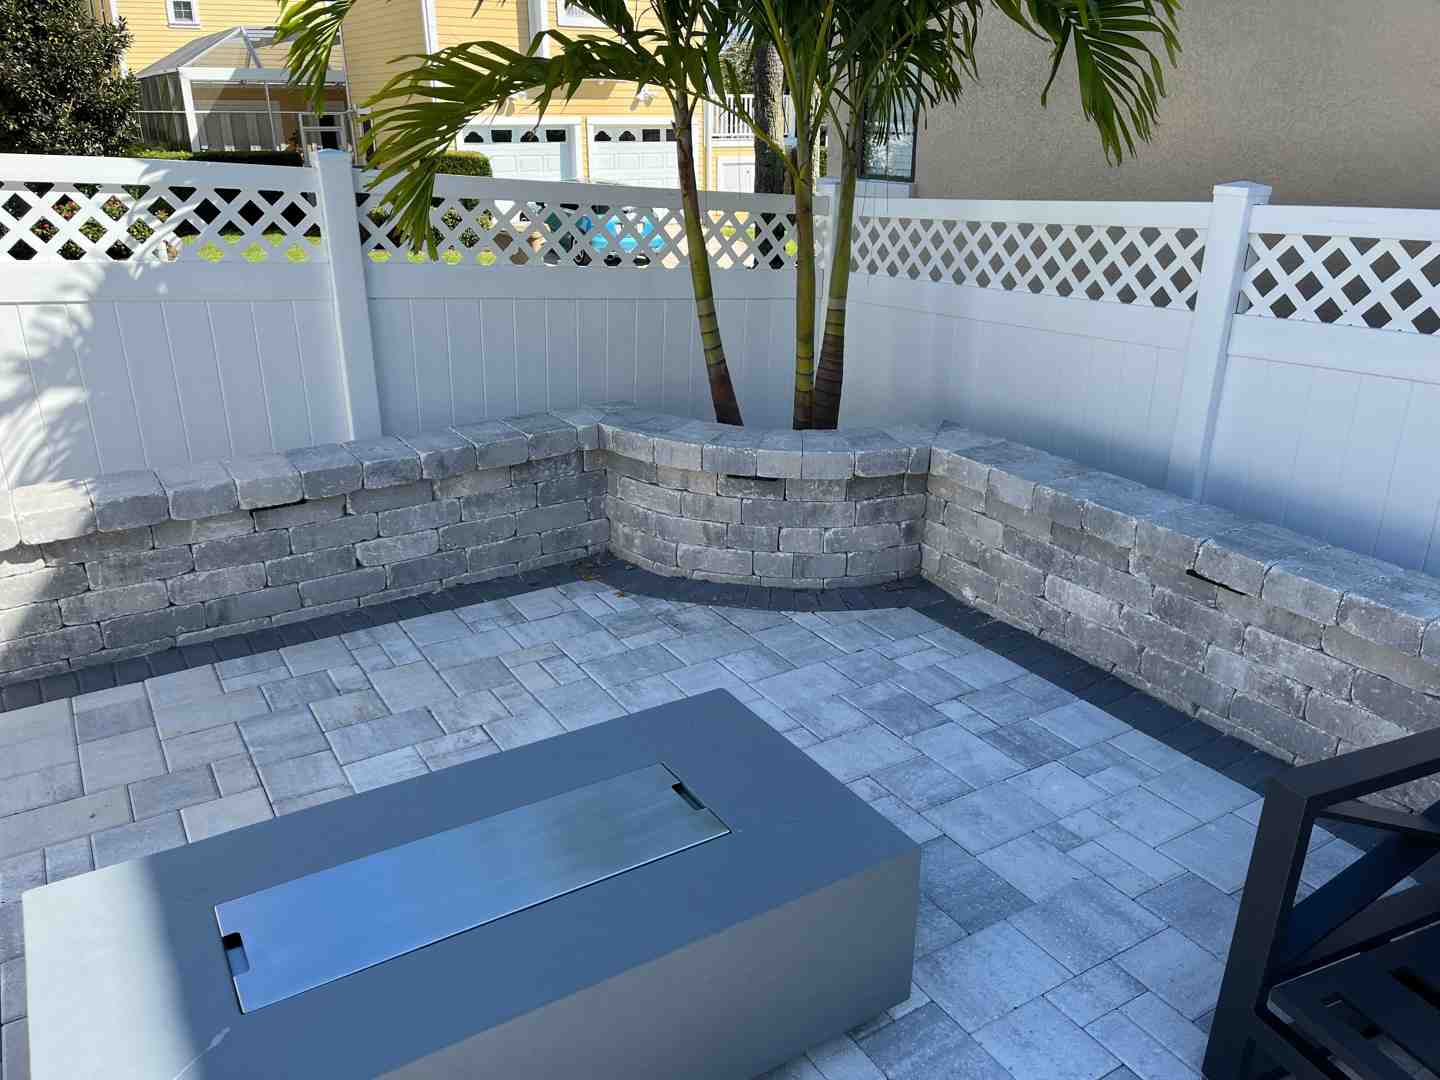
For the exterior, interlocking paver blocks or retaining wall blocks are ideal for Florida's weather. For circular fire pits, trapezoid blocks fit together in a curve without gaps. It's critical that these exterior blocks are not exposed to direct flame.
The interior requires heat-resistant materials. Fire-rated bricks (refractory bricks) are engineered to withstand extreme heat and protect the outer paver blocks. A steel fire pit ring or insert serves the same purpose, containing the fire and extending the structure's life.
Be cautious with decorative rocks. Pea gravel and river rocks can trap moisture and explode when heated. Instead, use lava rock in the bottom of your pit; it's safe, provides excellent drainage, and adds insulation.
Stone and pavers offer incredible design variety, from a rustic stone fire pit to sleek modern fire pit designs for urban backyards. The right materials will create a stunning focal point for your outdoor space.
Step-by-Step Fire Pit Installation Guide
Building your own fire pit installation can be a satisfying DIY project. This guide will walk you through each phase of the process to ensure your fire pit is stable, safe, and built to last.
For those who prefer professional help, our team has 25 years of experience. Explore more ideas on our firepits page.
Step 1: Preparing the Site for Fire Pit Installation
Proper site preparation is the foundation of a successful project.
First, call 811. This free, essential service marks underground utility lines to prevent dangerous accidents.
Next, mark your fire pit's location. For a circular pit, use a stake and string to draw a perfect circle with marking paint. For a square pit, lay out the first course of blocks to define the footprint.
Now, excavate the area. Excavation depth depends on your design. For an above-ground pit, remove 2 inches of sod. For an in-ground design or a pit with a compacted base (recommended), dig 6 to 12 inches deep. This allows for a 6-inch aggregate layer, 1 inch of sand, and lets you bury the first course of blocks 2-3 inches for stability.
Finally, compact the exposed soil with a hand tamper. Use a level to ensure the entire base is flat, removing high spots and filling depressions.
Step 2: Building a Stable Foundation
A stable foundation supports the structure and provides drainage.
Fill the excavated area with a 5- to 6-inch layer of crushed gravel or paver base. For in-ground pits, extend this base 6 inches beyond the pit's footprint for added stability.
Lightly moisten the gravel with a hose, then compact it thoroughly with a hand tamper. This prevents the fire pit from settling or shifting over time.
Next, add a 1-inch layer of bedding sand over the gravel. Rake it smooth, lightly mist it with water, and tamp it down.
Finally, use your level to ensure the entire surface is perfectly flat. A level foundation is critical for a stable, professional-looking result.
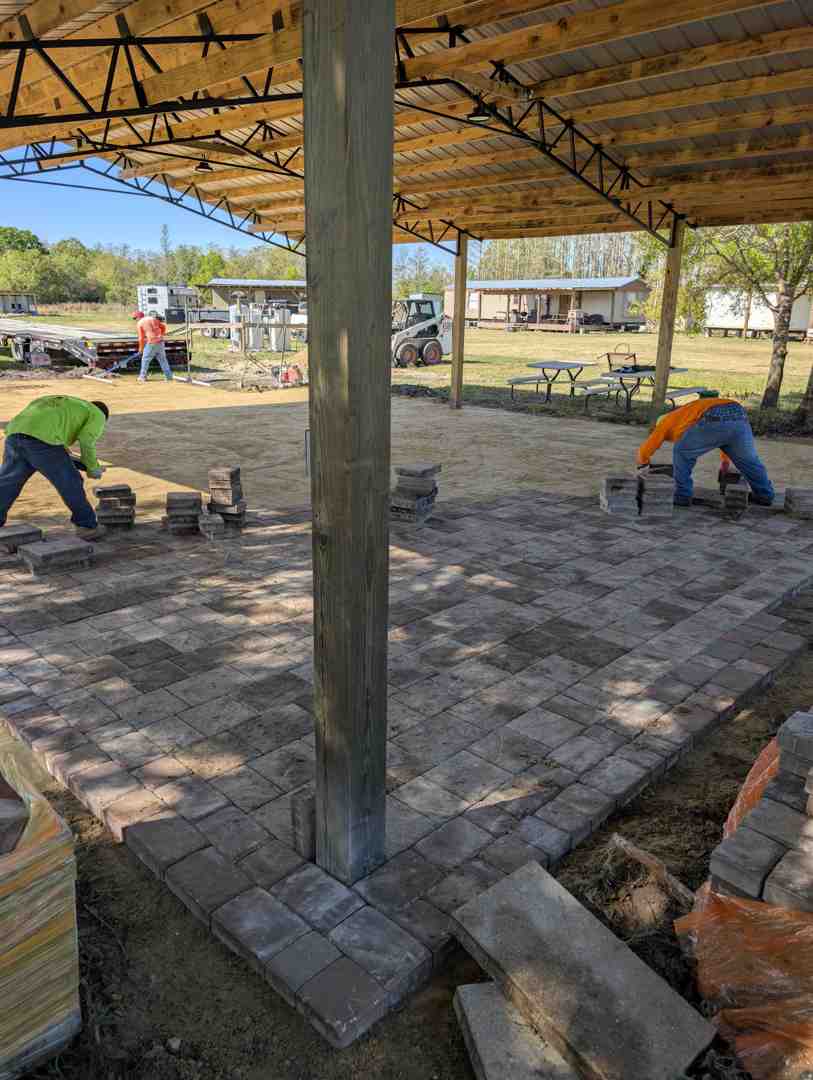
Step 3: Laying the Paver Blocks
This is where the structure takes shape.
Place the first course of blocks on the prepared sand base. Use trapezoid-shaped blocks for circular pits to avoid gaps. Set each block carefully, using a level and rubber mallet to ensure it is perfectly flat. This first layer is critical, as all other layers depend on it.
For the second layer and all subsequent courses, stagger the joints. Place each block so it spans the joint between two blocks below it, creating a strong, interlocking pattern.
Apply a bead of heat-resistant construction adhesive between each layer to unify the structure. A zigzag pattern ensures good coverage.
Continue stacking, staggering, and applying adhesive until you reach your desired height (typically up to 4 courses, or 30 inches). Check for level and alignment as you go.
Step 4: Securing the Structure and Lining the Interior
These final steps are critical for safety and longevity.
Allow the construction adhesive to cure completely. Follow the manufacturer's instructions, which typically recommend 2-7 days. Applying heat prematurely can weaken the bonds.
You must install an interior liner to protect the paver blocks from cracking under direct heat.
One option is to line the interior walls with fire bricks. These dense, clay-based bricks are engineered to withstand high temperatures. Fit them snugly against the paver walls, either dry-stacked or with heat-resistant mortar.
Alternatively, use a steel fire pit ring or insert. This metal barrier sits inside the paver structure, protecting it from the flames. For maximum protection, you can use both fire bricks and a steel ring.
Ensure proper ventilation for wood-burning pits. Leave small gaps between a few blocks in a lower course to allow oxygen to feed the fire, which reduces smoke.
Finally, add a layer of lava rocks to the bottom of the pit. This improves drainage, provides insulation, and creates a safe base for the fire. Unlike river rocks, lava rocks will not explode when heated. Once the adhesive has cured, your fire pit is ready to use.
Essential Safety and Maintenance Practices
Proper care after your fire pit installation is complete ensures it remains a safe and cherished gathering place for decades. Following essential safety and maintenance guidelines is key to its longevity and your enjoyment.
Using Your Fire Pit Safely
A few simple precautions ensure every memory made around your fire pit is a positive one.
- Maintain Safe Distances: Keep children and pets at least 3 feet away from an active fire. A spark screen is a great addition to catch stray embers.
- Never Leave a Fire Unattended: A responsible adult should always supervise the fire.
- Check the Wind: Avoid lighting a fire on very windy nights, as embers can travel and create a hazard.
- Burn the Right Fuel: Use only dry, seasoned firewood. Never use flammable liquids like gasoline or lighter fluid, which can cause dangerous flare-ups.
- Be Prepared: Keep a fire extinguisher, bucket of sand, or garden hose nearby at all times.
- Extinguish Properly: Let the fire burn down, then douse the ashes with water. Once completely cool, dispose of them in a metal container. Hot ashes are a serious fire risk.
For more tips, see our guide on fire pit safety features for family homes.
Maintaining Your Fire Pit for Longevity
Regular maintenance is simple and keeps your fire pit looking and functioning its best.
- Clean After Use: Once completely cool, remove ashes and debris from wood-burning pits to prevent moisture damage. Keep gas burners clear of leaves and dirt.
- Use a Cover: A weather-resistant cover is the best way to protect your fire pit from Central Florida's rain and humidity, preventing damage and keeping it ready for use.
- Inspect Periodically: Check for loose blocks, cracked fire bricks, or rust on metal parts, especially after harsh weather. Addressing small issues early prevents major repairs.
- Clean and Seal Pavers: Consider professional cleaning and sealing every few years to protect pavers from weathering and staining, which also makes routine cleaning easier.
A little maintenance ensures your fire pit will provide years of enjoyment.
Frequently Asked Questions about Fire Pit Installation
Here are answers to the most common questions we receive about fire pit installation.
What do you put in the bottom of a DIY fire pit?
The bottom of a fire pit requires proper layering for drainage and stability. Start with a 5- to 6-inch compacted base of gravel or crushed rock. Inside the pit itself, use lava rocks. They are porous, provide insulation, and won't explode from heat like river rocks can. You can also add a layer of fire-rated bricks for extra heat protection. The goal is a stable, well-drained, and heat-resistant foundation.
Is it better to use mortar or adhesive for a fire pit?
The best choice depends on the part of the fire pit. For the exterior paver walls, use heat-resistant construction adhesive. It provides a strong, flexible bond that accommodates the expansion and contraction caused by temperature changes, preventing cracks. It's also easier for DIYers to use than mortar. For the interior fire brick liner, use heat-resistant mortar. It creates a rigid, heat-proof barrier that can withstand direct flame and protect the outer structure. Use adhesive for flexibility on the outside and mortar for heat resistance on the inside.
Do I need a liner for my paver fire pit?
Yes, a liner is absolutely essential for the safety and longevity of your paver fire pit. Standard paver blocks are not designed to withstand direct exposure to fire and will crack and deteriorate quickly without protection.
A liner creates a protective barrier. Your two main options are:
- Fire Bricks: These dense, refractory bricks are engineered for extreme heat and line the interior walls.
- Steel Fire Pit Ring: A metal insert contains the fire and shields the pavers.
Using a quality liner is the key to ensuring your fire pit lasts for decades instead of just a few seasons.
Your Partner in Creating the Perfect Outdoor Oasis
Building a fire pit is a rewarding DIY project, and we hope this guide gives you the confidence to start your own fire pit installation.
However, if a major hardscaping project doesn't fit your schedule, Alliance Pavers is here to help. For 25 years, our family-owned team has transformed Central Florida backyards into beautiful outdoor living spaces. We handle every challenge our unique climate presents, partnering with you to create something special for your home.
From design to cleanup, we manage every detail of your custom fire pits in Orlando, FL. We help you select materials, ensure safe placement, and build a durable structure that will last for decades—all without the stress of a DIY project.
We bring our commitment to quality to every project, serving homeowners in St. Cloud, Winter Park, Lake Nona, and across Central Florida, including Doctor Phillips, Winter Garden, Oviedo, Winter Park, Lake Nona, St. Cloud, Heathrow, and Windermere.
Ready to create your perfect outdoor gathering space? Get started on your paver installation in St. Cloud, FL, or contact us to bring your backyard vision to life.