Your Guide to Building a Retaining Wall with Patio Pavers
Learn to build a retaining wall with pavers! Our guide covers planning, drainage, and step-by-step construction for a lasting wall.
Transform Your Sloped Yard into Functional Outdoor Living Space
Build a retaining wall with pavers to turn a challenging sloped yard into usable, beautiful outdoor space. If you're a Central Florida homeowner struggling with erosion, limited flat areas, or an uninviting hillside, a paver retaining wall solves these problems while adding lasting value to your property.
Quick Answer: How to Build a Retaining Wall with Pavers
- Plan and Prepare - Assess your site, call 811 to locate utilities, check local building codes for permit requirements (typically needed for walls over 4 feet)
- Excavate the Base - Dig a trench 6-12 inches deep and wider than your pavers, removing all vegetation
- Create a Solid Foundation - Add 4-6 inches of compacted gravel base material
- Install the First Course - Bury the first row of pavers partially (about half their height) and ensure perfect leveling
- Stack and Backfill - Add subsequent courses with offset joints, backfilling with gravel and installing drainage pipe
- Finish Strong - Secure capstones with construction adhesive and backfill with topsoil
A well-built paver retaining wall does more than hold back soil. It prevents erosion during Florida's heavy rainstorms, creates level areas for patios or gardens, and can increase your usable outdoor space by up to 50% on sloped properties. According to landscape industry data, these hardscaping projects can recover 100-200% of their cost at resale time.
The key to success lies in proper base preparation, ensuring adequate drainage behind the wall, and starting with a perfectly level first course. While smaller walls (under 4 feet) are often DIY-friendly, taller or more complex projects benefit from professional expertise. Learn more about retaining wall options for your property, or contact Alliance Pavers for expert installation in Central Florida.
Florida's sandy soil and frequent rainfall create unique challenges that make drainage absolutely critical. Without it, water pressure can build up behind your wall, causing it to lean, bulge, or even collapse. The good news is that with the right approach, pavers offer exceptional durability against our hot, humid climate while providing the flexibility to create curves, terraces, and integrated seating areas.

Planning Your Project: Key Considerations Before You Start
Before we even think about digging, careful planning is the bedrock of any successful retaining wall project. This initial phase helps us understand the unique characteristics of your property, ensuring the wall we build is not only beautiful but also structurally sound and compliant with local regulations.
Our first step always involves a thorough site assessment. We carefully analyze the slope of your land, the existing soil composition, and critically, how water moves across your property. In Central Florida, we often encounter sandy soils, which, while offering good drainage in some aspects, can also present challenges for retaining walls if not properly managed. This initial assessment helps us identify potential issues like poor drainage or unsuitable foundation soils that need addressing upfront.
Next, we need to gather crucial information. Before any digging begins, we always call 811 to locate any underground utilities. This essential step prevents costly and dangerous accidents. We also diligently check local building codes and HOA restrictions. For walls exceeding a certain height, typically over 4 feet in Florida, a building permit and potentially even engineering approval may be required. Ignoring these regulations can lead to stop-work orders and expensive rework down the line.
When it comes to design, the possibilities are vast! We can integrate your retaining wall with existing features, create flowing curves, or design multi-level terraces to maximize usable space. Consider how the wall will improve your outdoor living. Will it define a cozy paver patio, create raised garden beds, or simply control erosion on a challenging slope?
Understanding the Importance of Drainage
In Central Florida, where heavy rainfall is a regular occurrence, proper drainage is not just a recommendation—it's absolutely crucial for the longevity and stability of your retaining wall. Without an effective drainage system, water can saturate the soil behind the wall, leading to a phenomenon known as hydrostatic pressure. This pressure is the force exerted by water-logged soil, and it can increase significantly, pushing against the wall and potentially causing it to lean, bulge, or even fail entirely.
Proper drainage behind a retaining wall can reduce soil pressure by up to 30%, significantly enhancing wall stability. We achieve this by creating a pathway for water to escape. This typically involves using clean, coarse gravel (often 3/4-inch stone) as backfill directly behind the wall. This gravel provides a permeable layer that allows water to quickly drain away. At the base of this gravel layer, we install a perforated drain pipe, wrapped in filter fabric to prevent clogging, which channels the collected water to an appropriate outlet, safely directing it away from the wall's foundation. This comprehensive approach ensures that your retaining wall stands strong against even the heaviest Florida downpours.
Choosing the Right Pavers and Materials
The choice of materials is central to both the aesthetic appeal and the structural integrity of your retaining wall. When we build a retaining wall with pavers, we're leveraging the versatility and durability of these materials.
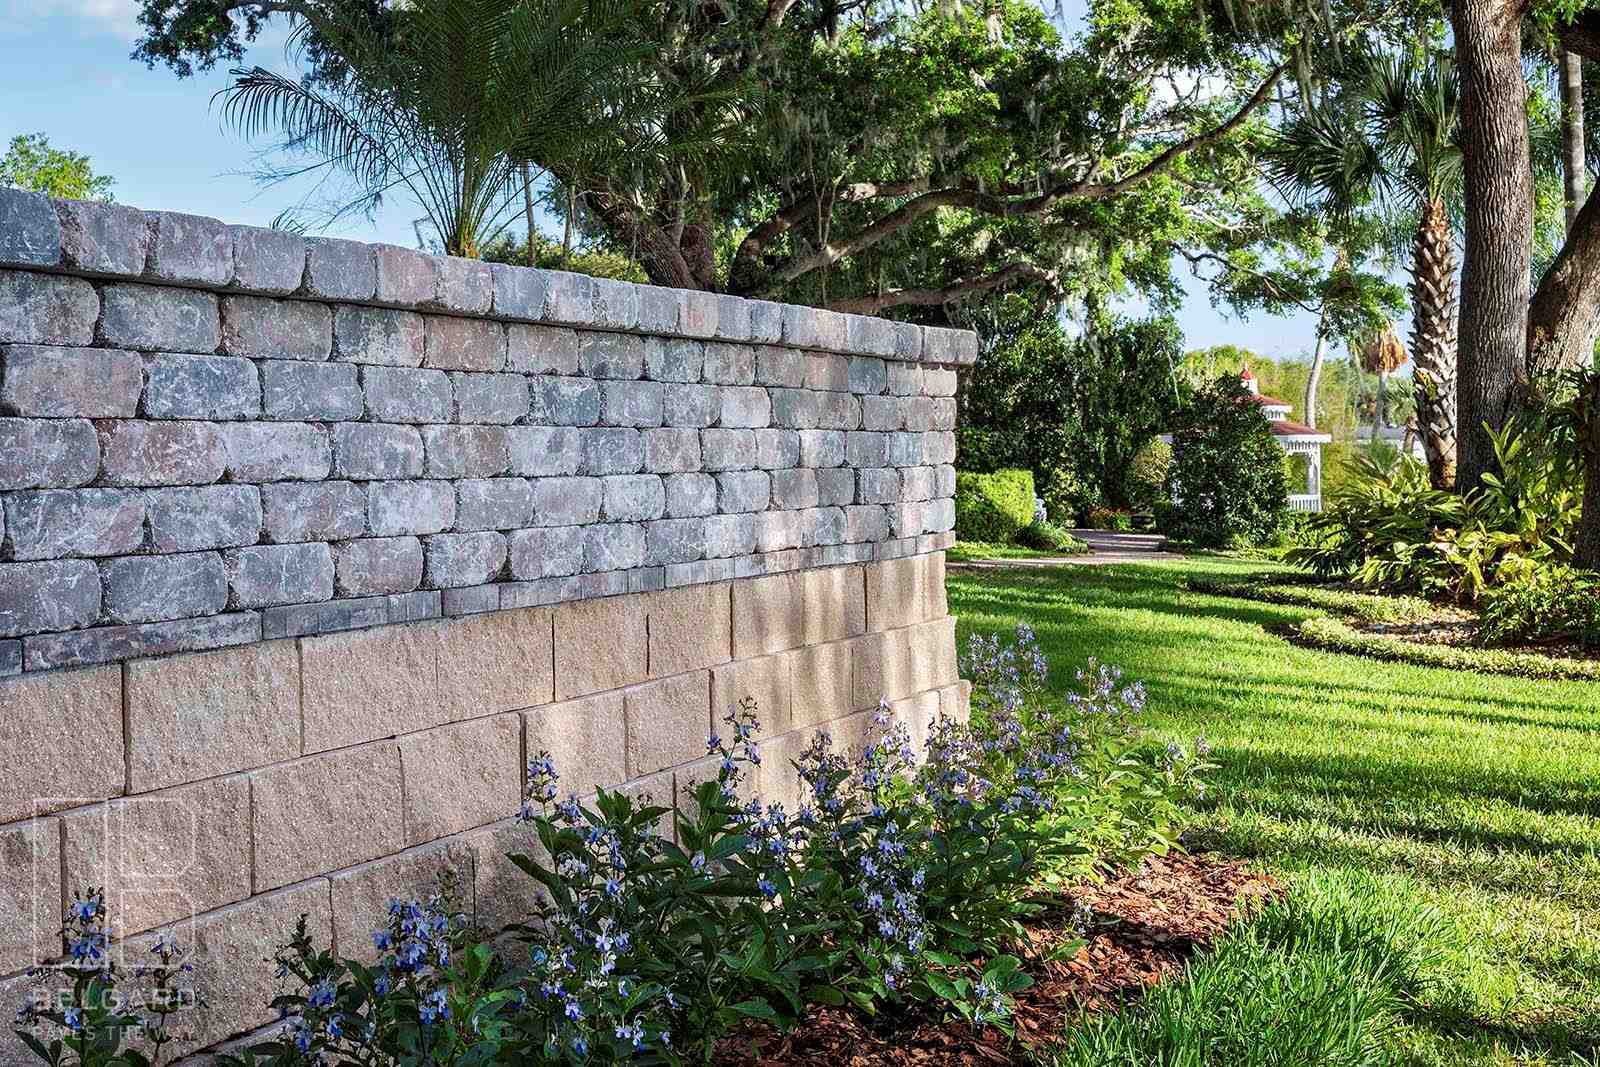
For the main structure of the retaining wall, interlocking concrete blocks are a popular and excellent choice. These blocks are specifically designed to stack and interlock, providing inherent structural stability. They are made from high-strength concrete, offering exceptional durability against Florida's hot, humid climate and frequent heavy rains. They come in a wide variety of shapes, sizes, colors, and textures, allowing us to achieve diverse aesthetic styles, from classic to contemporary. Natural stone can also be used for retaining walls, offering a timeless, organic, and rustic look.
When considering materials for an integrated paver patio, options expand to include concrete pavers, clay brick pavers, and natural stone pavers. Concrete pavers offer a fantastic balance of durability, style, and value, with endless design possibilities. Clay brick pavers provide a classic charm and exceptional durability, while natural stone pavers (like travertine or bluestone) create a premium, luxurious feel.
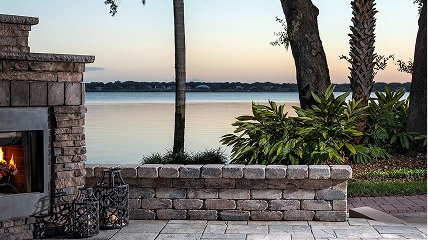
No matter the primary material, capstones are the finishing touch that provides a polished look and protects the top course of the wall from erosion. These are typically secured with construction adhesive for long-term stability. For the base and drainage layers, we rely on high-quality gravel and, for patios, a layer of leveling sand over the compacted base. Construction adhesive is also essential for securing capstones and, sometimes, for reinforcing higher courses of the wall.
How to Build a Retaining Wall with Pavers: A Step-by-Step Guide
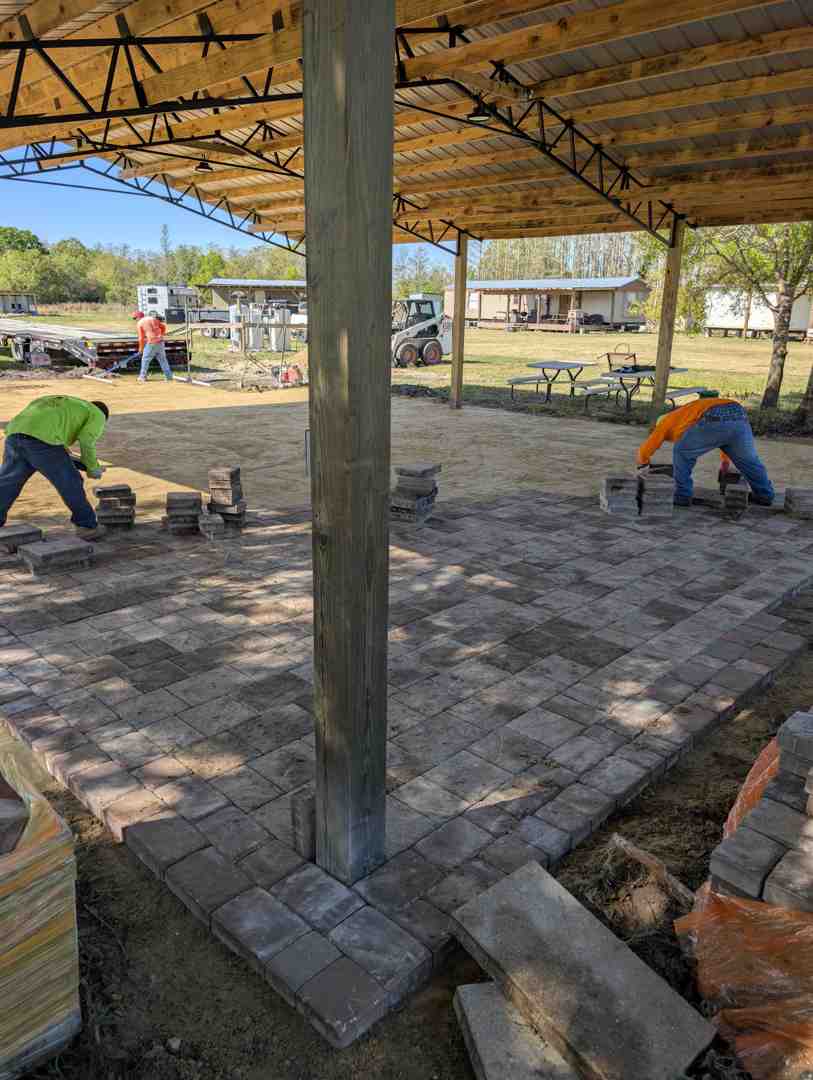
Building a retaining wall is a rewarding project that significantly improves your outdoor space. While some small, low walls can be a manageable DIY endeavor, the complexity and critical need for structural integrity often make professional installation the wisest choice. Below, we'll outline the essential steps involved in building a durable and attractive paver retaining wall.
Step 1: Excavation and Base Preparation
The foundation is everything. A retaining wall is only as strong and straight as the base it’s built upon.
- Mark the Layout: First, we mark the precise location and shape of your wall. We use stakes and a string line for straight walls, or a garden hose for curves, to visualize the layout.
- Excavate the Trench: We dig a trench that is wide enough to accommodate the base of your paver blocks, typically about 18-24 inches wide, and deep enough to bury at least half the height of your first course of blocks, plus 4-6 inches for the gravel base. For example, if your blocks are 6 inches tall, we'd aim for a trench depth of approximately 7-9 inches (3 inches buried block + 4-6 inches gravel). This ensures the wall is anchored securely and prevents soil pressure from pushing the bottom out. All surface vegetation and organic materials are removed from this area, as they can decompose and cause settling.
- Level and Compact the Trench: The bottom of the trench must be perfectly level. We use a hand tamper or, for larger projects, a vibrating plate compactor to thoroughly compact the soil at the base of the trench. If the foundation soil is soft or wet, we remove it and replace it with a granular material, compacting it in 8-inch lifts or less.
- Add and Compact the Gravel Base: We then add a layer of 4-8 inches of compactable gravel (often called wall rock) to the trench. This layer is critical for drainage and stability. We compact this gravel thoroughly with a plate compactor, making multiple passes, to create a dense, stable, and perfectly level foundation for the first course of pavers.
Step 2: Laying the Critical First Course
This is arguably the most important step, as any error here will compound throughout the entire wall.
- Start at the Lowest Point: We begin laying the first course of paver blocks at the lowest elevation of the wall, if your terrain has a slight slope.
- Ensure Perfect Leveling: Each paver block is placed firmly on the compacted gravel base. We use a string line pulled taut along the front of the wall to ensure perfect alignment. More importantly, we carefully check each block with a torpedo level, ensuring it is level from side-to-side and front-to-back. We also check across adjacent blocks to ensure they are level with each other.
- Adjust as Needed: If a block is too high, we gently tap it down with a rubber mallet. If it's too low, we add a small amount of coarse sand or gravel underneath and re-level. This precision is non-negotiable; a perfectly level and aligned first course is the secret to a straight, strong, and long-lasting retaining wall.
Step 3: Stacking, Backfilling, and Reinforcing
With the first course set, we build upwards, layer by layer.
- Stack Subsequent Courses: We stack the next course of paver blocks, ensuring that the vertical joints are offset from the blocks below by at least 1/4 the length of the block (typically 4 inches or more). This staggering, much like brickwork, interlocks the blocks and distributes pressure evenly, significantly increasing the wall's structural integrity. Many paver retaining wall systems have a built-in lip or pin system that automatically creates a slight setback, leaning the wall into the earth for added stability.
- Backfill with Drainage Gravel: As we lay each course, we immediately backfill the hollow cores of the blocks and the area directly behind the wall with clean, coarse drainage gravel. This gravel layer should extend at least 12 inches behind the blocks.
- Install Drainage Pipe: After the first few courses are laid and sufficient gravel backfill is in place, we install a perforated drain pipe at the base of the wall, within the gravel layer. This pipe is sloped towards an outlet (daylighted) every 50 feet or so, ensuring collected water has a clear path to exit. We wrap the drain pipe in geotextile filter fabric to prevent soil from clogging its perforations.
- Compact Backfill in Layers: We add the backfill material (drainage gravel first, then appropriate infill soil) in layers of no more than 8 inches. After each layer, we thoroughly compact it with a plate compactor. Proper compaction prevents future settling and helps the wall withstand lateral earth pressure. We continue this process until the wall reaches its desired height. For taller walls or challenging soil conditions, layers of geogrid reinforcement may be installed between courses as specified by engineering designs, further strengthening the soil mass behind the wall.
Finishing Touches and Long-Term Care
Once the structural work is complete, we turn our attention to the details that make your retaining wall truly shine and ensure its longevity.
Adding Capstones and Finalizing Your Build a Retaining Wall with Pavers Project
- Clean and Prepare: We brush off the top surface of the last course of paver blocks, ensuring it's clean and free of debris.
- Secure Capstones: We apply a durable construction adhesive to the top of the final course of blocks. The capstones are then carefully placed, often designed to overhang the retaining blocks by 1 to 1 1/2 inches, providing a clean, finished edge. We may even stagger them slightly backward and forward to create a perfectly straight line without gaps. The adhesive ensures these capstones remain securely in place for years to come.
- Final Backfilling and Landscaping: Behind the finished wall, we continue to backfill with appropriate soil, creating a smooth transition to your existing landscape. This is the perfect opportunity to create raised planting beds, filling the area with nutrient-rich topsoil ideal for flowers, herbs, or vegetables.
- Final Cleanup: We clear away any construction debris, leaving your newly transformed outdoor space pristine and ready for enjoyment.
Long-Term Maintenance for a Lasting Wall
A well-constructed paver retaining wall is built to last, often over 50 years with minimal maintenance. Quality pavers maintain their structural integrity and appearance for decades. However, a little proactive care goes a long way in protecting your investment.
- Regular Inspections: We recommend regular inspections, ideally in spring and autumn, to check for any signs of shifting, cracking, or settlement. Look for any bulges in the wall, cracks in the pavers, or areas where the soil behind the wall appears to be sinking. Addressing minor issues early can prevent them from becoming major, costly problems.
- Cleaning Pavers: Periodically clean the paver surfaces to remove dirt, moss, or algae. A gentle pressure wash annually can keep them looking pristine, and spot cleaning spills promptly helps prevent staining.
- Clearing Drainage Outlets: Ensure that the outlets of your drain pipe remain clear of leaves, debris, and soil. A clogged drain pipe can lead to water buildup and compromise the wall's stability.
- Addressing Minor Settling: If you notice minor settling in the paver patio area in front of or on top of the wall, it can often be addressed by carefully removing the affected pavers, adding more base material, re-leveling, and reinstalling them.
- Resealing Pavers: For concrete pavers, resealing them every 3-5 years can help maintain their color, prevent staining, and improve their durability against the elements.
Frequently Asked Questions about Paver Retaining Walls
What are the benefits of using pavers for retaining walls?
Building a retaining wall with pavers offers a multitude of benefits, especially for Central Florida homeowners. First and foremost, pavers provide exceptional durability, standing up to our hot, humid climate and frequent heavy rains without decaying or disintegrating like some other materials. Their interlocking nature provides inherent structural strength, ensuring the wall remains stable and robust.
Aesthetically, pavers are incredibly versatile. They come in a vast array of styles, colors, and textures, allowing us to create a retaining wall that perfectly complements your home's architecture and existing landscape. Whether you envision a classic, organic, or contemporary look, pavers offer the design flexibility to achieve it.
Beyond aesthetics, paver retaining walls are highly functional. They effectively prevent soil erosion, especially crucial on sloped properties during our rainy season. They also create usable, level space, changing otherwise unusable sloped areas into ideal spots for patios, garden beds, or outdoor living areas. In fact, a well-designed retaining wall with an integrated paver patio can increase your usable outdoor space by up to 50% on sloped properties. This functional beauty also translates to increased property value, with landscape industry data showing well-designed hardscaping projects can recover 100-200% of their cost at resale time.
How do I ensure proper drainage behind my retaining wall?
Ensuring proper drainage behind your retaining wall is paramount to its stability and longevity, particularly in Central Florida's climate. Without it, hydrostatic pressure from saturated soil can lead to wall failure. We implement a multi-layered approach to drainage:
- Gravel Backfill: We use at least 12 inches of clean, coarse gravel (often 3/4-inch stone) directly behind the entire height of the wall. This permeable layer allows water to filter through quickly, preventing it from saturating the soil directly against the wall.
- Perforated Drain Pipe: At the base of the gravel backfill, we install a perforated drain pipe. This pipe collects the water that seeps through the gravel and channels it away from the wall's foundation. The pipe is sloped towards an outlet, ensuring the water exits safely away from the structure, often "daylighted" to a lower elevation or connected to a stormwater system.
- Filter Fabric: We wrap the drain pipe in a geotextile filter fabric and often place a layer of this fabric between the gravel backfill and the native soil. This prevents fine soil particles from migrating into the gravel and clogging the drain pipe, maintaining the system's effectiveness over time.
- Surface Grading: We also ensure the ground surface directly above and in front of the retaining wall is properly graded to direct surface water away from the wall. This prevents water from pooling and seeping directly into the backfill area.
By combining these elements, we create a robust drainage system that effectively manages water, significantly reducing pressure on the wall and extending its lifespan.
When should I hire a professional contractor for a retaining wall project?
While the idea of a DIY project can be appealing, certain factors strongly suggest bringing in a professional contractor like us for your retaining wall project:
- Wall Height: For walls over 4 feet tall, or even 3 feet in some areas, local building codes in Central Florida typically require permits and may necessitate professional engineering. Taller walls exert immense pressure and demand precise construction and often geogrid reinforcement to ensure stability.
- Steep Slopes and Complex Terrain: If your property has a very steep slope, unstable soil conditions, or complex contours, the engineering and construction challenges increase significantly. Professionals have the experience and equipment to manage these complexities safely and effectively.
- Integrated Designs: If you envision a retaining wall seamlessly integrated with a paver patio, outdoor kitchen, or intricate terraced garden, the design and execution require specialized knowledge to ensure both structural integrity and aesthetic harmony.
- Drainage Concerns: Properties with significant water runoff issues or poor soil drainage demand expert planning for a robust drainage system. Incorrect drainage can lead to costly wall failure.
- Time and Equipment: Building a retaining wall is labor-intensive and requires specialized tools (like plate compactors, masonry saws, and levels) and heavy lifting. If you lack the time, physical ability, or access to the right equipment, a professional can complete the project efficiently and correctly.
- Peace of Mind: Hiring a professional ensures the project is built to code, engineered for durability, and backed by a warranty. This provides invaluable peace of mind, knowing your investment is sound and your outdoor space is safe.
With 25 years of experience in Central Florida, we bring the expertise and meticulous craftsmanship needed to build retaining walls that are both beautiful and built to last.
Conclusion
Building a retaining wall with pavers is truly one of the most rewarding outdoor changes you can make to your Central Florida home. We've seen how these projects can transform problematic slopes into stunning outdoor sanctuaries, creating level, usable spaces that become the backdrop for your family's memories. From preventing erosion and managing water runoff to defining neat outdoor living areas and increasing your property's value, the benefits are undeniable. Realtors consistently rank landscape redesign projects, including retaining walls, at the top of their list for adding significant resale value.
The journey from a challenging slope to a functional, beautiful space requires careful planning, a deep understanding of Florida's unique soil and climate conditions, and meticulous execution. While the process involves several critical steps—from precise excavation and base preparation to expert laying of each course and robust drainage solutions—the result is a durable, attractive structure that will serve your home for decades.
If you're ready to open up the full potential of your outdoor space, we're here to help. Our team at Alliance Pavers brings 25 years of experience in paver installation, outdoor living design, and retaining wall construction to Central Florida. We pride ourselves on exceptional craftsmanship and a stress-free experience, ensuring your project is completed on time and on budget.
Transform your landscape with a professionally installed retaining wall and find the functional beauty that awaits.