Green Thumbs Up: A Step-by-Step Guide to Residential Artificial Grass Installation
Install your dream lawn! This guide covers residential artificial grass installation from planning to perfection. Save water & time.
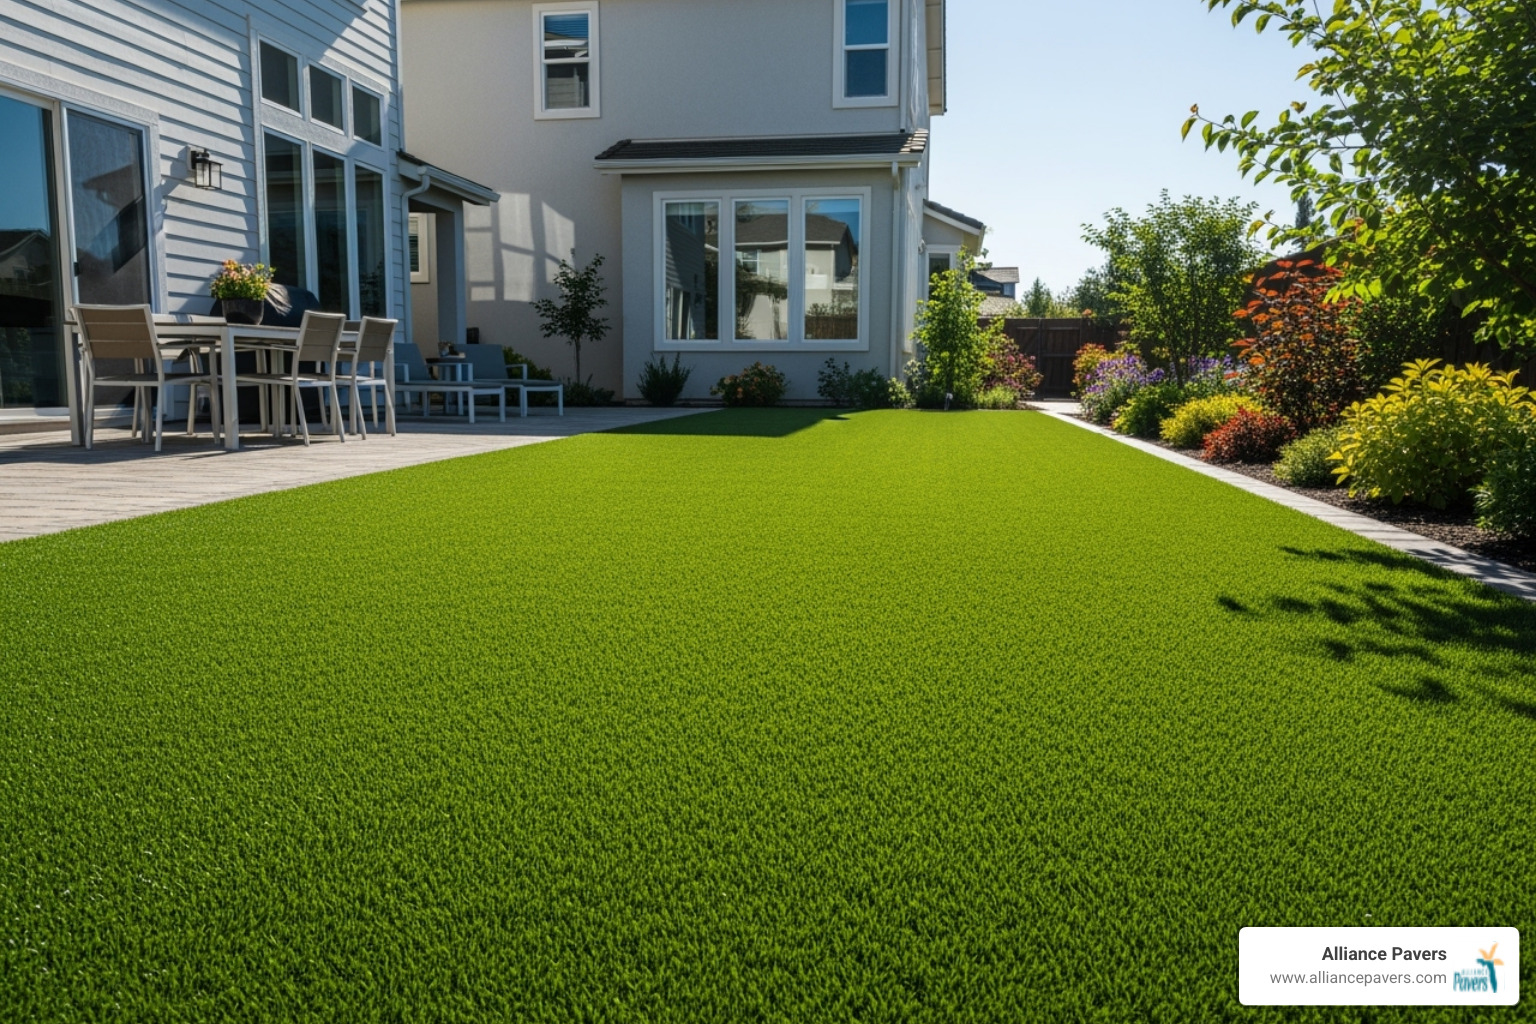
Transform Your Yard with a Low-Maintenance Lawn Solution
Residential artificial grass installation is becoming the go-to solution for Central Florida homeowners tired of battling brown patches, mud, and endless yard work. As one homeowner put it after their installation: "We all want that lush green lawn at home but not everyone wants to put in all the work that it takes to keep up with it."
Quick DIY Installation Overview:
- Site prep: Remove existing grass and excavate 2-4 inches
- Base layer: Install crushed stone aggregate and compact thoroughly
- Turf installation: Roll out grass, align blade direction, secure edges
- Seaming: Join pieces with adhesive tape for seamless appearance
- Finishing: Apply sand infill and brush fibers upright
- Timeline: Most residential installations take 1-3 days to complete
The benefits are clear: no more weekly mowing, year-round green appearance, and significant water savings. Premium artificial grass can last up to 20 years with minimal maintenance, making it perfect for busy families who want a beautiful yard without the constant upkeep.
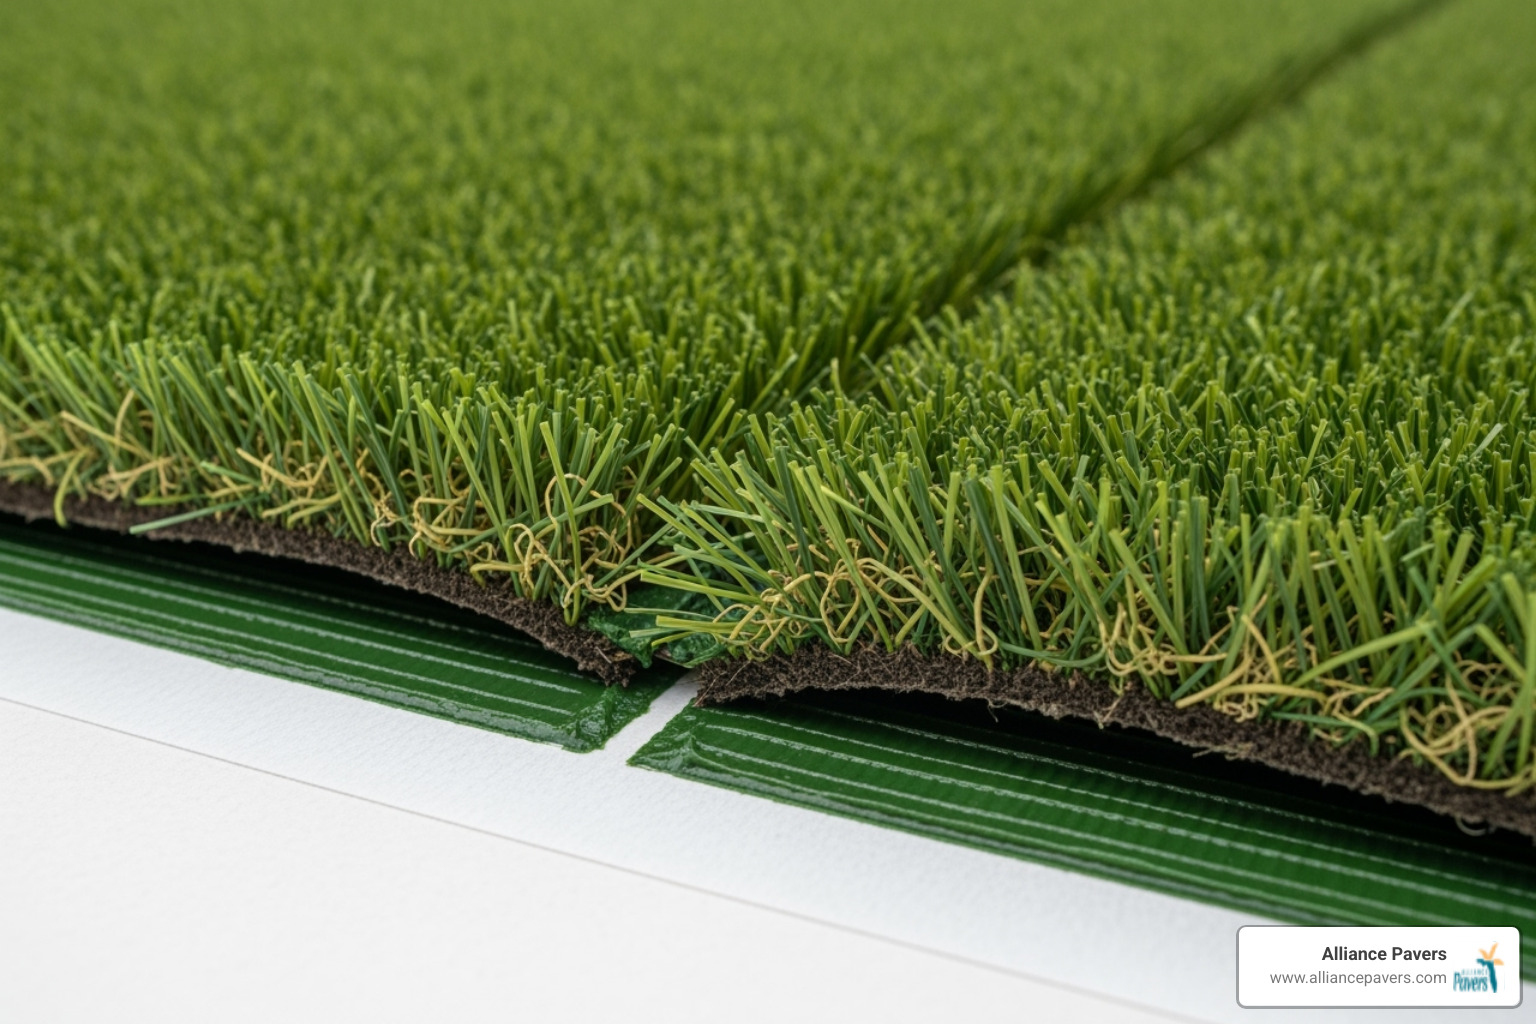
Modern artificial turf offers realistic appearance with UV-stabilized fibers that resist fading. Whether you're dealing with pet damage, shaded areas where natural grass struggles, or simply want to eliminate muddy areas around your pool deck, artificial grass provides a durable solution.
The installation process requires careful planning and physical effort, but with the right tools and techniques, most homeowners can achieve professional-looking results. The key lies in proper base preparation - this foundation determines how your lawn will look and perform for decades.
Planning Your Project and Gathering Supplies
Think of planning your residential artificial grass installation like preparing for a weekend camping trip – you want everything mapped out and packed before you head into the wilderness. The difference? Instead of conquering mountains, you're changing your backyard into a lush, maintenance-free oasis that'll make your neighbors wonder what your secret is.
This planning phase might not be the most exciting part (we get it, you want to see that gorgeous green grass!), but it's absolutely crucial for avoiding those "why didn't I think of that?" moments later.
Choosing the Right Turf for Your Needs
Walking into a turf showroom can feel overwhelming – there are so many options! But don't worry, choosing the right artificial grass is simpler than it seems once you know what to look for.
Pile height is your first consideration – think of it as choosing between a crew cut and flowing locks for your lawn. Shorter blades (around 1-1.5 inches) are incredibly durable and perfect for high-traffic areas where kids play soccer or dogs love to run. Longer blades (2+ inches) give you that luxurious, plush look that feels amazing underfoot.
Face weight tells you how dense your turf is – basically, how much grass you're getting per square foot. Higher face weight means more fibers, which translates to a fuller, more resilient lawn that bounces back beautifully after use.
The backing material might be hidden, but it's doing all the heavy lifting. Look for durable, permeable backing that lets water drain through easily. This foundation keeps your grass blades standing proud and ensures proper drainage during Florida's famous afternoon thunderstorms.
Got furry family members? Turf for pets needs special attention to antimicrobial properties and drainage rates. You'll want grass that drains quickly and resists odors naturally. Our guide on Pet-Friendly Turf Options in Doctor Phillips dives deep into what makes artificial grass perfect for your four-legged friends.
For play areas, safety comes first. Look for turf with low abrasion ratings and cooling technology – because nobody wants their kids playing on a surface that feels like a frying pan in the Florida sun!
Shaded areas where natural grass gives up and goes brown? Artificial turf thrives there! Check out our insights on Artificial Turf Installation for Shaded Areas to see how synthetic grass solves this common landscaping headache.
Finally, UV stabilization is non-negotiable in sunny Florida. UV-stabilized fibers resist fading and keep that vibrant green color looking fresh year after year.
Key Considerations for Your Residential Artificial Grass Installation
Now comes the fun part – turning your vision into a concrete plan. Grab a notepad and let's map out your project like a pro.

Measuring your area accurately is crucial – nobody wants to run out of turf halfway through installation! Artificial grass typically comes in standard widths (usually 15 feet), so measure your total square footage and add about 10% extra for trimming and fitting. Trust us, having a little extra is much better than coming up short.
Planning turf layout prevents headaches later. Sketch your yard and figure out how the rolls will fit together. This helps minimize waste and ensures you won't have awkward seams running right through the middle of your lawn.
Here's a detail many DIYers miss: blade direction matters more than you'd think! Artificial grass has a natural lean, just like real grass. All your turf sections should face the same direction for a uniform appearance. Generally, pointing the blades toward your house creates the best view from your windows and patio.
Ensuring proper drainage starts with planning, not just installation. Your artificial grass needs to shed rainwater effectively, which means creating a slight slope (about 1-2% grade) away from your house and ensuring the base allows water to percolate through.
Don't forget to check local regulations – some homeowners' associations have guidelines about artificial grass installations. A quick check now saves potential complications later.
Essential Tools and Materials
Nothing derails a weekend project faster than realizing you're missing a crucial tool right when you need it most. Let's make sure your toolbox is ready for action.
For excavation and base work, you'll need a sturdy shovel, wheelbarrow for hauling materials, and either a hand tamper or plate compactor for creating that rock-solid foundation. The plate compactor is worth renting for larger areas – your back will thank you.
Your cutting tools are critical for professional results. A sharp utility knife handles most cuts, but for precision work, grab a snap blade X-Acto knife with 18mm black Olfa blades – it makes clean, accurate cuts that ensure perfect seams.
For the finishing touches, you'll want seam tape and adhesive for joining pieces, landscape staples for securing edges, and a power broom for applying infill and grooming your grass. Speaking of power brooms, this one on Amazon is similar to what the pros use.
Don't forget the foundation materials: crushed aggregate base for stability, weed barrier fabric to prevent unwanted growth, and infill material (silica sand works great, or specialized options for pet areas).
With everything planned and your supplies ready, you're set up for installation success. The groundwork – literally and figuratively – is complete!
The Complete Residential Artificial Grass Installation Process
Now that we're fully prepared, it's time to roll up our sleeves and get into the nitty-gritty of the physical installation. This is where your vision truly starts to take shape!
Step 1: Site Preparation and Excavation
This is arguably the most critical step, as a solid foundation is paramount for a lasting, beautiful lawn. As we often say in hardscaping, proper base preparation is everything, and it's no different for artificial turf.
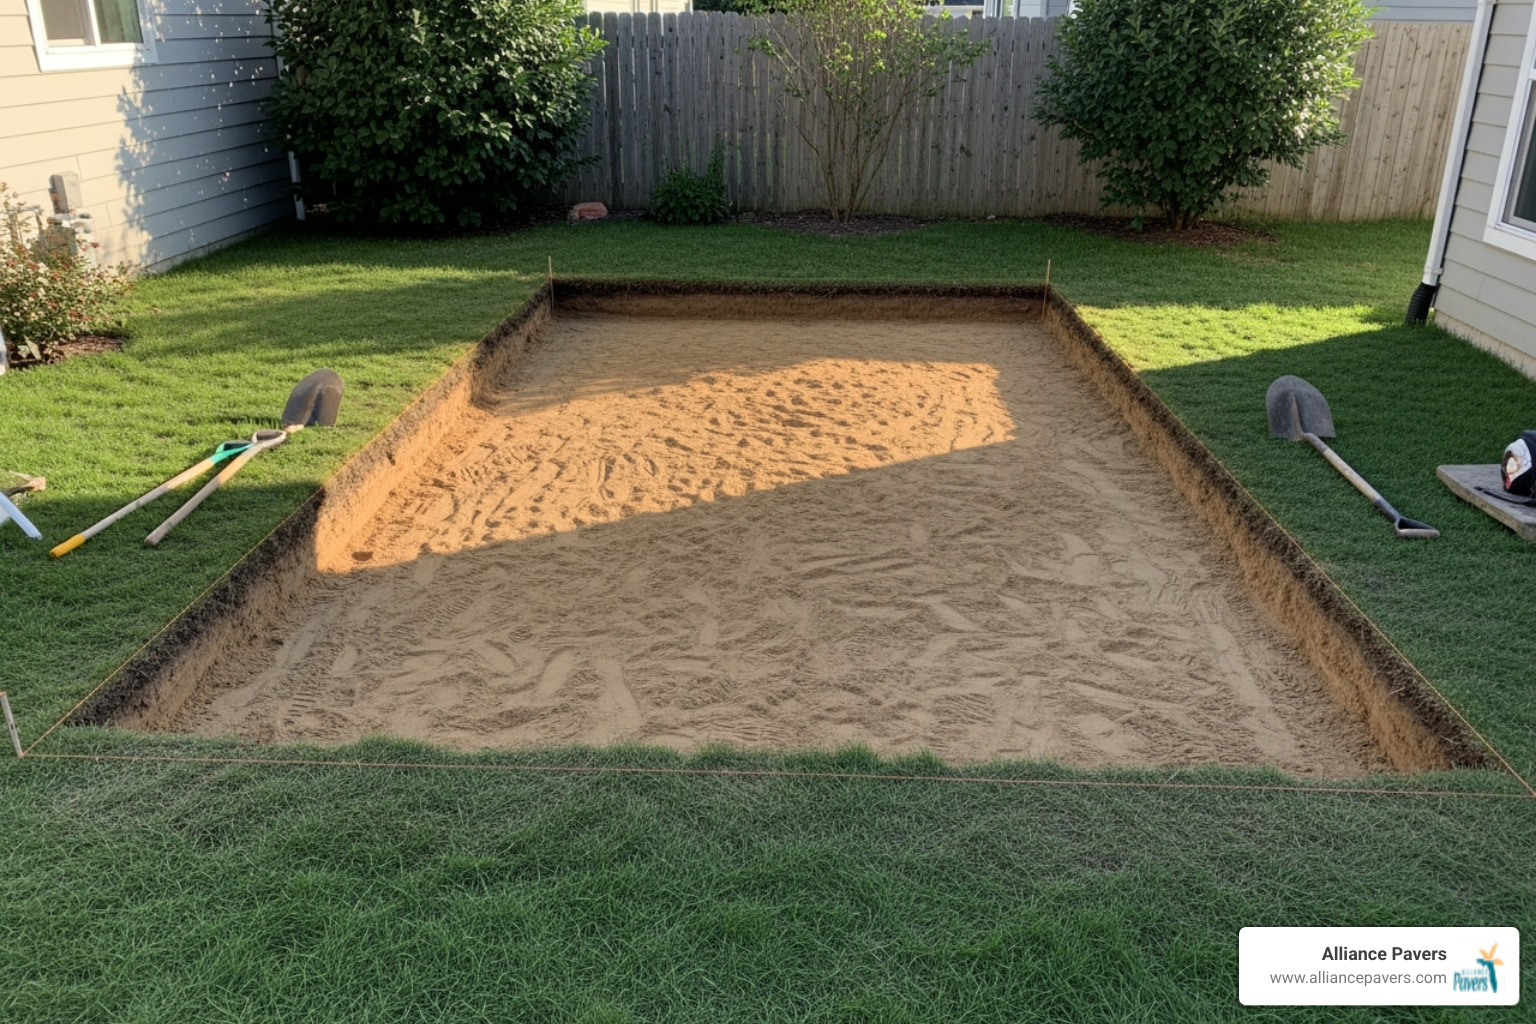
- Mark Utilities: Before any digging, always call 811 (or ClickBeforeYouDig.com) to have underground utilities marked. Safety first!
- Remove Existing Sod: Using a turf cutter, remove all existing natural grass, roots, and any debris from the area. Set the sod cutter to a depth of 2 to 3 inches to ensure all organic matter is removed.
- Excavation Depth: We need to dig down approximately 2.5 to 4 inches (75mm to 100mm, or even 150mm if a thick base is desired) below your desired final grade. This creates space for your sub-base layers.
- Creating a Slight Grade: For optimal drainage, especially on flat surfaces, we recommend creating a subtle slope of 2% to 3% away from your home or other structures, directing water towards a suitable drainage point.
- Installing Bender Board or Edging: If you're not butting up against an existing hardscape, you'll want to install a perimeter boundary. This can be done using treated wooden battens (75mm x 25mm) secured with stakes, or even concrete blocks. This provides a clean edge and something to fasten your turf to.
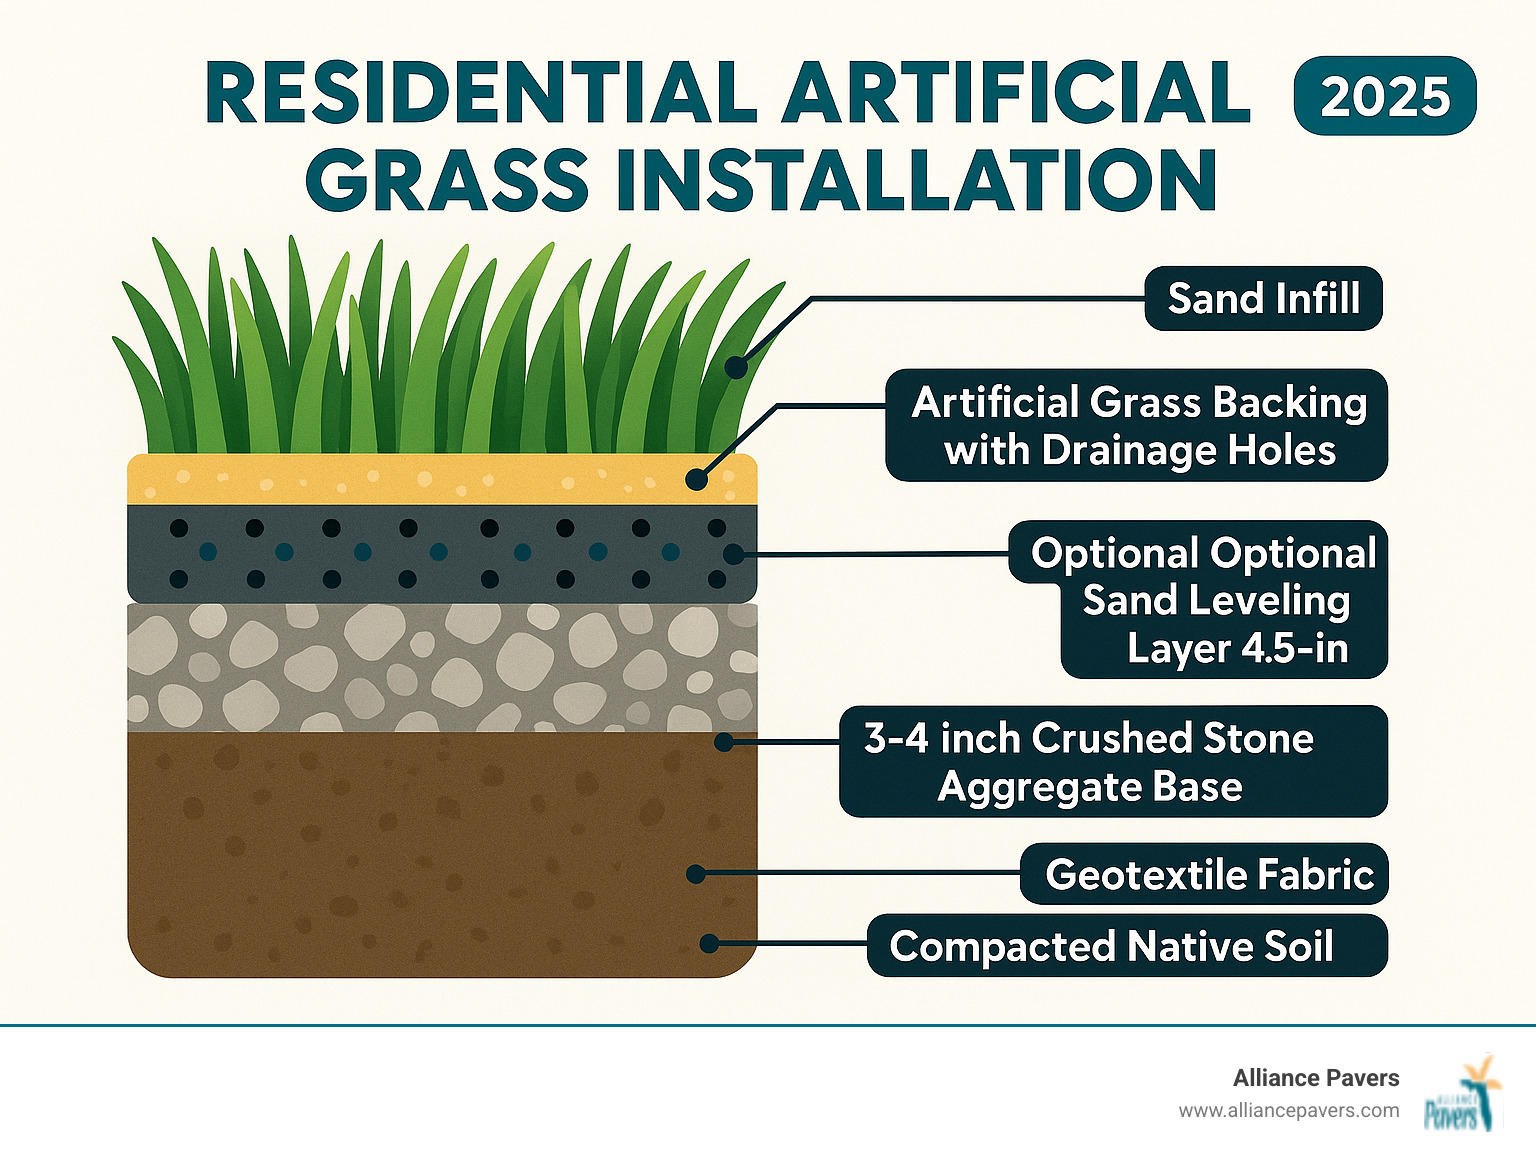
Step 2: Building and Compacting the Base
This is where we create the robust, permeable foundation for your artificial lawn. A properly compacted base prevents dips, bumps, and drainage issues later on.
- Weed Barrier Fabric Installation: Roll out your weed barrier fabric across the entire excavated area. This acts as a protective layer against future weed growth and helps stabilize the sub-base. Overlap sections by 3 to 4 inches to ensure full coverage and secure it with landscape pins every few feet. Trim any excess fabric around the edges.
- Spreading Crushed Stone Aggregate: Spread 2 to 4 inches (50mm to 100mm) of your chosen crushed aggregate base (e.g., type 1 hardcore, crushed granite, or CMB). This layer provides the bulk of your drainage and structural support.
- Leveling the Base: Using a yard rake, carefully level the aggregate, ensuring an even surface and maintaining your desired slight slope for drainage. For an ultra-smooth finish, we often add a thin skim coat (around 25mm) of builders sharp sand or quarry dust/screenings over the aggregate.
- Compacting the Base Layer: This step cannot be overstated! Thorough compaction is vital. Use a hand tamper for smaller areas or, ideally, a plate compactor for larger spaces. Lightly spray water on the aggregate as you compact; this helps eliminate air pockets and creates a solid, stable foundation. Compact in multiple passes until the base is firm and no longer shifts underfoot.
Step 3: Rolling Out and Cutting the Turf
Now for the fun part – seeing your green oasis begin to take shape!
- Acclimating the Turf: Unroll your artificial grass and lay it out in the sun for 1 to 2 hours (or even 24 hours if you notice significant creases from packaging). This allows the turf to relax, removes any wrinkles, and makes it easier to work with. Creases will naturally fall out over time, especially in warmer weather.
- Rolling Out the Grass: Carefully position your turf rolls according to your layout plan, ensuring the pile direction is consistent across all pieces. For the best visual appeal from your main viewing areas (like your patio or living room), the blades should ideally be facing towards the house. Avoid dragging the turf, as this can disturb your carefully prepared base.
- Aligning Blade Direction: Double-check that all rolls are laid with the blades pointing in the same direction. This is crucial for a uniform look.
- Making Relief Cuts: As you lay the turf, you'll need to make relief cuts to steer around obstacles like trees, posts, or intricate curves. Use your sharp utility knife to make small, careful cuts to allow the turf to lay flat.
- Trimming Edges for a Perfect Fit: Once the turf is in place, carefully trim the edges using your utility knife, cutting from the underside for a cleaner line. Leave a small extra margin initially, then make precise cuts for a perfect fit against your edging or existing hardscape.
Step 4: How to Properly Seam Artificial Grass
If your project requires more than one roll of artificial grass, creating invisible seams is the mark of a professional-looking installation. This takes patience and precision.
- Trimming Seam Edges: This is where that precision utility knife really shines. For a truly invisible seam, you need to trim the factory edge of each turf piece. We recommend removing the outer three tufts (or a small, consistent strip) from the seaming edges of both pieces. This allows the two pieces to butt together tightly, hiding the seam.
- Aligning Turf Pieces: Carefully bring the two trimmed turf pieces together, ensuring the gap between the joining tufts is minimal – ideally 1/8 to 1/4 inch maximum. The goal is for the blades to intermingle naturally across the seam.
- Applying Seam Tape: Fold back the adjacent edges of both turf pieces. Lay your seaming cloth or tape (typically 10 inches wide) directly underneath the seam line, ensuring it's centered.
- Spreading Adhesive: Apply a thin, consistent layer of urethane-based outdoor carpet adhesive onto the seam tape. Avoid over-application, as excess adhesive can seep through and create a messy, hard surface.
- Pressing the Seam: Carefully fold one turf edge back over the adhesive, pressing it firmly onto the tape. Then, bring the second turf edge over, aligning it perfectly with the first, and press down firmly across the entire seam. You can walk along the seam or place weights (like sandbags or boards) on top for at least 45 minutes to ensure the adhesive cures properly. Once cured, secure the seam with landscape pins every few inches along its length for added stability.
Finishing Touches and Long-Term Care
We're in the home stretch! These final steps transform your residential artificial grass installation from "almost done" to "absolutely stunning." Think of this phase as putting the cherry on top of your beautiful lawn sundae.
Applying and Spreading Infill
Infill might seem like a small detail, but it's actually the unsung hero of your artificial grass system. This granular material acts as the foundation that keeps everything looking and performing its best.
Silica sand is the most popular choice for general applications. It's affordable, effective, and does exactly what you need – weighing down the turf while helping those grass blades stand tall and proud. For most installations, silica sand creates the perfect foundation.
But if you have furry family members, zeolite infill becomes your best friend. Products like PureZEO Pro work like magic to absorb and neutralize pet odors before they become a problem. Many homeowners find that a 50/50 mix of zeolite and silica sand gives them the best of both worlds – odor control and structural support.
Spreading infill evenly across your new lawn requires patience and the right approach. A drop spreader gives you the most consistent results, though you can certainly do it by hand with a shovel if you work in small sections. The key is working the infill down into the turf backing, not just leaving it sitting on top.
This is where that power broom really shines. Using firm downward pressure and working in overlapping rows, the power broom drives the infill deep into the backing while encouraging those grass blades to stand upright. You can find a power broom similar to this one on Amazon that makes this job much easier than trying to do it with a regular broom.
Work in layers – spread some infill, brush it in, then repeat until you achieve the manufacturer's recommended depth. For pet areas, this is typically around one pound of infill per square foot. Your grass will thank you by looking lush and natural.
Maintaining Your New Lawn
Here's the beautiful truth about artificial grass – maintenance is refreshingly simple. After years of weekend mowing, fertilizing, and constant watering, you'll be amazed at how easy life becomes.
Your new lawn has serious longevity on its side. Premium artificial turf can last up to 20 years with proper care, making it a smart long-term investment for busy families. Some manufacturers offer 15-year warranties, giving you confidence in your installation.
Routine brushing keeps your lawn looking its absolute best. In high-traffic areas where kids play or pets run, the grass blades can flatten over time. A monthly brushing with a stiff-bristle broom or power broom brings those fibers back to life, maintaining that just-installed appearance.
Rinsing with water occasionally washes away dust, pollen, and light debris that naturally accumulates. This is especially helpful during Florida's dry spells when everything seems to collect a layer of dust. A simple spray with your garden hose does the trick.
Removing debris is straightforward – use a leaf blower for quick cleanup or a plastic rake for stubborn items. Just avoid metal rakes that could damage the delicate turf fibers you've worked so hard to install perfectly.
Spot cleaning spills happens just like it would indoors. Blot fresh spills immediately, clean with mild soap and warm water, then rinse thoroughly. Most spills clean up easily since the synthetic fibers don't absorb liquids like natural grass would.
For pet owners, waste management remains simple. Pick up solid waste promptly, just as you would with natural grass. For urine spots, a thorough rinse with water usually does the job. If you notice persistent odors, a mixture of equal parts water and white vinegar works wonders, though your zeolite infill should handle most odor control automatically.
The best part? No more weekend mornings spent pushing a mower around the yard. Your residential artificial grass installation gives you back your time while keeping your outdoor space beautiful year-round.
Frequently Asked Questions about Artificial Grass
After helping countless Central Florida families with their residential artificial grass installation projects, we've noticed homeowners tend to ask the same thoughtful questions. Let me share the answers to the most common ones we hear:
How does artificial grass drainage work?
Here's the beautiful thing about modern artificial grass - it's actually designed to handle water better than many natural lawns! The magic happens in layers, just like a well-built sandwich.
Your artificial turf comes with a permeable backing that's dotted with perforated holes - think of it as a colander for your lawn. Water passes right through these openings without any pooling on the surface.
But the real star of the show is that compacted aggregate base we spent so much time preparing earlier. This crushed stone layer acts like a giant sponge, allowing water to filter through quickly and efficiently. When we create that slight slope during installation, we're directing water flow away from your home and toward natural drainage areas.
The porous sub-base we build ensures that even heavy Florida downpours won't leave you with standing water. Instead, the water moves through the system and soaks into the ground below, just like nature intended.
For those tricky installations on concrete patios or pool decks, we can add specialized drainage underlays that channel water away effectively. The system works so well that many homeowners are amazed at how quickly their artificial lawn drains compared to their old natural grass!
Can you install artificial grass directly over natural grass?
I wish I could tell you this shortcut works, but it's absolutely not recommended - and here's why it'll cause you headaches down the road.
Think about what happens to that natural grass underneath. It doesn't just disappear - it decomposes, creating an uneven surface that gets lumpier over time. Your beautiful new lawn will start looking like a lumpy mattress within months.
The poor drainage issue is even worse. That layer of decomposing grass acts like a soggy sponge, trapping water and creating the perfect environment for mold and mildew. Nobody wants that smell wafting up from their backyard!
Then there's the weed growth problem. Those persistent weeds will push right through the old grass and can even penetrate some turf backings. You'll end up fighting the same weed battles you were trying to escape.
Perhaps most importantly, taking this shortcut voids warranty coverage from virtually every manufacturer. That's their way of telling you how critical proper installation really is.
Trust me, spending the time to do proper excavation and base preparation now saves you from having to tear everything up and start over later. Your future self will thank you!
Can I walk on the artificial grass right after installation?
Hold your horses there, partner! While I know you're excited to enjoy your beautiful new lawn, it's best to wait 24 hours before giving it a proper walkthrough.
This waiting period allows adhesive to cure properly if you've done any seaming work. Those invisible joints need time to bond completely, and walking on them too soon could compromise their integrity.
The infill material also needs time to settle into the turf backing naturally. When you let infill settle without disturbance, it creates a more stable, comfortable surface that will perform better for years to come.
Most importantly, walking on fresh installation can cause the turf to shift slightly, especially around the edges where it's still finding its final position. This prevents shifting that could create wrinkles or gaps in your finished lawn.
I know 24 hours feels like forever when you're looking at your gorgeous new yard, but think of it as the final step in creating something that will bring you joy for the next two decades. A little patience now ensures your residential artificial grass installation stays picture-perfect from day one!
Your Perfect Lawn Awaits
Congratulations! You've just walked through every step of a successful residential artificial grass installation. From selecting the perfect turf for your family's needs to applying that final layer of infill, you now have all the knowledge needed to transform your yard into a stunning, low-maintenance oasis.
There's something truly satisfying about stepping back and admiring a DIY project well done. Your new artificial lawn will greet you every morning with that perfect green glow – no brown patches, no muddy paw prints, and definitely no weekend mowing marathons. Just beautiful, consistent grass that looks great year-round.
But let's be honest – this project requires serious dedication. Between the excavation, base preparation, and careful seaming work, you're looking at several days of physical labor. Not everyone has the time, tools, or desire to tackle such an ambitious project, and that's perfectly okay!
If you'd rather spend your weekend relaxing on your future lawn instead of installing it, that's where we come in. At Alliance Pavers, we've spent 25 years perfecting outdoor spaces throughout Central Florida. While artificial grass installation is just one part of what we do, we love how it integrates seamlessly with our hardscaping services – imagine your new lawn bordered by beautiful pavers or complementing a stunning retaining wall.
Our family-owned team brings the same attention to detail and craftsmanship to every project, whether it's a simple turf installation or a complete outdoor living change. We handle the heavy lifting, the precise measurements, and all those technical details, so you can focus on planning your first barbecue on your perfect new lawn.
For homeowners in the Oviedo area looking for that flawless finish and professional peace of mind, check out our Artificial Turf Installation in Oviedo, FL. We'll make sure your installation is stress-free, on-time, and on-budget – just like every project we've completed over the past quarter-century.
Whether you tackle this as a rewarding DIY adventure or trust it to our experienced hands, your perfect lawn is waiting. Here's to many years of green grass and relaxing weekends ahead!