Green Thumbs, No Mowing: A Step-by-Step Guide to Artificial Grass Installation
Transform your yard! Our step by step artificial grass installation guide makes going green easy and low-maintenance.
Why Professional-Quality Artificial Grass Installation Matters
Step by step artificial grass installation transforms your Central Florida yard into a lush, green oasis. Artificial grass saves on maintenance and provides a perfect lawn year-round, regardless of weather conditions.
Quick Installation Overview:
- Plan and measure - Calculate square footage and layout
- Excavate - Remove existing grass and dig 3-4 inches deep
- Install edging - Create clean borders with bender board
- Add weed barrier - Lay geotextile fabric with overlapping seams
- Build sub-base - Spread and compact 3-4 inches of aggregate
- Roll out turf - Position grass with consistent grain direction
- Cut and fit - Trim edges for perfect fit using utility knife
- Create seams - Join pieces with tape and adhesive
- Secure perimeter - Nail edges every 6-8 inches
- Add infill - Apply 1-2 lbs per square foot of sand
- Final grooming - Brush fibers upright for natural look
While the installation process can be completed by a beginner, the quality of your artificial grass is only as good as its installation. Poor preparation can lead to drainage issues, visible seams, and premature wear.
The benefits make the effort worthwhile:
- Zero mowing required
- Consistent green appearance through Florida's weather
- Water conservation with no irrigation needed
- Increased property value with professional curb appeal
- Pet and family friendly surface year-round

Planning and Preparation: Before You Dig
Proper preparation is key to a successful step by step artificial grass installation. This phase sets the stage for everything that follows, including assessing your site, understanding water flow, and creating a solid plan before digging. Taking your time here prevents costly mistakes later.
Safety is your first priority. Before you start digging, call 811 or your local utility marking service to identify any buried cables, gas lines, or irrigation systems. Accidentally hitting a utility line is a serious hazard.
For homeowners who want to dive deeper into the planning process, you'll find more info about turf installation that covers additional considerations for Central Florida's unique climate.
Measuring Your Space and Planning the Layout
First, map out your space with a tape measure. Sketching the area on graph paper provides a helpful visual reference.
Calculating square footage is simple math, but be sure to account for curves and odd corners. Measure twice to ensure you order the correct amount of material. Most artificial grass comes in 15-foot roll widths, so planning your layout around this dimension minimizes cuts and waste.
Planning seam locations is strategic. Position seams in lower-traffic areas and ensure the pile direction (the way the grass blades lean) is the same on all pieces. High-traffic zones should be solid turf pieces whenever possible. When sketching the layout, mark all sprinkler heads to be capped, drainage areas, trees, and walkways.
Essential Tools and Materials for Your Project
Having the right tools ensures a professional-looking installation.
- Heavy-Lifting: You'll need a shovel, wheelbarrow, and for larger areas, a rented turf cutter to remove existing grass efficiently.
- Base Preparation: A plate compactor is non-negotiable for creating a stable, compacted base that prevents settling. Hand tampers are only suitable for very small patches.
- Cutting & Fitting: A sharp, heavy-duty utility knife with plenty of replacement blades is essential for clean, precise cuts.
- Seaming: Seaming tape and high-quality adhesive create durable, invisible joints between turf pieces.
- Securing: Use 6-inch non-galvanized nails or landscape staples to secure the perimeter. Non-galvanized metal prevents rust stains.
- Infill: Silica sand provides weight and stability. For pet areas, zeolite is recommended for its natural odor control.
- Grooming: A power broom or stiff-bristled brush is needed for the final grooming to make the grass blades stand up naturally.
For a complete list of materials, download a detailed landscape turf guide from Alliance Pavers with product recommendations for Central Florida's climate.
The Foundation: Preparing the Ground for Perfect Turf
The foundation is the most critical part of a step by step artificial grass installation. Proper groundwork determines whether your lawn will be professional and durable or a bumpy disappointment. Rushing this phase can lead to uneven surfaces and poor drainage. For homeowners in Central Florida who want to see how professionals handle this critical phase, check out our Turf Installation in Orlando, FL services.
Step 1: Excavating the Area
First, remove all existing sod, grass, rocks, and roots. Any organic material left behind will decompose and create uneven soft spots.
Dig down 3 to 4 inches from your desired finished grass height. This depth allows room for the base layers. For heavy clay soil, common in Central Florida, you may need to excavate up to 6 inches to improve drainage. While digging, rough grade the area with a slight slope away from buildings to direct water runoff.
Cap any unused sprinklers at the pipe level. If you find irrigation or electrical lines, move them at least 6-8 inches from edges to avoid damage during nailing.
Step 2: Installing Edging and a Weed Barrier
Install a border using bender board, paving stones, or steel edging. This creates a clean, defined edge and provides a solid frame to secure the turf against.
Next, lay the geotextile fabric (weed barrier) across the excavated area. Overlap all seams by at least 3 inches to prevent weeds from finding any gaps. Keep the fabric as flat and smooth as possible, as wrinkles can show through the final surface. For pet areas, consider skipping the weed barrier, as it can sometimes trap odors from pet urine.
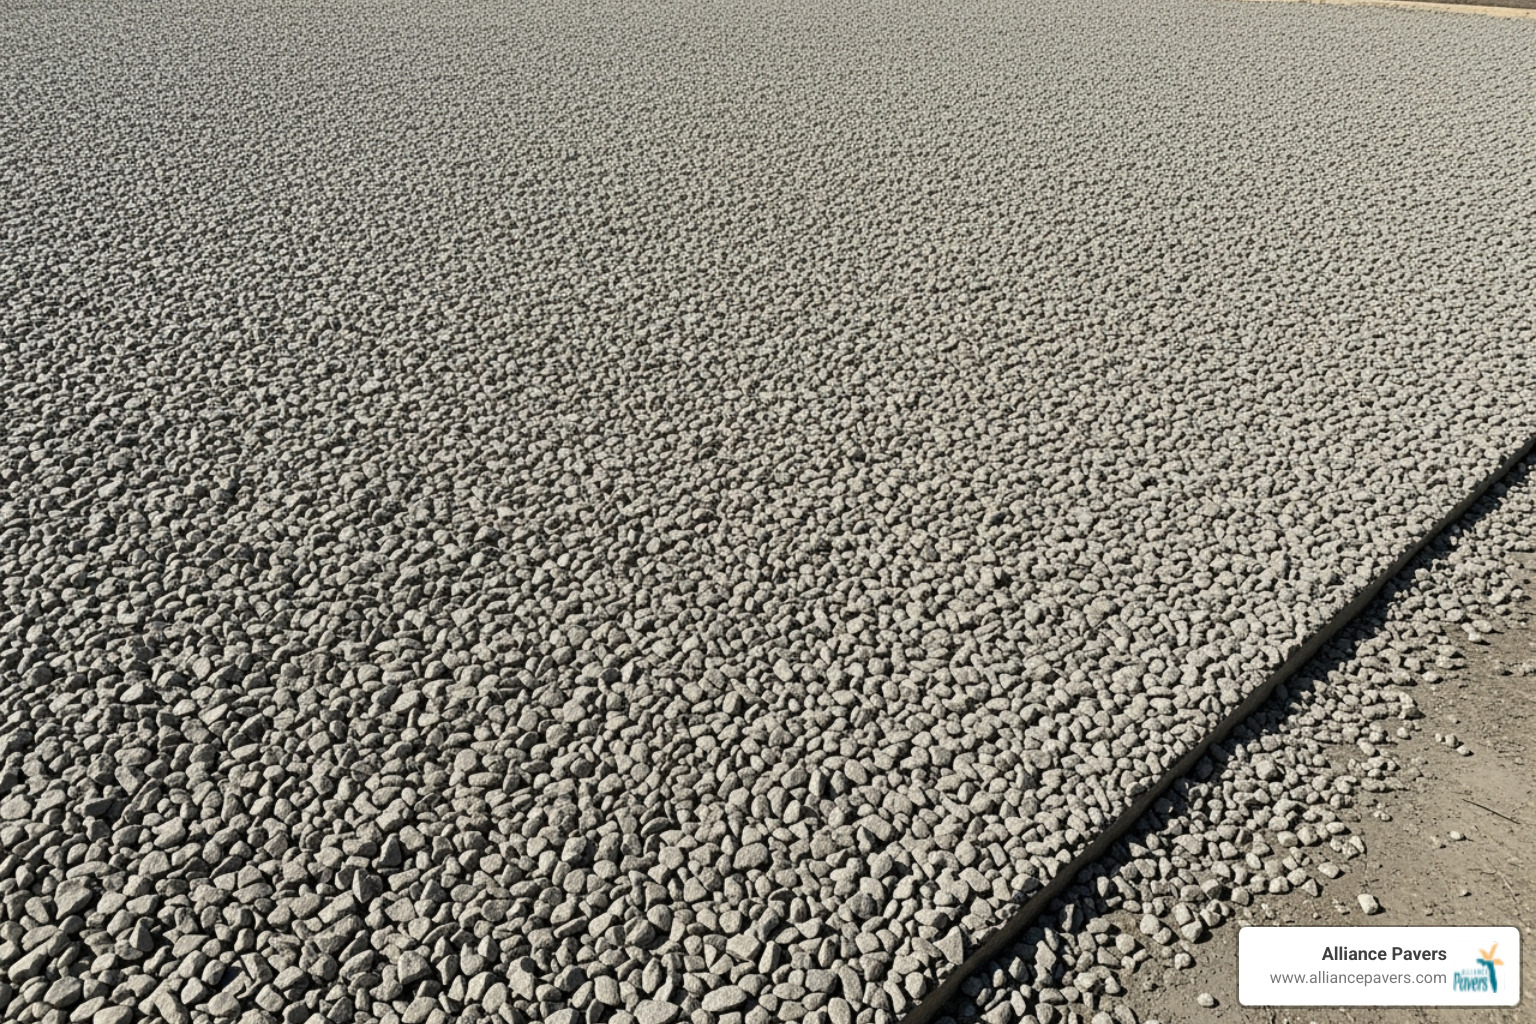
Step 3: Building and Compacting the Sub-Base
The sub-base provides stability and drainage. Get this step right for a long-lasting, professional result.
Spread a 3 to 4-inch layer of aggregate base material, such as crushed stone or decomposed granite, across the entire area. Rake it evenly, maintaining the gentle slope for drainage.
Next is the most critical part: compaction. Use a plate compactor to compress the aggregate until it is rock-solid, aiming for 90% compaction. This prevents the lawn from settling or developing soft spots. Lightly dampening the material before compacting helps the particles bind together for better density.
Finally, add a thin top layer (about half an inch) of granite dust or rock dust. This creates a perfectly smooth surface for the turf. Spread it evenly, level it, and compact it one last time. A well-prepared base is the key to a professional-looking installation.
Your Step-by-Step Artificial Grass Installation Guide
With the foundation prepared, it's time to lay the artificial grass. This phase of our step by step artificial grass installation guide requires precision for a seamless, professional result. For those in Windermere, FL, looking for professional assistance, we offer comprehensive Turf Installation in Windermere, FL services.
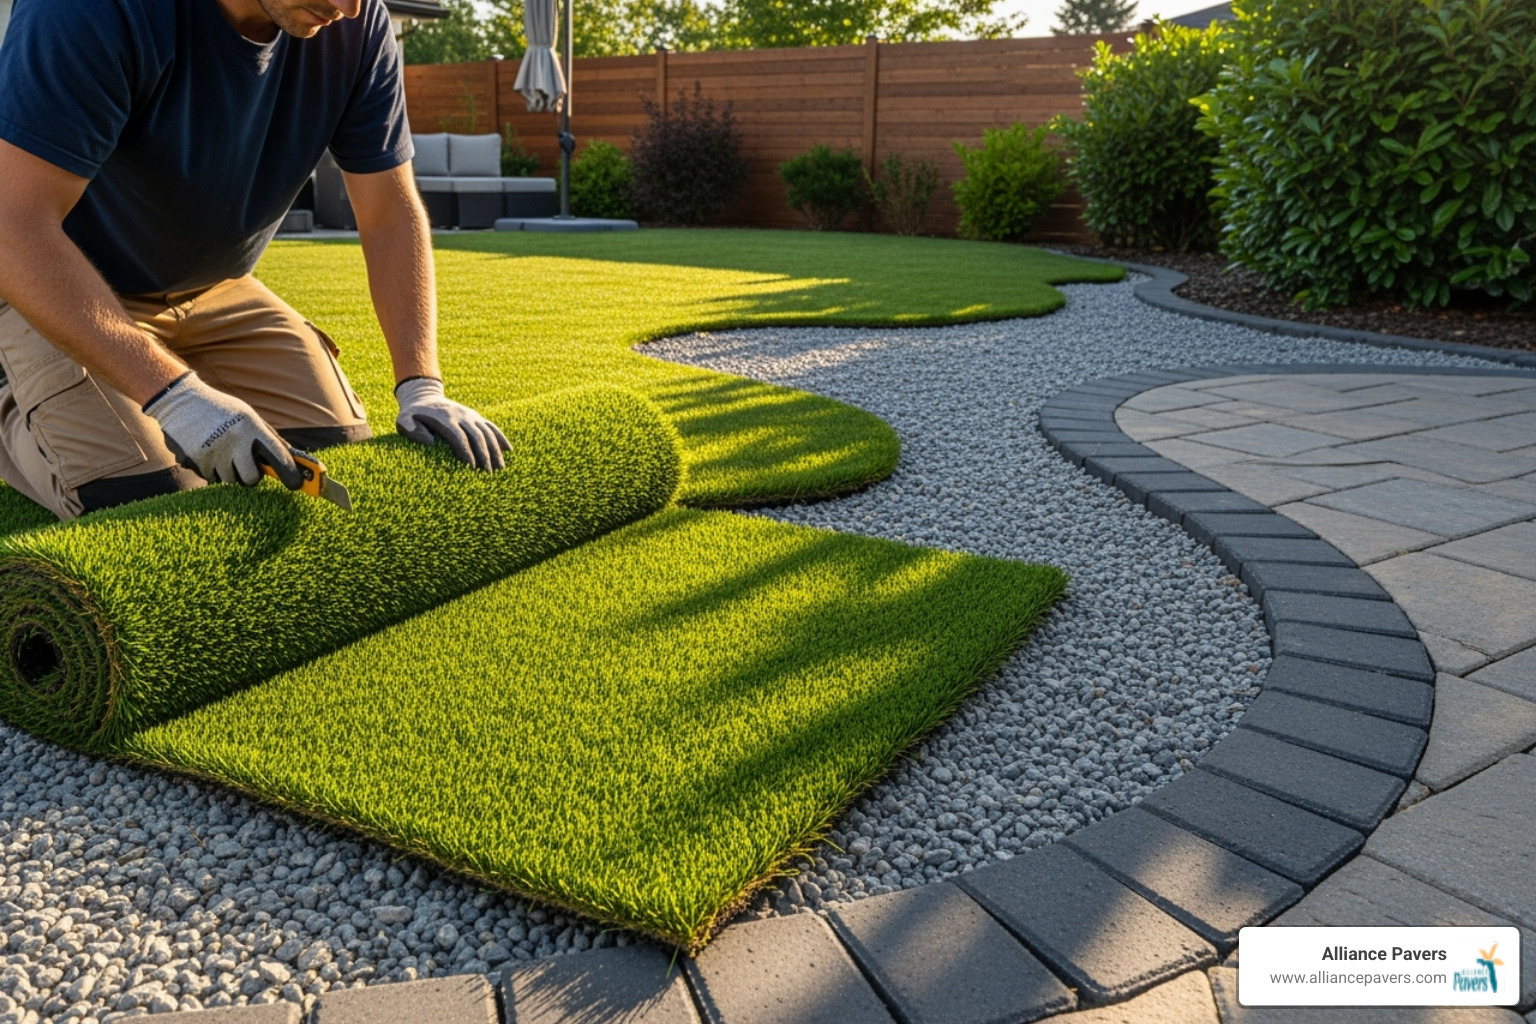
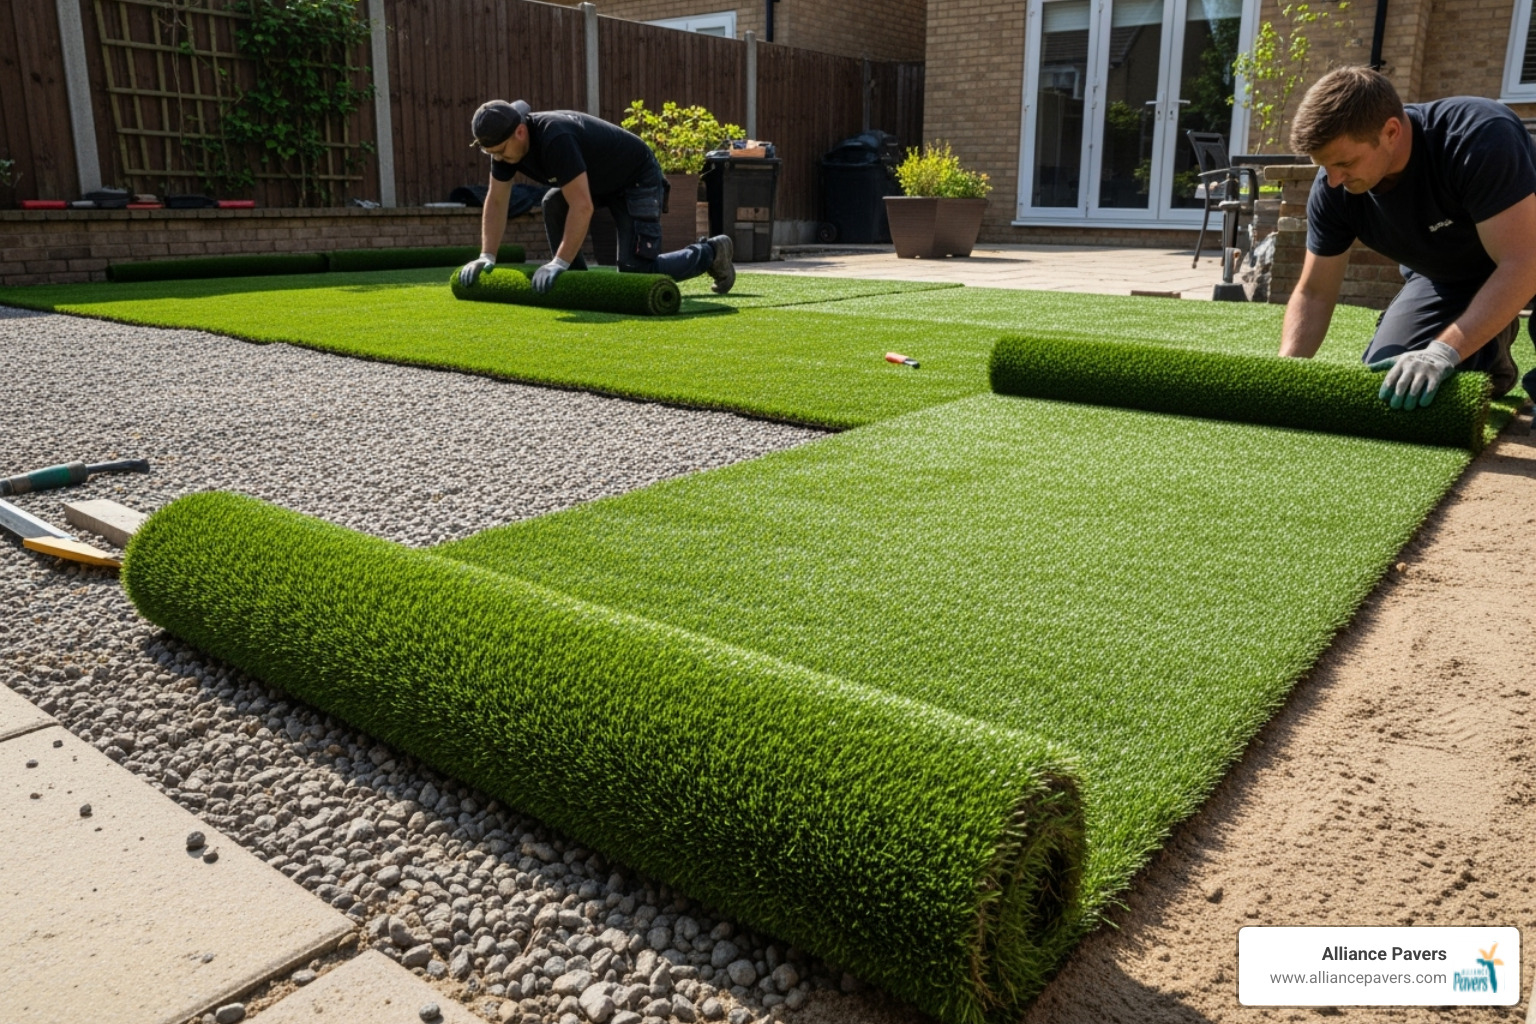
Step 4: Rolling Out and Positioning the Turf
Carefully unroll the turf over the base. If using multiple rolls, ensure the grain direction (the way the blades lean) is consistent across all pieces to avoid color variations. Position the turf so the pile leans toward the primary viewing area, such as your home, for the most natural look.
Allow the turf to acclimate for a few hours to relax any wrinkles from packaging. Position the pieces to minimize seams, placing them in less visible areas. Overlap the edges of multiple pieces slightly to allow for precise cutting.
Step 5: How to Properly Cut and Fit the Turf
Using a sharp utility knife, cut the turf from the backing side. A snap-blade knife is recommended for precision. Cut slowly and steadily for clean lines. For edges against hardscapes, trim the turf for a snug fit, leaving about 1/4" to 1/2" of excess to be tucked in later.
For curves and irregular shapes, make small "relief cuts" to allow the turf to lay flat without buckling. The goal is a perfect fit. Remember to change knife blades often, as a dull blade can tear the backing.
Step 6: Creating Invisible Seams
Invisible seams are a hallmark of professional installation. First, align the turf pieces with parallel edges and matching grain direction. For the cleanest seam, trim the factory edges of each piece (removing the outer three tufts). This helps the blades blend seamlessly when joined, leaving a gap of no more than 1/8 to 1/4 inch.
Fold back the edges of both turf pieces and lay seaming tape (rough side up) centered underneath the join. Apply artificial grass adhesive in a thin, zigzag pattern on the tape, avoiding excess that could seep through.
Carefully bring the two turf pieces together over the tape, ensuring no grass blades get trapped in the glue. Press down firmly along the entire seam and walk on it to ensure good contact. You can place weights, like unopened infill bags, on the seam for at least 45 minutes while the adhesive cures.
Step 7: Securing the Perimeter
To prevent lifting, secure the perimeter with 6-inch non-galvanized nails or spikes. Space nails every 6-8 inches along the entire edge, and closer in high-traffic areas.
Drive nails about 3/4 of the way down, so the head is hidden beneath the grass fibers but doesn't create a dimple. Place nails about 1/4 to 1/2 inch from the turf edge to prevent curling. For a polished look, use a wonder bar or similar tool to tuck the turf edges against hardscapes or borders.
Finishing Touches and Long-Term Care
The final steps in our step by step artificial grass installation are what lift the project from good to great. These finishing touches, along with proper long-term care, will keep your lawn looking beautiful for years. If you're working in shaded areas, check our guide on Artificial Turf Installation for Shaded Areas for special considerations.
Step 8: Applying Infill for Stability and Feel
Infill is the secret ingredient for an authentic look and feel. It adds weight to prevent shifting, helps grass blades stand tall, and protects the turf backing from UV rays.
For most applications, silica sand is sufficient. For homes with pets, we strongly recommend zeolite infill, which is excellent for odor control as it absorbs and neutralizes pet urine odors.
Use a drop spreader for the most even coverage, applying 1-2 pounds per square foot. Apply it in thin layers, not all at once. After spreading, use a power broom or stiff-bristled brush to work the infill deep into the base of the turf.
Step 9: The Final Grooming for a Natural Look
Grooming makes your lawn look realistic. Using a power broom or stiff brush, brush against the grain of the grass fibers. This makes the blades stand upright, mimicking healthy, natural grass.
Overlap your passes to ensure every blade is lifted and the infill is evenly distributed. After brushing, a gentle rinse with a garden hose will wash away any installation dust and reveal the true colors of your new lawn.
Maintaining Your New Artificial Lawn
Artificial grass maintenance is minimal, but a few habits will keep it looking its best.
- Rinsing: Periodically hose down the lawn to remove dust and pollen.
- Debris Removal: Use a leaf blower, plastic rake, or stiff broom to clear leaves and twigs. Avoid metal rakes.
- High-Traffic Areas: If grass looks flat from use, a quick brushing against the grain will fluff it back up.
- Spills: Clean spills quickly with warm water and mild dish soap. For tougher stains, use a 3% ammonia solution and rinse thoroughly. Use mineral spirits sparingly for oil-based stains.
- Pets: Let solid waste dry before scooping, then hose the area down. Use an enzyme cleaner or a vinegar-water mix for odors.
- Protection: Keep open flames away, use protective pads under sharp furniture, and be aware of intense reflected sunlight from windows, which can melt fibers.
Frequently Asked Questions about Artificial Grass Installation
Here are answers to common questions we receive about step by step artificial grass installation.
Can I install artificial grass on concrete or a slope?
Yes, with the right approach.
On concrete, drainage is the main challenge. Since water cannot pass through, a shock pad or turf underlay is installed beneath the turf. This creates channels for water to flow to drains or off the edge. The concrete must be clean, smooth, and level before installation.
On slopes, the installation process is similar but requires extra care. The base must be exceptionally smooth and well-compacted to prevent shifting. We also use more frequent nailing or longer spikes to secure the turf against gravity.
Never install artificial grass directly over existing grass or weeds. This will cause drainage problems, weed growth, and an uneven surface, likely voiding your warranty.
What are the special considerations for pets or putting greens?
Both pets and putting greens require specific materials and techniques.
For pets, the focus is on drainage and odor control. Choose turf with improved drainage capabilities. For infill, use specialized materials like Zeolite, which absorbs and neutralizes pet urine odors. We also recommend skipping the secondary weed barrier in pet areas, as it can trap odors.
Putting greens demand precision. The base must be perfectly smooth and compacted to ensure a true ball roll. The turf itself has a much lower pile height and denser construction than landscape grass to provide consistent ball speed. For detailed instructions, Download a putting green installation guide from Alliance Pavers.
When should I consider hiring a professional installer?
While this guide is comprehensive, hiring a professional is often the smartest choice.
Consider a pro for large or complex projects (over 100 sq. ft., with multiple seams, or on steep slopes) to avoid costly mistakes. Professionals also save you time, completing most jobs in 1-3 days, compared to several weekends for a DIY project. They have the specialized tools like plate compactors and power brooms, saving you rental costs.
Most importantly, professional installers provide warranties and peace of mind, ensuring invisible seams, proper drainage, and maximum longevity for your investment.
As a family-owned business with 25 years of experience, Alliance Pavers believes that quality installation is paramount. For homeowners in Central Florida, including Turf Installation in Lake Nona, FL, we deliver a stress-free experience so you can enjoy your new lawn without the headache.
Conclusion
By following this step by step artificial grass installation guide, you can transform your outdoor space. You've replaced a high-maintenance yard with a lush, green oasis that stays perfect through Florida's weather, saving you time and effort for years to come.
Each step, from careful planning and base preparation to the precise cutting and seaming of the turf, builds upon the last to create a durable and beautiful lawn.
Your new artificial lawn offers lasting benefits:
- A water-saving landscape that is environmentally friendly.
- Improved curb appeal and property value.
- More free time to enjoy your backyard instead of maintaining it.
The simple maintenance routine ensures your lawn will look fantastic with minimal effort. Your investment in proper installation techniques will pay off for many years.
For homeowners throughout Central Florida who prefer to leave the work to experienced professionals, Alliance Pavers has been perfecting artificial grass installation for 25 years. Our family-owned team is committed to delivering flawless results, letting you skip straight to the enjoyment. From St. Cloud to Orlando and Winter Garden, we bring the same commitment to quality that we've built our reputation on.
Whether you've tackled this as a DIY project or are considering professional help, the result is a gorgeous, low-maintenance lawn. If you'd like our team to handle your project, Get a professional turf installation in Oviedo, FL.