Green Thumbs, Green Fairways: How to Install Your Artificial Putting Paradise
Create your dream backyard with expert artificial golf green installation. Get tips on design, setup, & maintenance for a perfect putt.
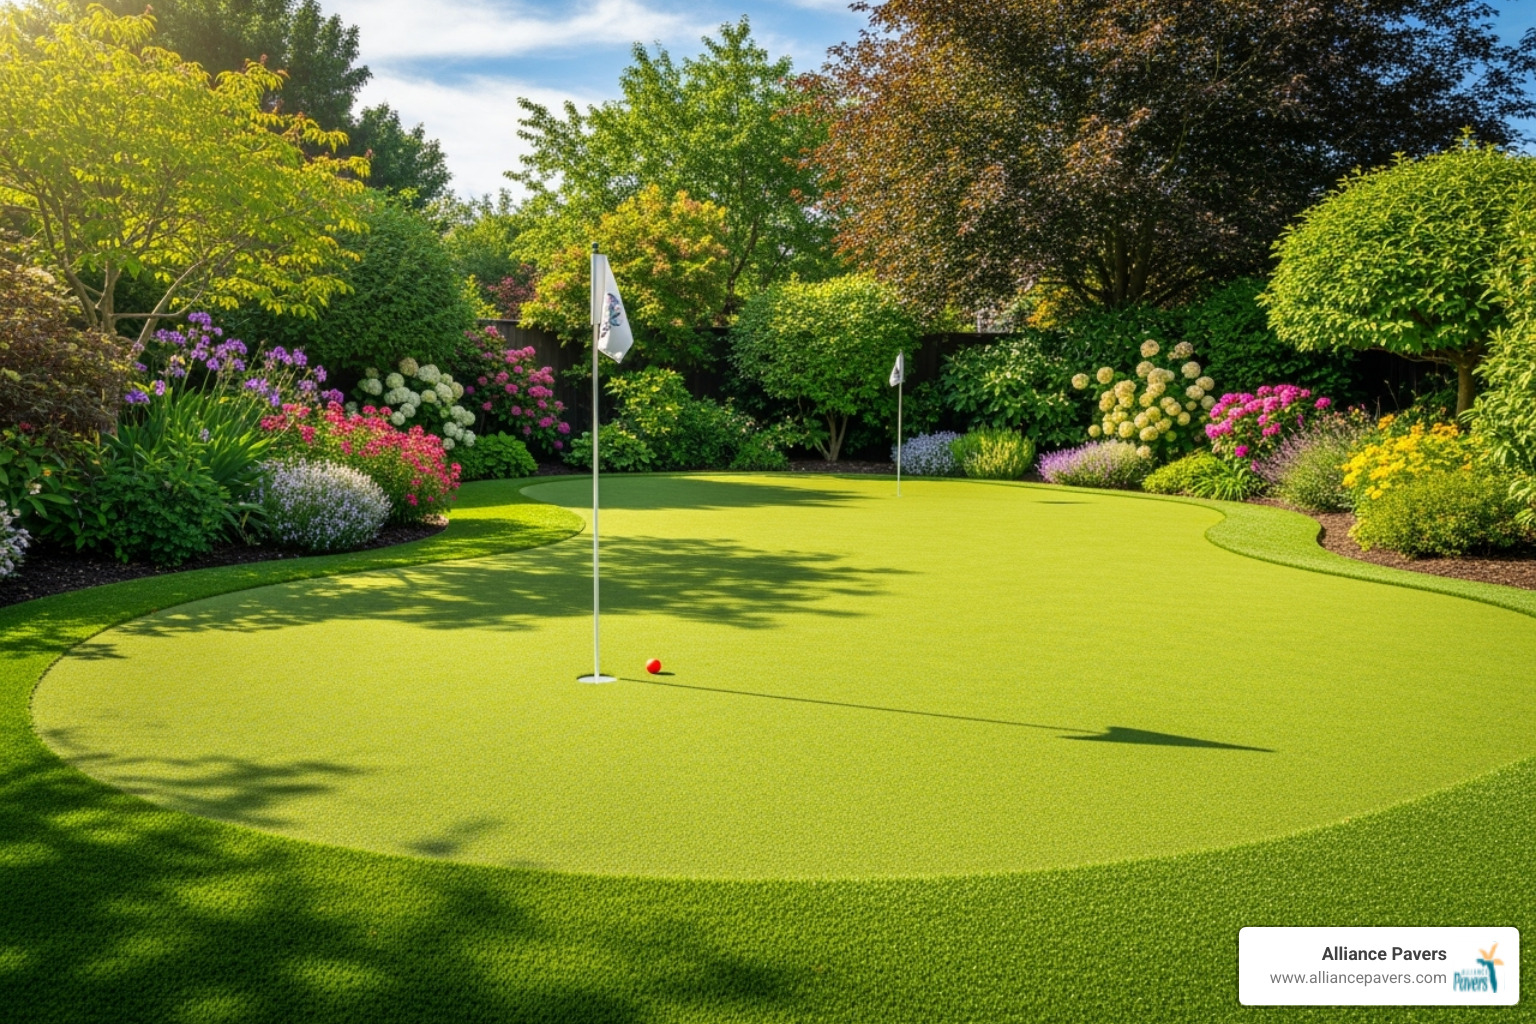
Transform Your Backyard into a Golf Paradise
Imagine stepping out your back door, putter in hand, onto a perfectly manicured green that rivals the conditions of a championship course. This isn't a scene from a luxury resort; it's a reality for countless homeowners who have found the joy of a personal putting green. An artificial golf green installation is a comprehensive process that transforms a patch of your yard into a high-performance practice facility. It involves meticulous site preparation, advanced drainage solutions, expert turf laying, and precise finishing touches to create a professional-quality surface.
Here's a glimpse into what the process includes:
Key Installation Steps:
- Site Planning & Design - Conceptualize the layout, select the ideal location, and measure the designated area.
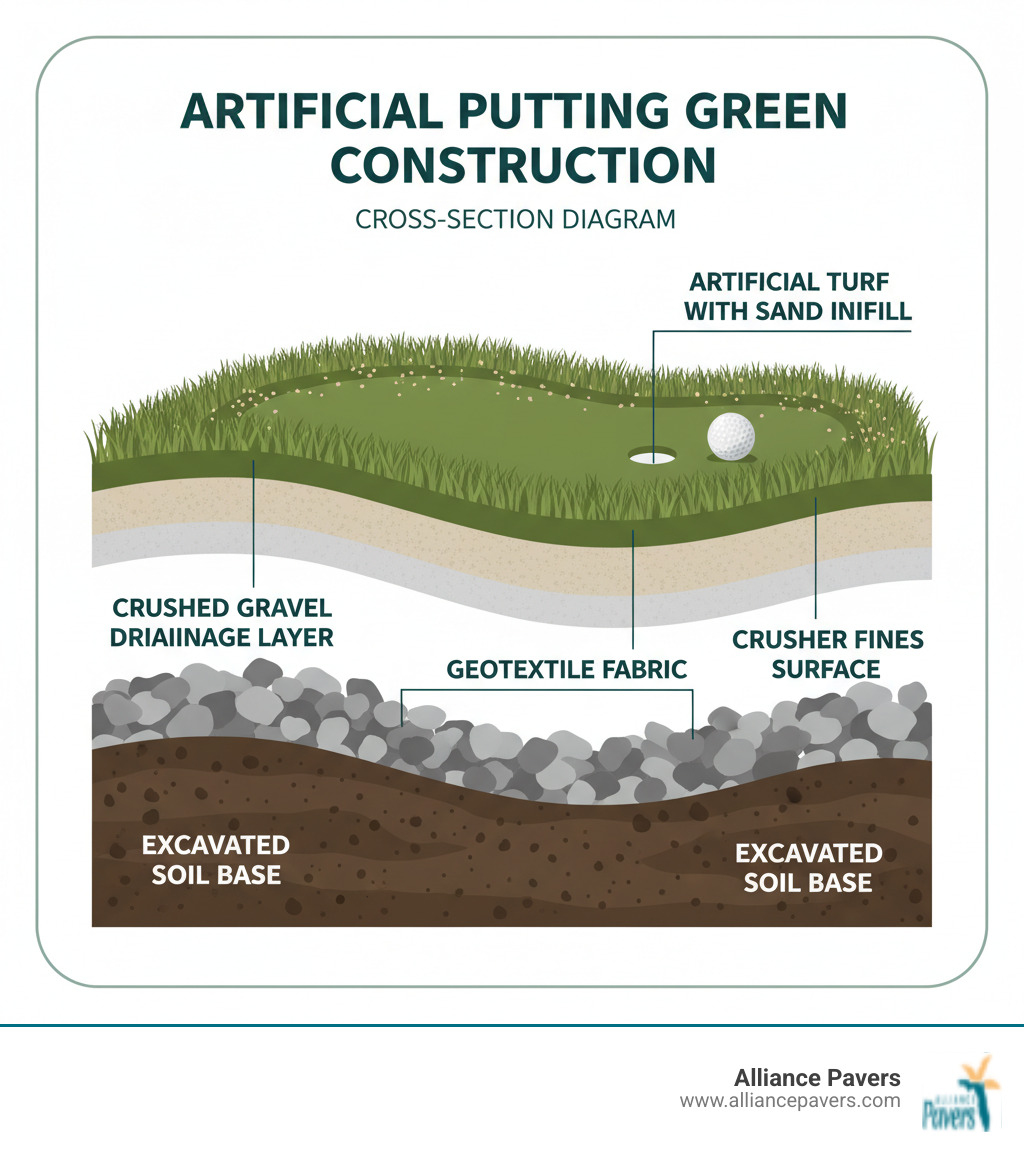
- Ground Preparation - Excavate the site to a depth of 4-6 inches, removing all grass, roots, and organic material.
- Base Installation - Construct a stable foundation using a crushed gravel base, which is then graded and compacted thoroughly.
- Drainage Setup - Implement a proper drainage system, often incorporating geotextile fabric to prevent weed growth and maintain base integrity.
- Turf Installation - Carefully roll out the specialized putting green turf, ensuring all pieces are perfectly seamed together for a flawless surface.
- Finishing Touches - Install cups, add specialized sand infill to control ball speed, and brush the turf fibers upright for a pristine look and feel.
Gone are the days when a perfect putting green was a luxury reserved for exclusive country clubs. Thanks to incredible advancements in artificial turf technology, homeowners can now create their own putting paradise right in their backyard—and it's more accessible and customizable than ever before.
Whether you're a serious golfer looking to shave strokes off your handicap by improving your short game, a family seeking a unique and engaging entertainment space, or a homeowner aiming to add significant value and curb appeal to your Central Florida property, an artificial putting green is a winning investment. It offers year-round playability without the relentless maintenance of natural grass. Say goodbye to brown patches, strict watering schedules, chemical fertilizers, and the constant drone of the lawnmower.
The installation process is a craft that demands careful planning and unwavering attention to detail. With the right professional approach, you can have a tour-quality green that delivers consistent ball roll, realistic chip shots, and endless hours of practice and enjoyment. From the initial excavation to the final putt, each step is crucial in creating a surface that not only looks but also performs like the real thing.
Step 1: Planning and Designing Your Dream Green
Think of planning your artificial golf green installation like designing your perfect home - you wouldn't break ground without a solid blueprint, right? This initial planning phase is where the magic truly begins, changing your backyard dreams into a tangible, realistic roadmap for success. It's a collaborative process where your vision meets our expertise to create a space that is both beautiful and functional.
The beauty of a modern artificial putting green lies in its incredible customization potential. This isn't a one-size-fits-all product. Want gentle, rolling hills that challenge your putting skills and mimic the subtle breaks of your favorite course? We can sculpt the base to create those exact undulations. Dreaming of a multi-tiered green with different pin positions for varied practice? That's absolutely doable. Some homeowners even go all-out, commissioning complete short-game practice areas that feature dedicated chipping zones, different cuts of fringe, and strategically placed sand traps.
Location is everything in real estate, and it's just as crucial for your putting green. Sunlight exposure plays a bigger role than you might think. While artificial turf doesn't need sun to grow, the surface can absorb heat. Placing it in an area with intense, direct sun all day can make it uncomfortably hot during Florida's scorching summer afternoons. We'll help you analyze your yard's layout to find that sweet spot—perhaps a location that gets pleasant morning light but is shaded during the peak heat of the day, making it perfect for an after-work practice session.
The ultimate goal is to design a space that doesn't just look stunning but actively helps you improve your golf game. Every contour, every break, and every hole placement should serve a purpose, challenging you in new ways. For homeowners looking to integrate their putting green into a broader outdoor living vision, our comprehensive landscaping services guide offers valuable insights into creating cohesive, beautiful, and functional outdoor spaces.
Factors Influencing Your Putting Green Project
Your artificial golf green installation will be as unique as your home, and several key factors will shape both the design and the intricate installation process. Understanding these elements upfront helps set clear expectations and ensures your finished green is everything you hoped for and more.
Size and scale form the foundation of your project. A compact 200-square-foot practice pad is perfect for a smaller yard, offering a convenient spot to work on your putting stroke. In contrast, a sprawling 1,000-square-foot installation can become a true backyard centerpiece, accommodating multiple hole locations, long putts, and challenging shot variations for chipping. Think about your available space, but also consider how you'll actually use the green—is it for daily, focused practice, or for weekend entertainment with family and friends?
Shape complexity dramatically influences both the visual impact and the installation requirements. Simple oval or kidney-shaped greens are classic, easier to install, and integrate well into many landscape designs. However, intricate, free-flowing designs with multiple tiers and sweeping curves create more dynamic and visually striking playing surfaces. These complex shapes require more precise turf cutting and meticulous seaming, but the breathtaking results are often well worth the extra effort.
Consider whether you want fringe areas surrounding your main putting surface. This slightly longer pile turf creates a natural transition to your existing landscape while providing the perfect space for chipping practice. It adds a layer of realism and versatility, effectively giving you a mini golf hole right in your backyard.
For the ultimate short-game experience, sand traps and water features can lift your green from a simple practice area to an impressive entertainment centerpiece. These additions require more detailed planning, excavation, and drainage expertise but create an authentic golf course feel that will undoubtedly impress your guests and sharpen your skills.
The intended use and player skill level should guide every design decision. A green designed for family fun might benefit from gentler slopes, more forgiving turf, and larger target areas. Conversely, a serious golfer might request a tournament-speed surface (measured by a Stimpmeter) with challenging breaks that replicate conditions on their favorite professional course.
DIY vs. Professional Installation
The age-old question for any home project: tackle it yourself or call in the pros? Both approaches have their merits, and the right choice depends on your skill set, available time, budget, and desired quality of the final product.
FactorDIY InstallationProfessional InstallationTime InvestmentSignificant; potentially weekends for several months, including a steep learning curve.Efficient; typically completed in a matter of days with minimal homeowner time required.Equipment NeededMust rent or buy specialized tools (plate compactor, sod cutter, etc.); involves transport and storage challenges.All professional-grade equipment is included; no need for homeowner to source or store anything.Expertise RequiredHigh; steep learning curve for grading, drainage, and seaming. Trial and error is almost inevitable.Decades of experience; Alliance Pavers brings 25 years of proven techniques and problem-solving skills.Finish QualityVariable; high potential for costly mistakes like poor drainage, uneven surfaces, or visible seams.Consistent, professional, tour-quality results; backed by a warranty for peace of mind.
DIY kits are readily available and can be a viable option for smaller, simpler installations on perfectly level ground. They typically include the turf, adhesive, infill, and a set of basic instructions. However, the most critical part of the project—the foundation work, including excavation, grading, and drainage—requires significant physical effort and a high degree of technical knowledge. A mistake here can compromise the entire project.
Professional installation through certified and experienced installers like Alliance Pavers brings a level of expertise that's hard to replicate. We possess an intimate understanding of Central Florida's unique soil conditions, heavy rainfall patterns, and specific drainage requirements. Our 25 years of experience in hardscaping and turf means we've encountered and solved nearly every potential challenge, ensuring a flawless installation that lasts.
The complexity of your project often makes the decision for you. A simple, small, rectangular green on flat ground might be a manageable DIY project. However, any project involving sloped terrain, intricate shapes, or additional features like bunkers benefits tremendously from professional expertise.
Special Considerations: Patios and Uneven Terrain
Not every backyard is a perfectly level, blank canvas—and that's a good thing. Some of the most visually stunning and challenging putting greens we've installed have been on sites that required creative engineering and design solutions.
Installing on a patio opens up a world of possibilities you might not have considered. Existing concrete or paver surfaces can serve as an excellent, stable base for a putting green, provided they are prepared correctly. We use specialized interlocking base panel systems that create the necessary air gap for proper drainage while maintaining the green's true playing characteristics. This approach is perfect for rooftop installations, courtyards, or homes with limited green space.
Grading for uneven ground requires meticulous planning but also creates incredible opportunities for natural-looking, challenging undulations. Slopes that might initially seem like a problem can be transformed into interesting green features with proper grading and earthmoving. Our philosophy is to work with your terrain's natural flow rather than fighting against it, creating a green that looks like it has always been a part of your landscape. For significant grade changes, we can even incorporate retaining walls to create dramatic, multi-level playing areas.
Solutions for shaded areas involve both careful turf selection and specific design modifications. While artificial turf doesn't need sunlight to thrive, drainage becomes even more critical in shaded spots where natural evaporation is slower. We adjust our base preparation, potentially adding more drainage channels, and select appropriate infill to ensure your green performs beautifully and drains efficiently, regardless of sun exposure.
Unique backyard layouts challenge us to think creatively, and we love a good challenge. Narrow side yards can be transformed into linear putting greens, perfect for practicing those crucial straight putts. Oddly shaped, leftover spaces in a yard often inspire the most interesting and functional designs. No space is too difficult—it just requires the right blend of experience, creativity, and technical skill to make it work perfectly.