Patio Paver Problems? Easy Steps to a Perfect Pavement
Tired of tripping? Learn how to repair paver stone patio yourself! Get tools, steps & tips for a perfect, long-lasting pavement.
When Your Beautiful Patio Becomes a Problem
Learning how to repair paver stone patio issues can save you from tripping hazards and restore your outdoor space's beauty. Over time, pavers can sink, shift, and become uneven as the sand base settles. Poor drainage and winter's freeze-thaw cycles can also wash away the foundation beneath your stones.
Quick Repair Steps:
- Remove damaged pavers - Use pry bars or screwdrivers to lift problematic stones.
- Fix the base layer - Add and level new paver sand beneath sunken areas.
- Replace pavers - Set stones back in place, ensuring they're level.
- Fill joints - Sweep polymeric sand between pavers and activate with water.
- Compact and clean - Tamp the surface and remove excess sand.
Common paver problems include:
- Sunken or loose pavers that create tripping hazards
- Gaps between stones where weeds grow
- Uneven surfaces that collect water
- Cracked or broken paver stones
The good news is that most paver repairs are straightforward DIY projects. With the right tools and techniques, you can restore your patio's safety and beauty.
Why Pavers Shift: Understanding Common Patio Problems
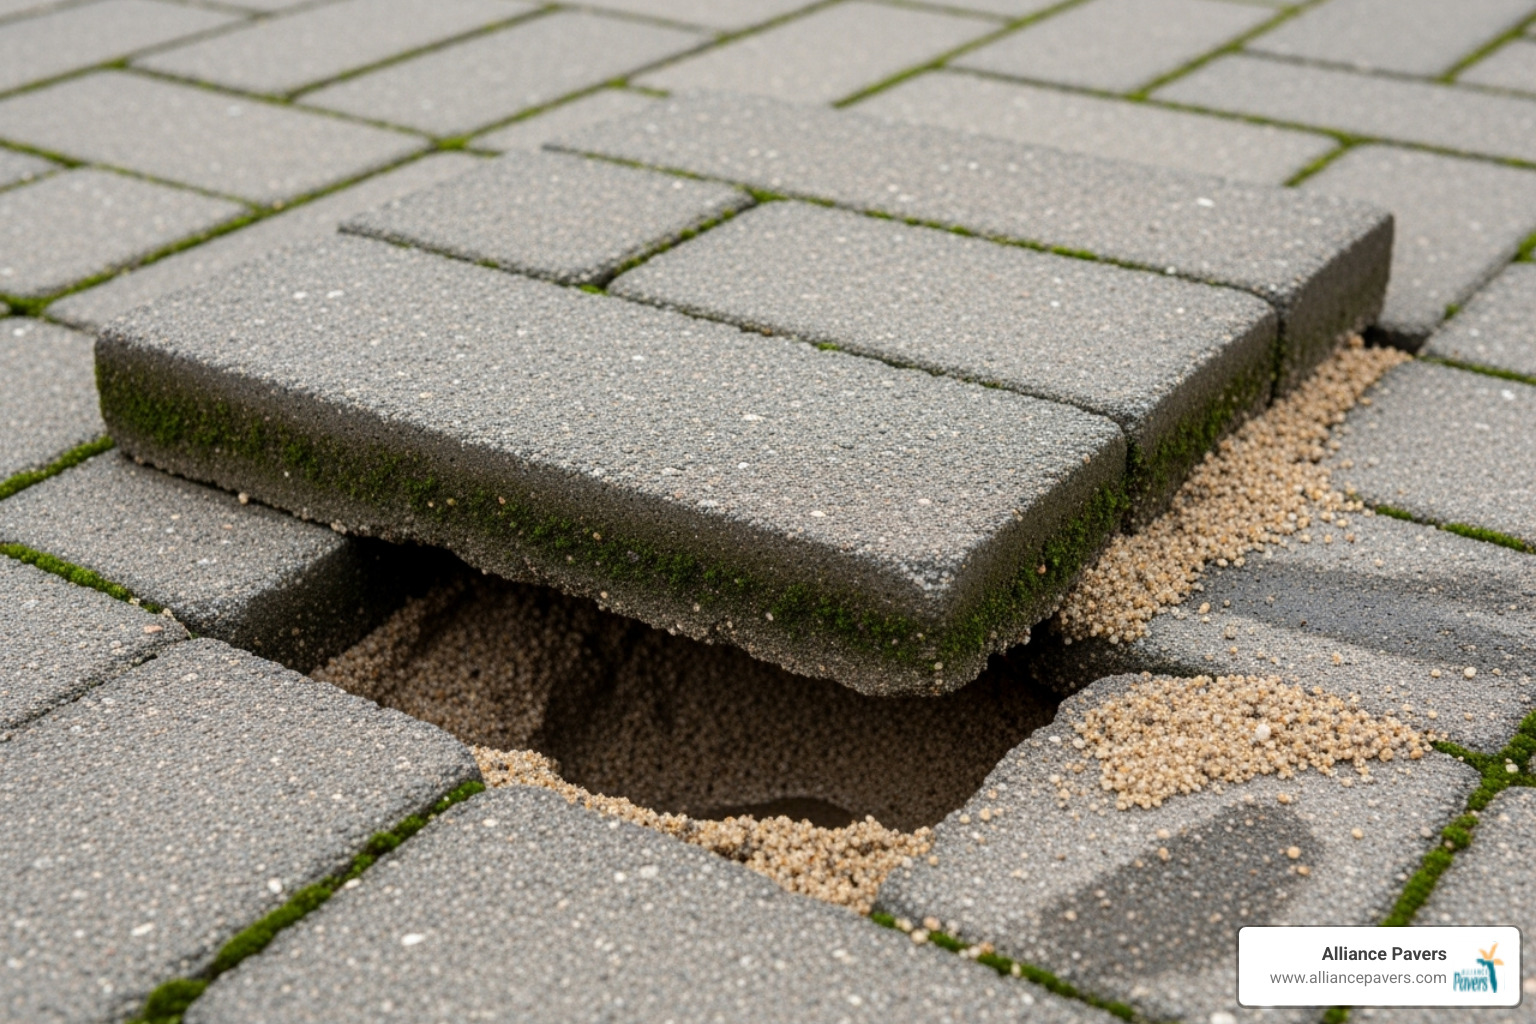
Understanding why pavers shift is the first step in learning how to repair paver stone patio problems. Unlike concrete slabs, pavers rely on a layered foundation. When this foundation fails, your patio becomes a tripping hazard.
An unstable base is the biggest culprit. If the original sand base wasn't thick enough or properly compacted, it will shift and settle over time, leaving pavers loose.
Poor compaction during installation leaves the sand base loose and prone to settling. Every footstep and rainstorm gradually compresses this inadequate foundation, causing pavers to sink.
Water damage from poor drainage doesn't just create puddles; it washes away the sand underneath your pavers. Over time, the sand base disappears, leaving hollow spaces.
Freeze-thaw cycles in winter cause significant damage. Water seeps into gaps, freezes and expands, then thaws and contracts. This constant movement shifts pavers out of place.
Edging failure occurs when edge restraints loosen or break, allowing perimeter pavers to spread outward. This creates a domino effect that can destabilize the entire patio.
Drainage issues from improper grading or clogged gutters create ongoing erosion. Water flowing under your patio slowly washes away the foundation, one grain of sand at a time.
By understanding what causes pavers to shift, you can tackle repairs more effectively. For detailed prevention strategies, see our guide on Prevent Brick Patio Settling in Doctor Phillips. Catching these problems early makes repairs much easier.
Gearing Up: Tools and Materials for Your Paver Repair
Before you learn how to repair paver stone patio problems, gather your supplies. Having everything ready will save you mid-project trips to the hardware store. Most of these items are common for homeowners.
Essential Tools
- Pry bars and flathead screwdrivers: For lifting stubborn pavers without damaging them.
- Rubber mallet: To gently tap pavers into place without cracking them.
- Carpenter's level: To ensure your repaired surface is perfectly flush.
- Stiff-bristled broom: For sweeping sand into joints and clearing debris.
- Hand tamper: To compact the new sand base in small repair areas.
- Shovel: For digging and moving materials.
- Hose with a spray nozzle: Crucial for activating polymeric sand with a mist or shower setting.
- Safety glasses and gloves: Essential for protecting your eyes and hands.
Necessary Materials
- Paver base sand: Also called screed sand, this coarse, angular sand creates a stable bedding layer under the pavers.
- Polymeric sand: Contains special binders that activate with water, hardening to lock pavers together and prevent weeds.
- Replacement pavers: If you have cracked or broken stones, you'll need matching replacements. It's always wise to keep extras from the original installation.
- Crushed stone or gravel: For deeper base problems, you may need to rebuild the foundation before adding paver sand.

The Ultimate Guide on How to Repair Paver Stone Patio
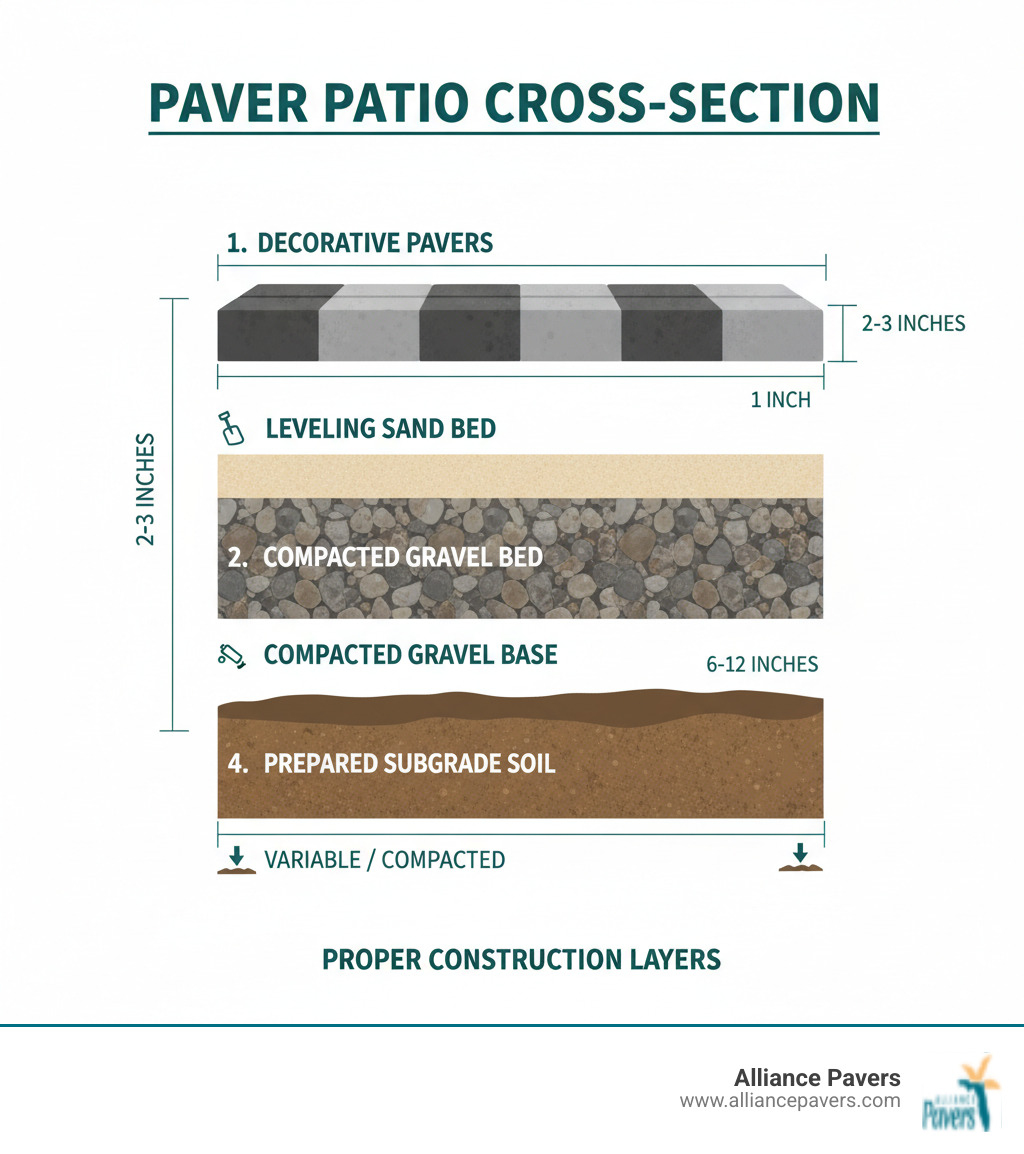
Learning how to repair paver stone patio problems requires patience, but the modular nature of pavers makes it manageable. Unlike a concrete slab, individual pavers can be lifted, adjusted, and reset. Most issues stem from the sand base, so addressing the foundation is key.
Step 1: Remove the Problem Pavers
First, identify the affected area; you may need to remove several surrounding pavers to work properly. Use two flathead screwdrivers to gently pry up the problem paver from opposite sides. If it's stuck, wetting the joints can help soften old sand. Once the paver is out, remove all old sand, dirt, and debris from the cavity. Finally, assess the base for hollow spots or signs of erosion that indicate a deeper issue.

Step 2: Rebuild and Level the Base
This step is crucial for a lasting repair. If you find deep hollows from erosion, fill them with a layer of crushed gravel and tamp it down firmly before adding sand. Next, spread fresh paver base sand evenly in the cavity. Use a small trowel or a straight piece of wood to screed it smooth.
Do not skip compacting. Use a hand tamper to firmly compress the new sand, creating a dense, stable foundation. After compacting, the sand base should sit about 1/8-inch below the level of the surrounding pavers to account for the paver's thickness. For more guidance, see our guide on Leveling Techniques for Brick Patio Installation.
Step 3: How to Repair Paver Stone Patio by Replacing the Pavers
Gently set the paver straight down into position; avoid sliding it, which can disrupt the sand base. Use a rubber mallet to tap the paver until it sits perfectly level with its neighbors. Constantly check for levelness and proper alignment with your carpenter's level and by eye. It's much easier to make adjustments now than after the joints are filled.
Step 4: Lock It In with Jointing Sand
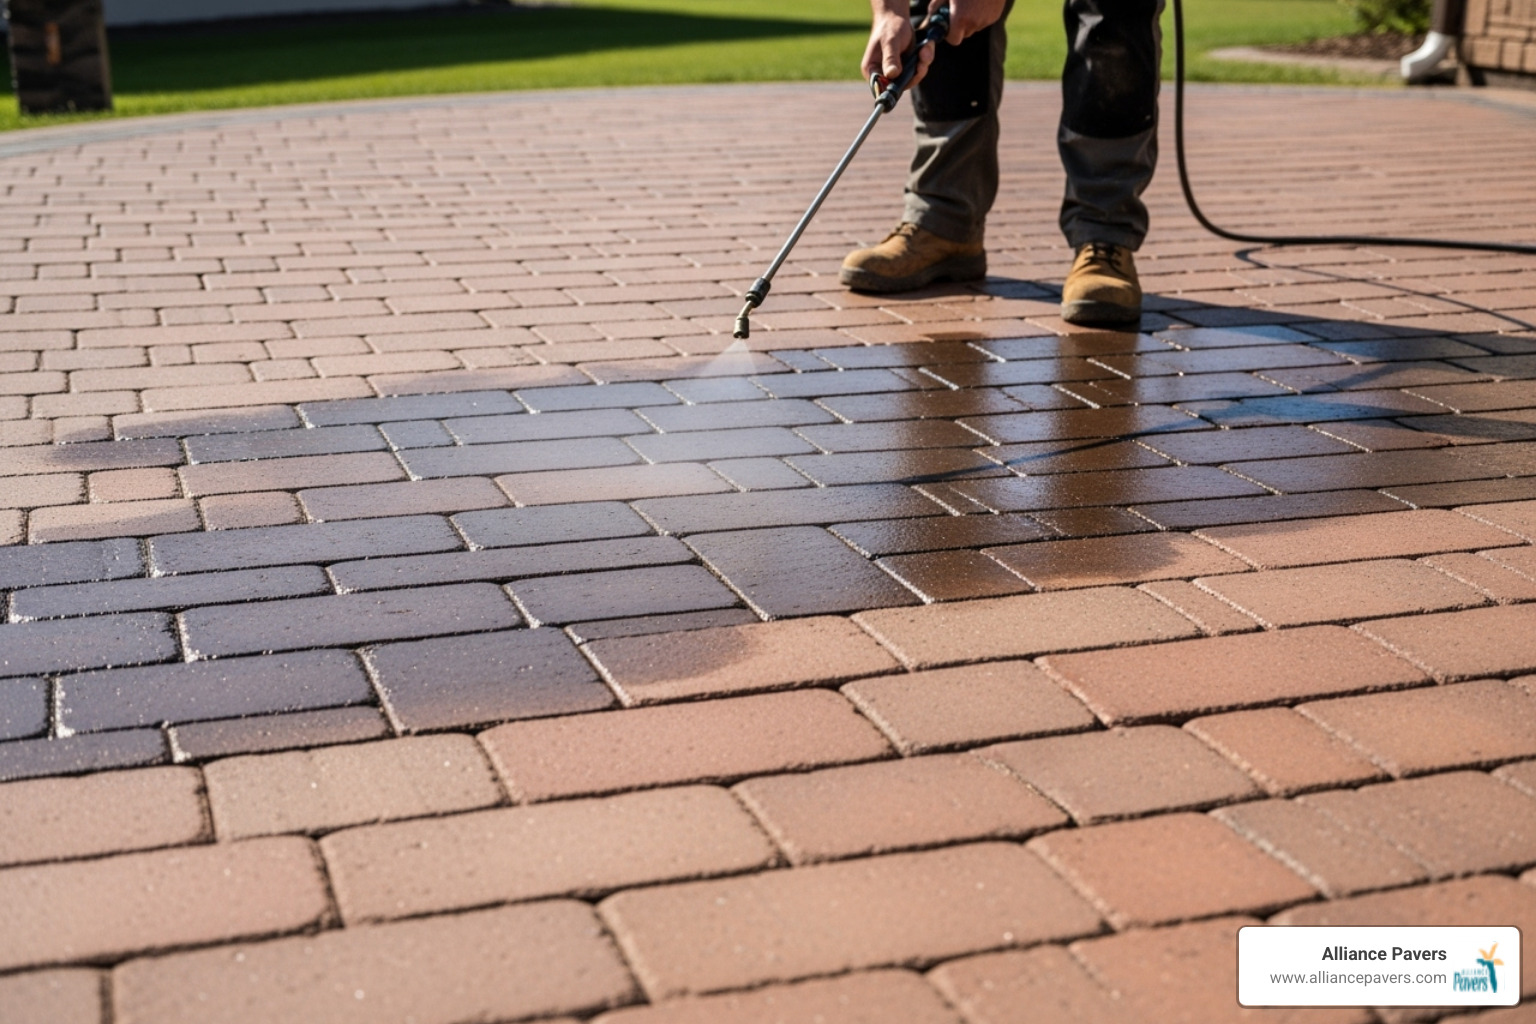
The final step is to lock the pavers together. Generously cover the repaired area with jointing sand and use a stiff-bristled broom to work it deep into every gap. The joints must be filled completely for structural integrity. Tamp the surface one last time to help the sand settle. Finally, lightly mist the area with water to help the sand settle and, if using polymeric sand, to begin the hardening process. You may need to repeat the sweeping and misting until the joints are full.
The Secret Ingredient: Using Polymeric Sand for a Lasting Fix
For a superior how to repair paver stone patio project, use polymeric sand. It combines fine sand with polymer additives that activate with water. Once cured, it creates a flexible, durable bond that locks pavers together, resists weeds and insects, and prevents washout from rain.
FeatureRegular SandPolymeric SandWeed GrowthProne to weed growthSignificantly reduces weed growthWashoutEasily washes out with rain and cleaningResists washout, stays in jointsDurabilityLoose, allows paver movementHardens, locks pavers together, improves stabilityInsect ActivityProvides habitat for ants and other insectsDeters insects from burrowingMaintenanceRequires frequent refillingLong-lasting, less frequent refilling
Benefits of Polymeric Sand
- Weed and Insect Prevention: The hardened surface makes it nearly impossible for weeds to grow or insects like ants to burrow.
- Erosion Resistance: Polymeric sand stays in the joints during heavy rain or power washing, unlike regular sand which washes away.
- Structural Stability: It locks pavers together, reducing movement and preventing the shifting that causes uneven surfaces.
For more details on its properties, see this comprehensive resource.
How to Repair Paver Stone Patio with Polymeric Sand Application
Applying polymeric sand requires care, but the results are worth it.
- Ensure Dry Conditions: The patio surface must be completely dry, with at least 24-48 hours of dry weather in the forecast. Any moisture can cause staining.
- Sweep into Joints: Pour the sand over the repair area and use a stiff-bristled broom to work it into the joints. Fill them completely, stopping about 1/8 inch below the paver surface.
- Remove Excess Dust: Thoroughly sweep all excess sand from the paver surfaces. Use a leaf blower on a low setting to remove any remaining fine dust to prevent staining.
- Activate with Water: Use a hose on a shower or mist setting to gently saturate the sand. Work in small sections, avoiding heavy streams that can wash the sand out.
- Allow Curing Time: Keep foot traffic off the area for at least 24 hours and avoid heavy use for 72 hours to allow the sand to fully harden.
After the Fix: Cleaning, Maintenance, and Prevention
Now that you know how to repair paver stone patio sections, the secret to longevity is a simple maintenance routine. Proactive care protects your investment and keeps your patio looking great.
Post-Repair Cleaning and Maintenance
- Regular Sweeping: A weekly sweep with a stiff-bristled broom removes debris that can cause stains.
- Gentle Cleaning: For deeper cleaning, use a mild detergent solution (like a few drops of dish soap in water) and a soft brush. Rinse gently with a garden hose. Avoid harsh chemicals that can damage pavers.
- Address Stains Quickly: Use appropriate cleaners for oil, rust, or organic stains, always testing on an inconspicuous area first.
- Annual Power Washing: A light power wash once a year can refresh the surface. Use a wide-angle nozzle, keep it at least 12 inches from the surface, and avoid spraying directly into the joints.
For more tips, see our guide on How to Clean Brick Pavers and Keep Them Looking New.
Preventing Future Paver Problems
- Ensure Proper Drainage: Your patio should slope away from your home (about 1/4 inch per foot). Address pooling water or erosion by improving landscape grading or fixing gutter downspouts that empty onto the patio.
- Seal Your Patio: Applying a quality paver sealer every 2-3 years protects against UV rays and moisture, makes cleaning easier, and helps stabilize joint sand. Our guide on How to Seal Paver Driveway explains the process.
- Check Edge Restraints: Periodically inspect the plastic, metal, or concrete edging that holds your patio together. Reinforce or replace any loose or damaged sections.
- Perform Regular Inspections: After heavy rain or winter weather, walk around your patio and look for any new shifting, settlement, or weed growth. Catching issues early makes for a much easier fix.
Following these strategies will protect your repair work and ensure your patio remains a beautiful, safe part of your home for years.
DIY vs. Pro: When to Call for Backup
While this guide on how to repair paver stone patio issues covers many common fixes, it's important to know when a problem is too big for a DIY approach. Minor issues like a few sunken or loose pavers are great DIY projects. They save money and provide a sense of accomplishment.
However, paver repair is labor-intensive, and some problems signal deeper structural issues that require professional expertise.
Signs You Need a Professional
It's time to call a professional when you see:
- Widespread Sinking or Shifting: If large sections of your patio are uneven, it likely points to a major failure in the underlying base. This often requires a complete excavation and rebuild of the foundation.
- Major Drainage Problems: Constant pooling water or significant erosion around the edges indicates a structural issue that may require regrading or installing drainage systems like French drains.
- Retaining Wall Failure: If a retaining wall that supports your patio is bulging, cracking, or leaning, it is a serious safety hazard that requires an expert.
- Recurring Foundation Issues: If problems keep returning no matter how many times you fix them, a professional can diagnose deeper soil or subgrade issues.
- Large-Scale Damage: When a significant percentage of your patio is damaged, the scope of work often makes a professional crew more efficient and cost-effective.
If you lack the time, physical ability, or confidence for a complex repair, calling an expert is the right choice. Professionals use commercial-grade equipment and address the root cause of the damage, ensuring a lasting solution. For substantial paver issues in the Orlando area, our team offers expert services. Learn more at Paver Repair Orlando FL.
Restore Your Patio's Beauty and Safety
Learning how to repair paver stone patio issues empowers you to maintain a safe and beautiful outdoor living space. A successful repair eliminates tripping hazards, prevents small problems from escalating, and protects your home's value. You've invested in your patio; proper repairs and maintenance ensure it lasts.
While many repairs are suitable for DIY, some problems require professional expertise to address the root cause. For extensive damage or complex underlying issues, calling a professional is the wisest choice.
At Alliance Pavers, we bring 25 years of family-owned experience to every project in Central Florida. We specialize in diagnosing and fixing the core problems that cause paver failure, ensuring a repair that lasts. Our team uses commercial-grade equipment and proven techniques to restore your patio correctly the first time, offering a stress-free, on-time, and on-budget experience.
Whether you choose the DIY route for simple fixes or trust us with more complex repairs, the goal is a beautiful, safe outdoor space for you to enjoy. For larger projects or an expert assessment in the St. Cloud area, explore our Paver Repair St. Cloud FL services for a perfect, lasting result.